Photography: What is Post-Processing?

When it comes to photography, I consider myself a journeyman or apprentice. I work alone with the Internet serving as my mentor and it has provided great benefits to me as a student of photographic skills. I have always been interested in photography and back in the days of “only film,” I had a black and white darkroom.

Nowadays, digital photography makes things easier; at least for me. Post-processing is chemical free and done on a computer where mistakes can often be easily corrected with a few key strokes. If you are new to photography, you might be wondering: “What is post-processing?” Let me try to give you a simple explanation as I understand it.

When a digital photograph is taken on an automatic setting, the camera, which is really a computerized device, gathers all the information about the scene such as how dark it is, what colors go where, what area should be in focus, etc. and then it interprets the data and converts into a digital image. The current camera models are really quite capable and most will produce good to very good results on automatic settings.

There are times however when the camera may become “confused” because the scene is more difficult to analyze. A picture with lots of snow or many dark areas or one with high contrast will often cause problems. With many cameras, the settings can be changed from automatic to compensate for these difficult situations if the user is skilled enough to adjust the settings manually.

There will invariably be times, however, when a picture is less than ideal. Perhaps the photographer made an error in one of the settings. Some times a dial or setting is changed unintentionally and the error is not noticed until several shots later. The good news is that many mistakes can be remedied after the fact, i.e. post-processing.

In order to have the most options to re-work or revise photographs, some formats are better than others for allowing the photographer to compensate for mistakes such as underexposure or faulty composition. The most common form that offers leeway is the RAW image format, but what I am writing about below applies to almost every format including JPEG, PNG and others as well. It is just that RAW offers more latitude than some and is most common so there are many programs to help correct a picture via appropriate software.

In the RAW format, the camera caputers all the data, but doesn’t put it together for the user as it would in automatic mode. The camera offers the user the opportunity to make most of the decisions about how the photograph is to look. It is as though the camera is communicating with the user and saying: “OK, I know there is red in the scene and I know where it goes, but what is the exact hue of red that you want and what should the saturation and vibrance be?” The user can then use software to manipulate the camera’s information to create the scene as they saw it when the shutter was pressed.

The photograph below, for example, was taken at the Tucson Botanical Garden. When I put the image on my computer to view, it was lacking much of the “punch” and interest that encouraged me to take it in the first place.
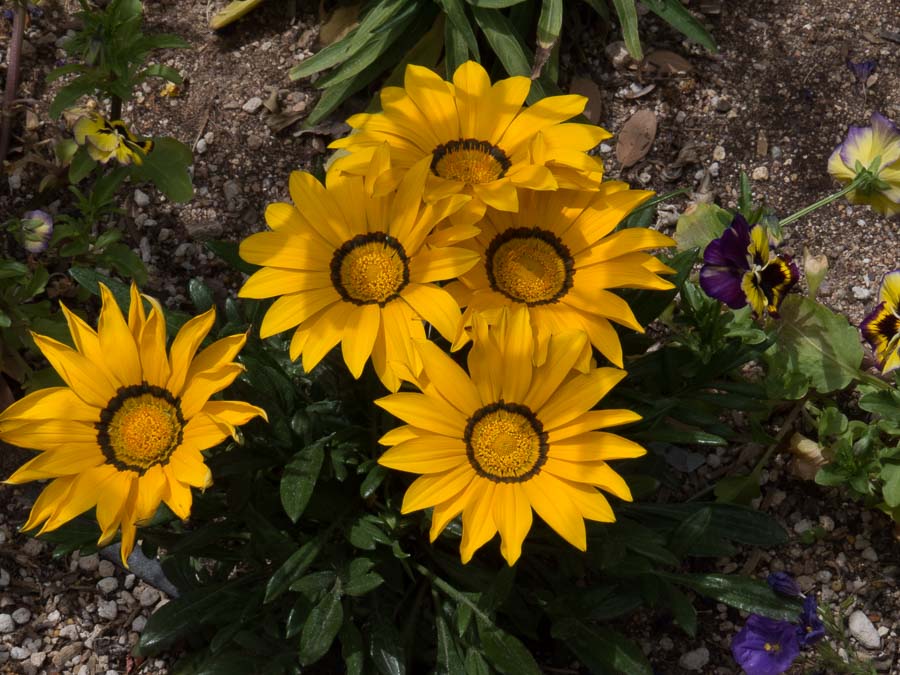


I didn’t realize it at the time, but there are too many distracting elements in the photograph. The eye is being pulled away from the main group of the yellow daisy-like flowers by the bits of colors in the pansies on the right.

The upper left also has some distracting plant material. My intent was to have viewers focus on the yellow cluster of flowers. Cropping (cutting off) some elements of the picture will help a bit. In the edit below, I removed as much of the pansies (right-side) as possible without cutting off any of the pretty yellow petals.
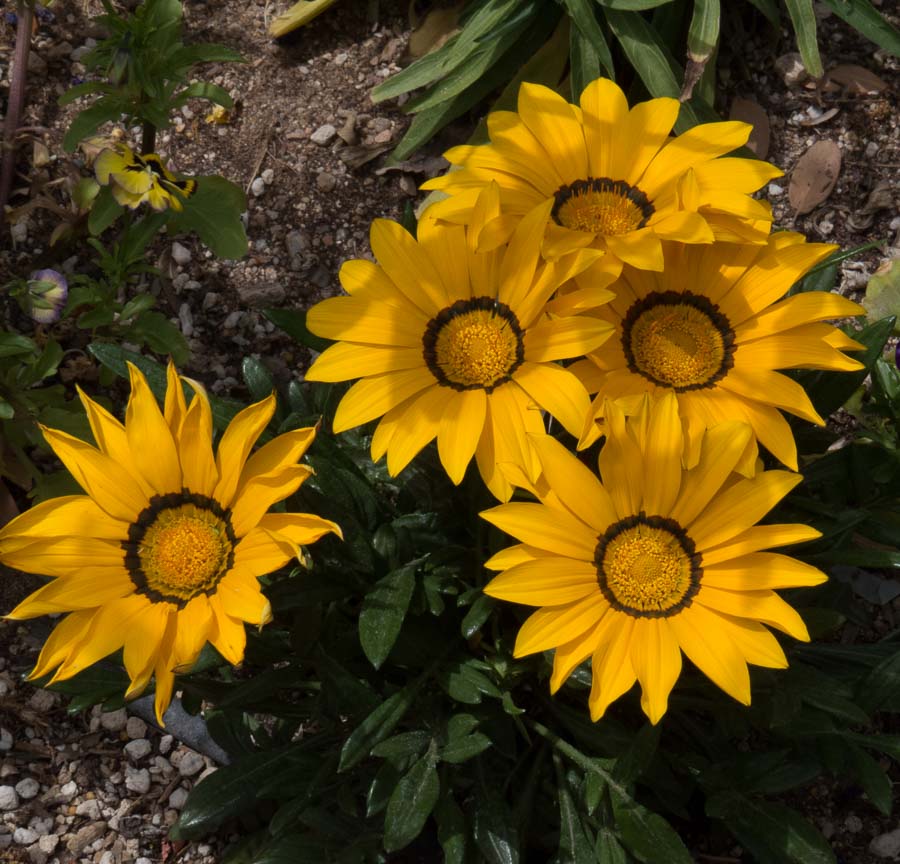


Once that was done, I used tools in Lightroom and Photoshop to darken the areas around the plant that were distracting. Making the corners and other areas darker helps to lead the eye directly to the flowers. I also enhanced the color to more closely represent the flowers as I remembered them. I tried to be careful to avoid removing the shadows which add an element of interest to the picture. I like the shades of yellow as they are altered by the varying intensities of the light.
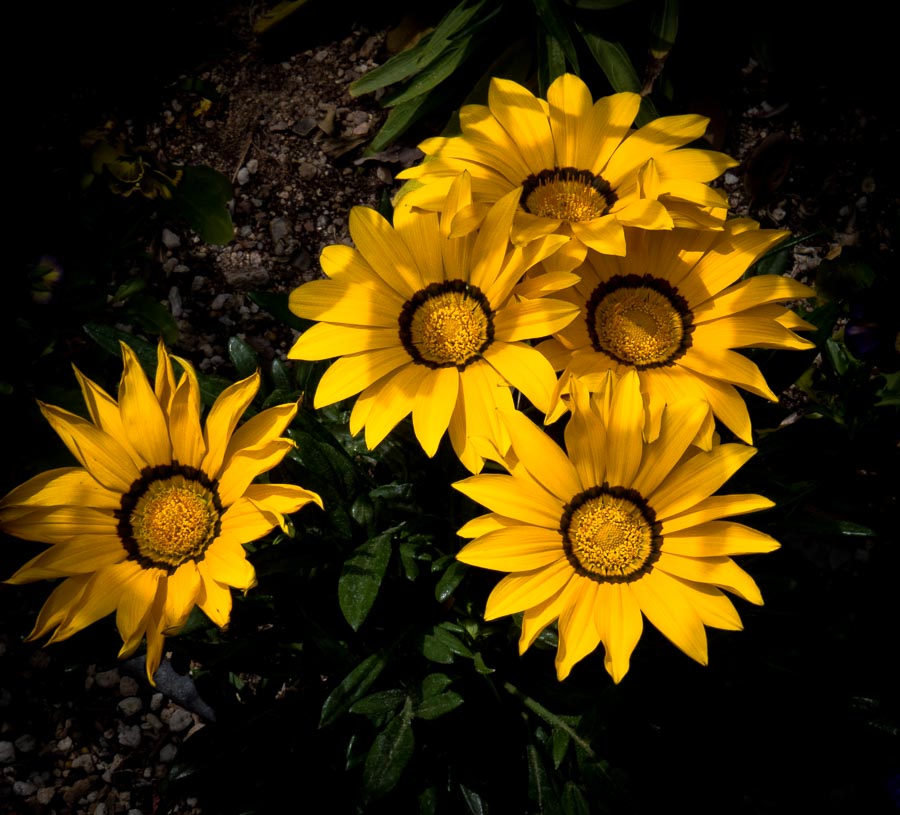


I was relatively happy with the result at this point, but I didn’t like the flower on the extreme left. It was on the wane and seemed to be drawing attention away from the main grouping of four. Experts suggest using odd numbers of objects in a photograph as they most often produce a pleasing result, but I wasn’t sure about this specific image.

I decided to remove the flower on the left to see how that looked.
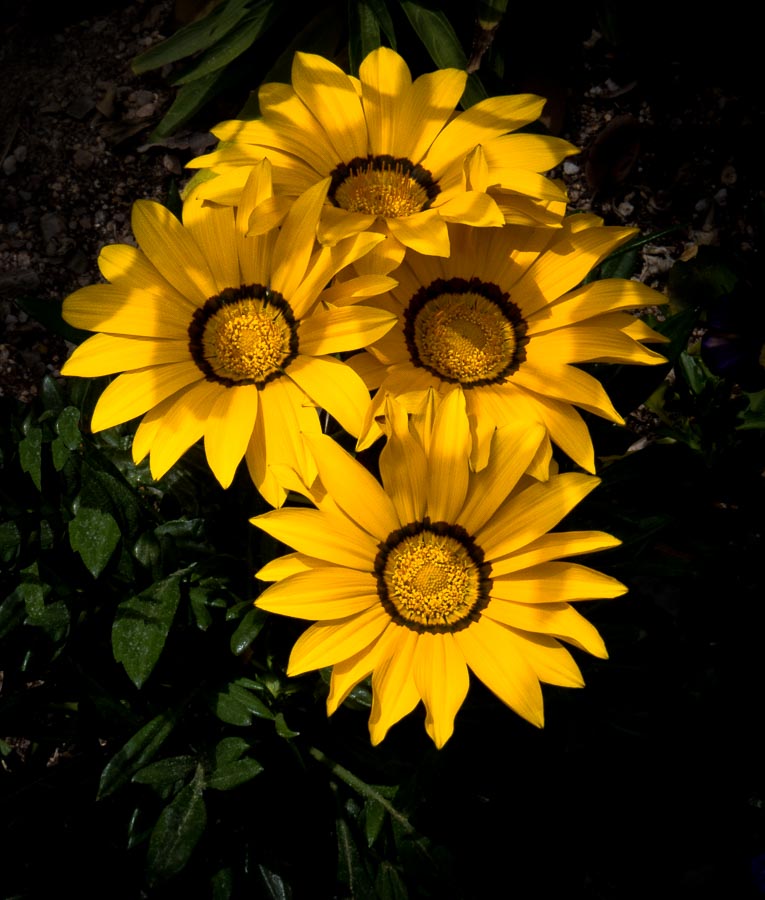


I like the edited picture above the best. What do you think? When you compare the original image to the final image, I think you will agree that post-processing, i..e. modifying the image after it has been taken, has created a more pleasing and artistic picture.

To quote one of America’s most famous photographers, Ansel Adams, “I don’t take photographs I make photographs.” This is what I try to do. I am an average user of post-processing software, but I continue to learn and enjoy making images. It is much fun and offers the photographer a chance to become a photographic artist.

*********

Metadata

File Name: yellow_flowers_0507-2.CR2
Capture time: 12:21:36 PM
Capture date: April 11, 2014
Exposure: 1/500 sec @ f/8.0
Focal Length: 17.14mm
ISO: 125
Camera: Canon PowerShot SX50 HS
Lens: 4.3-215mm

**********


JBRish.com originally published this post

See previous Photography Posts HERE

See Jeff’s other photographs on Instagram


All original content on this blog is copyrighted by Jeffrey B. Ross with ALL Rights Reserved. While reference links back to JBRish.com are appreciated and encouraged, please acquire approval for any reproduction of original content from this website.

©Jeffrey B. Ross – 2018 – JBRish.com


Hiking: Yellow-Throated Gilia, Sequoia National Park, CA

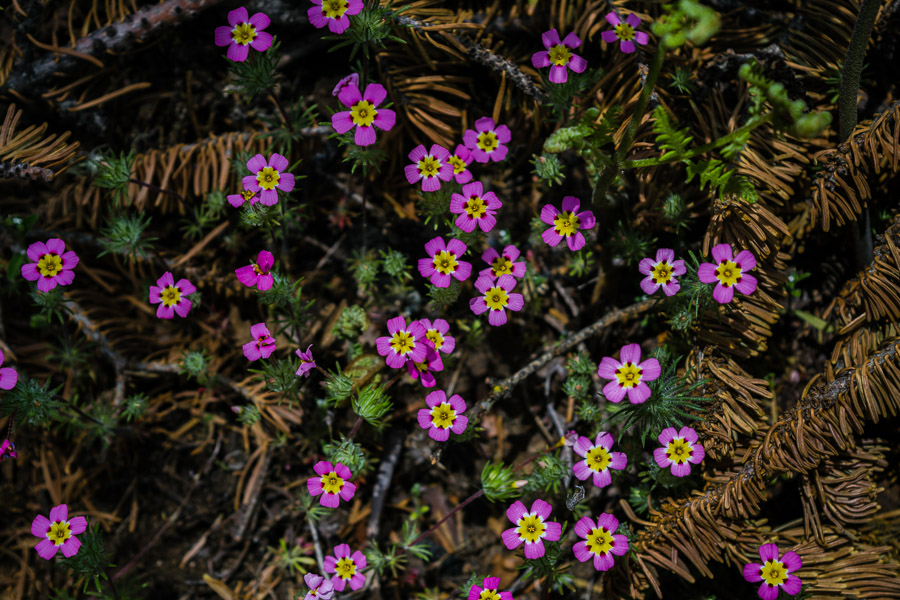
One of the reasons I enjoy hiking is that it offers opportunities for interesting discoveries; some anticipated and others serendipitous. We were hiking along the Crescent Meadow Loop Trail in Sequoia National Park nearly a year ago when we came across a patch of wildflowers tucked away in a wooded area…


Yellow-Throated Gilia wildflower

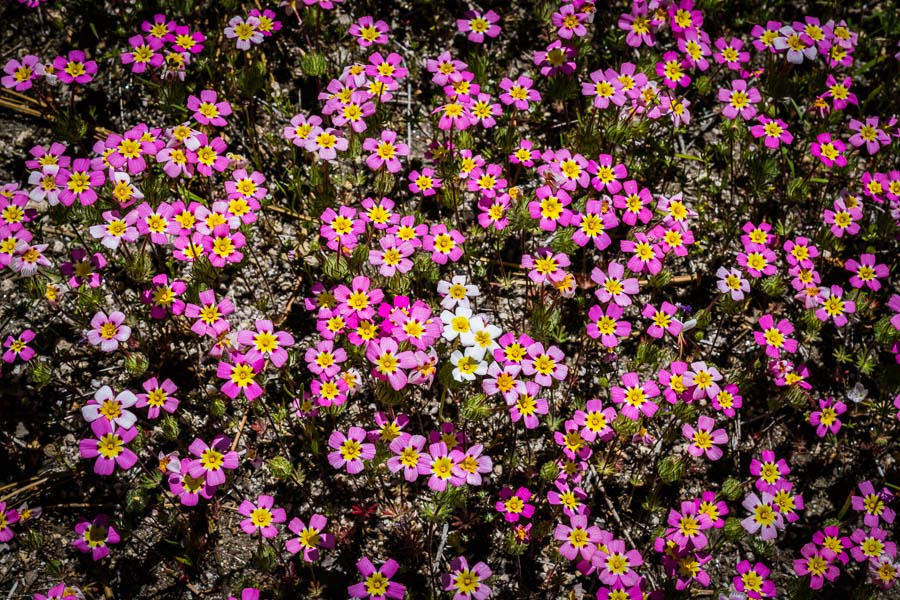
It was hard to believe that these were real. The colors were so vibrant and unusual in combination. It was an amazing sight. The next day we were on the Sunset Point Trail and there was a large swath of these wildflowers covering the entire hillside.


Yellow-Throated Gilia wildflower
Love those standouts adding their all white accents in the middle of the patch!

 
Nature is the art of God.” – Dante Alighieri

Read more about Yellow-Throated Gilia HERE


Read more JBRish.com posts:

Hiking/Exploring HERE, Nature HERE, Photography HERE


**********


All original content on this blog is copyrighted by Jeffrey B. Ross with ALL Rights Reserved. While reference links back to JBRish.com are appreciated and encouraged, please acquire approval for any reproduction of original content from this website.

©Jeffrey B. Ross – 2018 – JBRish.com


Photography: My Shot – Canyonlands Wooden Shoe Arch

The southwest is truly a spectacular part of the United States. That is not to say other states, sections, etc. do not have beauiful areas as well, but the southwest has been blessed with an abundance natural wonders.

Utah, for example, has their Mighty Five:

  • Canyonlands National Park
  • Capitol Reef National Park
  • Arches National Park.
  • Bryce Canyon National Park
  • Zion National Park

I am glad to report that we have been to all of the above and we yearn to return to several of them to see more of what they have to offer. We hiked Zion two times and want to return at least once more. For those who love nature, hiking, etc. it is hard to overestimate the amount of wonder that can be found in all of the parks listed above.

As a side trip to visiting Arches National Park, we took a day to go to Canyonlands National Park’s Needles District. The day was stormy with periods of rain, but as long as it is safe, we hike rain or shine.

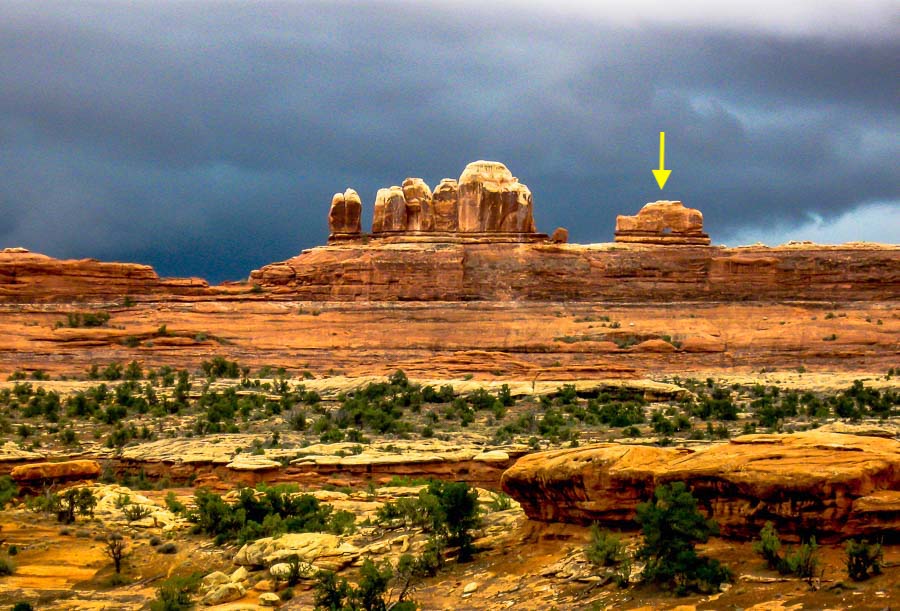
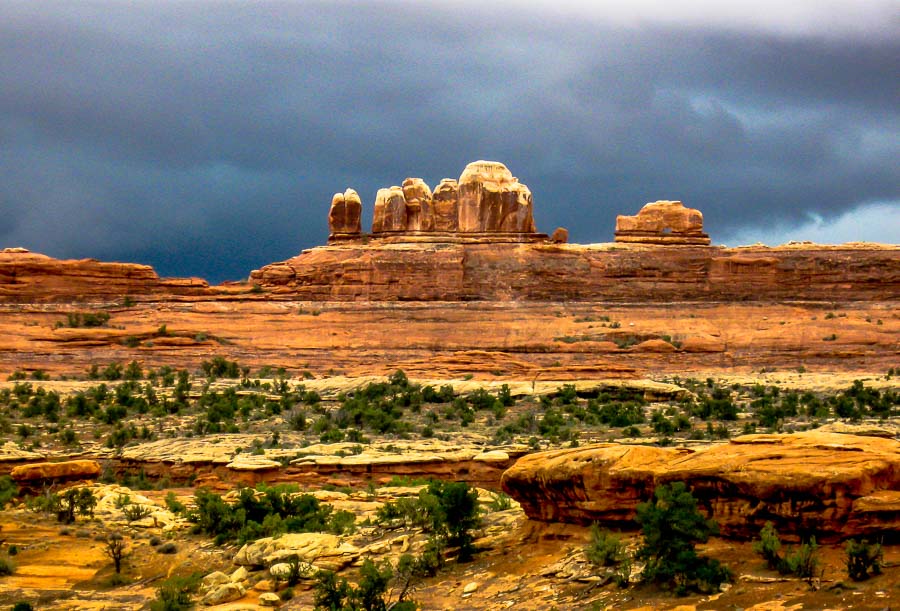
One site we saw was the Wooden Shoe Arch. I only had my 8 MP Canon point-and-shoot, but as they say: “The best camera is the one you have with you.” I took the picture below and I think it captures the beauty of the area.


Stormy Canyonlands Wooden Shoe Arch

You may have to look carefully to see the “shoe.” It is the formation in the distance on the right. The heel and front of the shoe are separated by a space. The cloudy day makes it hard to discern so I put an arrow above the shoe in the picture below.


Stormy Canyonlands Wooden Shoe Arch

**********

Metadata

File Name: 8968_cl_woodenshoe_arch.JPG
Capture time: 3:02:01 PM
Capture date: September 11, 2012
Exposure: 1/200 sec @ f/5.5
Focal Length: 23.2mm
ISO: 200
Camera: Canon PowerShot AS590 IS
Lens: 4.3-215mm

Edited in Lightroom

**********

Read more photography posts HERE


**********


All original content on this blog is copyrighted by Jeffrey B. Ross with ALL Rights Reserved. While reference links back to JBRish.com are appreciated and encouraged, please acquire approval for any reproduction of original content from this website.

©Jeffrey B. Ross – 2017 – JBRish.com


Photography – My Shot: Enchanted Forest, Tillamook, OR


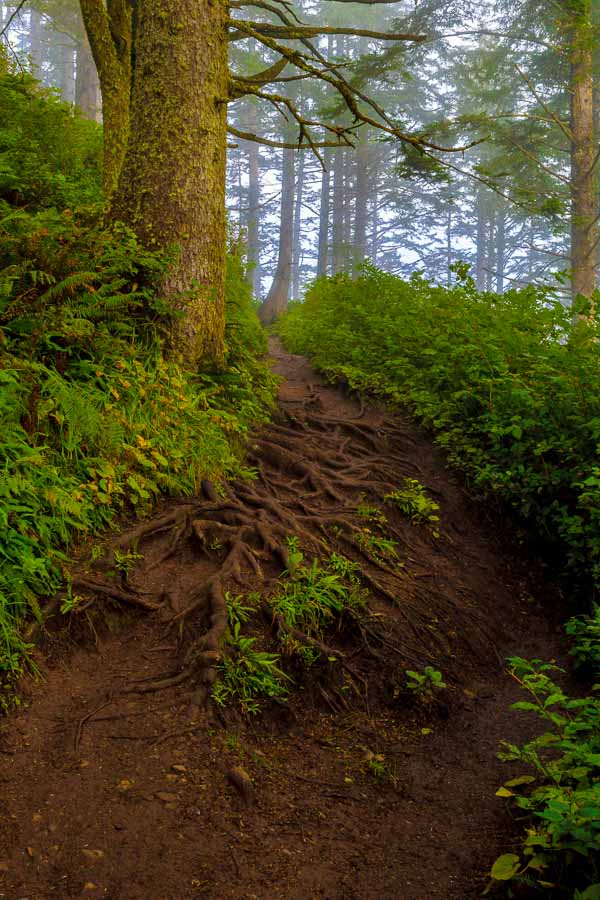
Enchanting patch of forest

A beautiful scene along the South Trail of Cape Lookout near Tillamook, OR

The majesty of the forest has always had a special place in my heart. I feel a kinship with the plants and trees which are so vital to our ecosystem and therefore our lives. The picture above was taken during our hike along the South Trail of Cape Lookout which is part of Cape Lookout State Park near Tillamook, OR.

As you can tell, the mist was clearing, but still hanging in the air. This tree had an intricate web of roots which enhanced its character even if it made footing a bit tricky. I was taken in by the wonderful colors of brown and greens. This was an enchanted setting.


**********

Metadata

File Name: DSC_2002.NEF
Capture time: 9:12:35 AM
Capture date: September 9 2017
Exposure: 1/60 sec @ f/13
Focal Length: 25mm
ISO: 720
Camera: Nikon D3300
Lens: 18-55mm f/3.5-5.6mm

Edited in Lightroom

**********

Read more photography posts HERE


**********


All original content on this blog is copyrighted by Jeffrey B. Ross with ALL Rights Reserved. While reference links back to JBRish.com are appreciated and encouraged, please acquire approval for any reproduction of original content from this website.

©Jeffrey B. Ross – 2018 – JBRish.com


Photography: As Shot – Stormy Mendocino Headlands


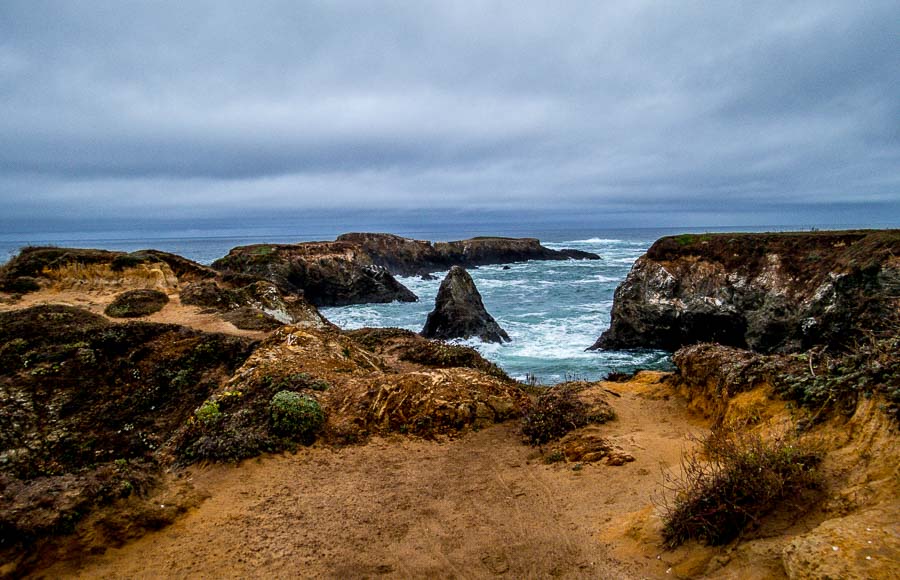
Stormy Ocean - Mendocino Headlands

There is something about a stormy sea that attracts me. Knowing that I am standing on terra firma looking at the churning water and feeling the building strength of the impending storm carries a thrill with it. On such a day we were drawn to the edge of the ocean in Mendocino Headlands State Park. There were only a few adventurers at the water’s edge this morning.

The grey skies could not hide the beauty of the scene. The browns of the beach and rocks against the bluish grey water and sky created a very pleasing panorama.

Read more about Mendocino Headlands State Park – Click HERE

**********

Metadata

File Name: IMG_1636.CR2
Capture time: 9:51:17 AM
Capture date: September 24, 2014
Exposure: 1/250 sec @ f/4.0
Focal Length: 4.3mm
ISO: 100
Camera: Canon PowerShot SX50 HS
Lens: 4.3-215mm

Edited in Lightroom

**********

Read more photography posts HERE


**********


All original content on this blog is copyrighted by Jeffrey B. Ross with ALL Rights Reserved. While reference links back to JBRish.com are appreciated and encouraged, please acquire approval for any reproduction of original content from this website.

©Jeffrey B. Ross – 2017 – JBRish.com


Photography: As Shot – Reflections of Dinner

NOTE – “As Shot” photographs are some that I have posted on Instagram, but without any imposed crop that might not be warranted, less detail reduction and more of an explanation.


Reflections of Dinner in a wine glass

Reflections of dinner in a wine glass

I don’t usually photograph abstract scenes or items, but sitting at dinner a few days ago, I was fascinated by the reflections of our dinner plates, silverware and food in the bottom half of my wine glass. It may be hard to see, but look carefully and I think you will notice the plates, spoons, etc. in the reflection. They are distorted by the curvature of the glass.

**********

Metadata

File Name: IMG_1188.JPG
Capture time: 5:49:30 PM
Capture date: Nov. 21, 2017
Exposure: 1/15 sec @ f/2.4
Focal Length: 4.12mm
ISO: 800
Camera: Apple iPhone 5

Edited in Lightroom

**********

Read more photography posts HERE

Visit Jeff’s Instagram Portfolio HERE


**********


All original content on this blog is copyrighted by Jeffrey B. Ross with ALL Rights Reserved. While reference links back to JBRish.com are appreciated and encouraged, please acquire approval for any reproduction of original content from this website.

©Jeffrey B. Ross – 2017 – JBRish.com


Photography: As Shot – Saguaro with a Halo

NOTE – “As Shot” photographs are some that I have posted on Instagram, but without any imposed crop that might not be warranted, less detail reduction and more of an explanation.


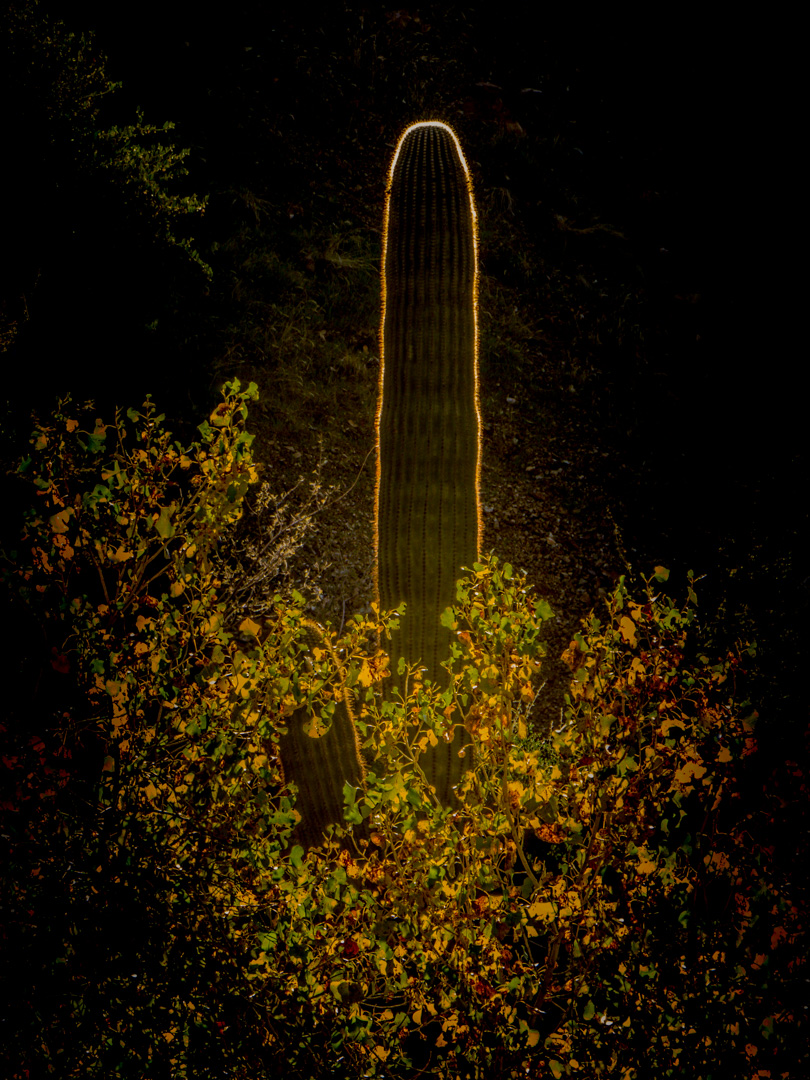
Saguaro with a Halo as seen at the Jewel of the Creek Preserve, Cave Creek, AZ

One of our favorite places to hike is at the Jewel of the Creek Preserve in Cave Creek, AZ. This is a riparian area and has running water all year long. In the desert this is a commodity which is likely to attract many of its inhabitants including birds, lizards, snakes, etc.

The trails have some ups and downs, but overall the hiking is moderate at its most strenuous for those who do any amount of hiking. While on a hike, we were descending into a lower area and the sun was backlighting the edges of this saguaro. The light playing off of the surrounding foliage along with the halo over the main cactus caught my eye.

Technically, this is not the best picture. The only camera I had with me was my bridge camera which does not do too well at an ISO higher than 100 especially in this type of lighting situation. Having said that, however, there is something about this photograph that that I find artistically satisfying.

**********

Metadata

File Name: jewel_of_creek_IMG_0118-2.tif
Capture time: 2:27:04 PM
Capture date: Dec. 29, 2015
Exposure: 1/160 sec @ f/5.6
Focal Length: 83.27mm
ISO: 200
Camera: Canon PowerShot SX50 HS
Lens: 4.3-215mm

Edited in Lightroom and Photoshop

**********

Read more photography posts HERE

Visit Jeff’s Instagram Portfolio HERE


**********


All original content on this blog is copyrighted by Jeffrey B. Ross with ALL Rights Reserved. While reference links back to JBRish.com are appreciated and encouraged, please acquire approval for any reproduction of original content from this website.

©Jeffrey B. Ross – 2017 – JBRish.com


Fuji X-T2: Firmware Update Procedure

One of the reasons to consider a Fuji camera is the ongoing support Fuji offers its users. Some camera manufacturers sell their camera to someone and unless there is a major problem, the firmware rarely gets updated.

Fuji, on the other hand, continues to support their buyers by improving the performance of their cameras by updating the software often with new capabilities. Yes, of course they use updates to correct poor performance or problems, but they don’t stop there.

Last week I learned that my relatively new Fuji X-T2 was eligible for a firmware update. I updated the firmware once before, but I couldn’t remember exactly how to do it and believe me, this is one area where nobody wants to make a mistake. I discovered that there are more warnings than a photographer can shake a stick at while I was reviewing the correct procedure.

I did what most people would do under the circumstance, and I went to the web to determine the best procedure.

Here is the procedure I used: (I give official documentation at the end and I would suggest your read that as well as watching the video.) I found comfort in reviewing the correct procedure from different sources just to make sure I understood it completely.

NOTE: There seem to be many steps, but it is easier than it appears. Just take your time and follow the instructions carefully. Please read this entire web page and information at the links before proceeding. It will give you confidence!

  • 1. I visited the Fuji firmware update page and located the latest firmware upgrade for my camera which was represented by the entry in the table on that web page:
  •  


    X-T2 Firmware update listing

  • 2. Since I knew I needed the update, I clicked on the Firmware-Download link and checked all the necessary agreements!
  •  

  • 3. The file, FWUP0010.DAT, was waiting for me in my downloads folder. I could see that it was 53.5 MB
  •  

  • 4. The next thing needed is a newly formatted memory card. There are couple of ways to do this. P. 203 of the User’s Manual provides the basic outline**:
  •  

      A. – Press the Menu button on the back of the camera and select User Setting (the wrench) –> Format
      B – Choose the slot that has the memory card you want to use and press MENU/OK.
      C – You have to confirm the choice. Naturally, all data on the card will be erased and lost so make sure there isn’t anything on the card that you will need. You can always select CANCEL at this point if you are unsure.
      D – If you are sure you want to format the card, choose OK and let the camera do its work.

    ** Fuji owner’s manual

  • 5. Once the card is formatted correctly, insert it into your computer and copy the .DAT file recently saved as the Fuji firmware download. Don’t change the name of the file or do anything to it other than copy it to the card.
  •  

    NOTE – The copied file needs to be in the main directory or root directory of the card. It should not be in a folder and technically, it should be the only thing on the card! (Just drag and drop it onto the newly formatted card and you will be fine)


  • 6. Eject the card from your computer and carefully insert it into the camera.
  •  

  • 7. Fuji warns users to make sure they are using a fully charged battery. You can insert the battery into your camera to check the power level. Make sure it is fully charged.
  •  

  • NOTE: Firmware updates can take some time. You never want to interrupt an update so be careful in handling the camera so that it is not turned off or disturbed in any way. I just put it down with the screen facing me and let it go through the paces. Fuji suggests that the update can take up to 90 seconds. When waiting for the process to complete, it may seem like a long time, but let it run through the steps. You will be notified when the process is completed.
  •  

  • 8. With the camera turned off, press and hold the DISP/BACK button while turning the camera on. You should see a menu indicating the firmware version. It may give both a body and lens version. Now you can let go of the button.
  •  

  • 9. Make sure BODY is selected and press the OK button on the back of the camera. Pressing the up button should highlight the word “OK.” DO NOT SELECT LENS as this upgrade is for the body’s firmware only.
  •  

  • 10. Press the OK button and the camera will update the firmware. When the update is complete, the screen will show the current firmware (updated) version.
  •  

  • 11. Fuji recommends that you turn off the camera at this point and check the firmware version; good idea. (see step 8 above). It should list the updated version.
  •  

  • 12. Fuji also suggests that once you have checked the firmware version and the upgrade has been successful, you should reformat the memory card so that it can be used for photos and doesn’t become a source of confusion later.
  •  

Here is a video offered by Fuji if you prefer learning that way.

NOTE: The video seems to imply that users should remove the lens, but I did not find that necessary with my X-T2 and the video actually addresses that particular issue so don’t be concerned. You can leave the lens in place with the X-T2

You can also read the Fuji web page detailing the complete procedure which is basically what I outlined above.

I hope newcomers to the Fuji system, especially the X-T2 find this information useful!


**********


All original content on this blog is copyrighted by Jeffrey B. Ross with ALL Rights Reserved. While reference links back to JBRish.com are appreciated and encouraged, please acquire approval for any reproduction of original content from this website.

©Jeffrey B. Ross – 2017


Photography: As Shot – Cosanti Boxes

NOTE – “As Shot” photographs are some that I have posted on Instagram, but without any imposed crop that might not be warranted, less detail reduction and more of an explanation.


Picturesque

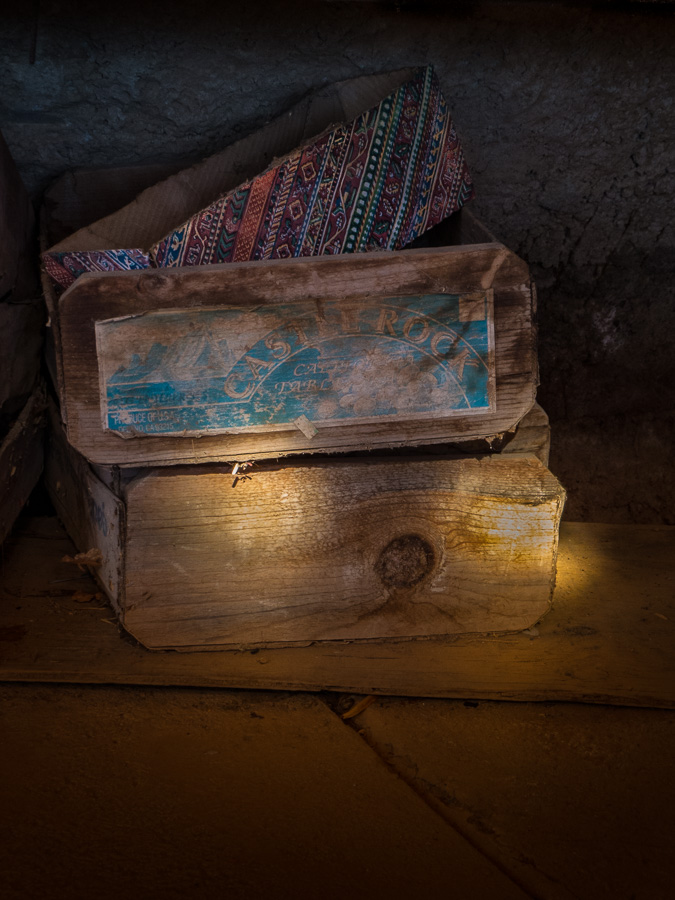
Beautiful decorative boxes near the forge at Cosanti Studios, Paradise Valley, AZ

Paolo Soleri was a master craftsman and excellent designer as well as bronze and ceramic artisan. While visiting his Paradise Valley, AZ (near Scottsdale) studio, Cosanti, I saw this small stack of wooden boxes which were almost hidden from view. They were near the area of the forge and the sun coming through the overhang created a certain mood that I was hoping to capture. I like the dark, subdued mood accented by the sun’s rays.

Click the link to read more about Cosanti. It is an interesting 20-30 minute visit if you are in the area.

Address: 6433 E Doubletree Ranch Rd, Paradise Valley, AZ 85253

**********

Metadata

File Name: Cosanti Boxes_IMG_0105.CR2
Capture time: 10:16:06 AM
Capture date: Nov. 22, 2015
Exposure: 1/50 sec @ f/5.6
Focal Length: 16.16mm
ISO: 200
Camera: Canon PowerShot SX50 HS
Lens: 4.3-215mm

Edited in Lightroom

**********

Read more photography posts HERE

Visit Jeff’s Instagram Portfolio HERE


**********


All original content on this blog is copyrighted by Jeffrey B. Ross with ALL Rights Reserved. While reference links back to JBRish.com are appreciated and encouraged, please acquire approval for any reproduction of original content from this website.

©Jeffrey B. Ross – 2017 – JBRish.com


Photography: As Shot – Colorful Tom Turkey

NOTE – “As Shot” photographs are some that I have posted on Instagram, but without any unwarranted imposed crops, less detail reduction and more of an explanation.


On the road near Hereford, Arizona with storm clouds closing in

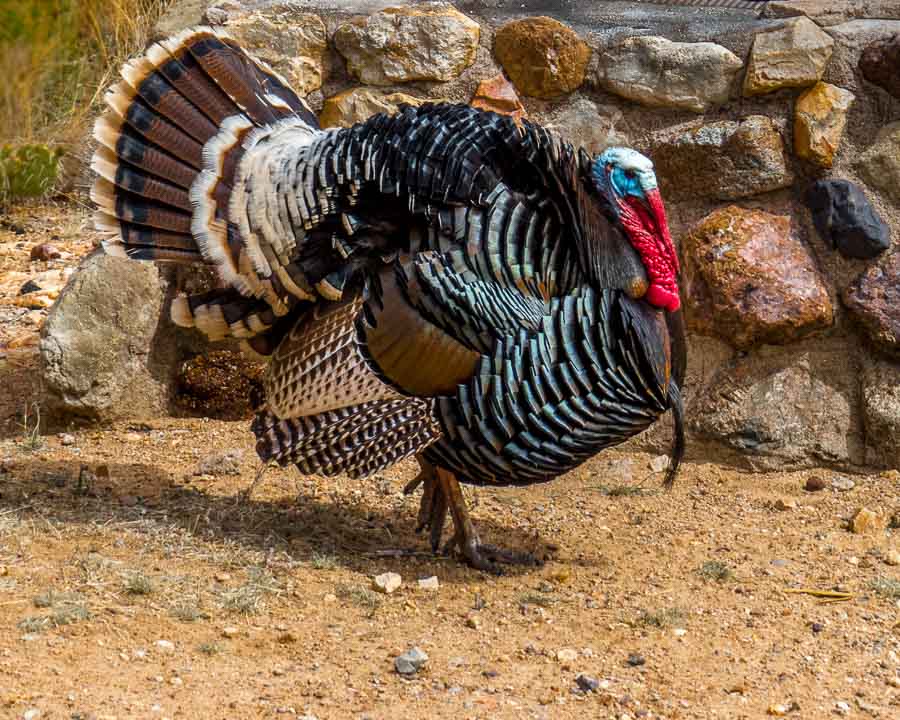
Tom shows his colors when is around the hens – Happy Thanksgiving – 2017!

On a hiking trip to Brown Canyon in Buenos Aires National Wildlife Refuge, southern Arizona, we were treated to a display by this Tom Turkey who was parading around in front of two hens.

**********

Metadata

File Name: turkey_tom_0597.CR2
Capture time: 2:26:46 PM
Capture date: April 12, 2014
Exposure: 1/640 sec @ f/5.6
Focal Length: 25.065mm
ISO: 100
Camera: Canon PowerShot SX50 HS
Lens: 4.3-215mm
Edited in Lightroom

**********

Read more photography posts HERE


**********


All original content on this blog is copyrighted by Jeffrey B. Ross with ALL Rights Reserved. While reference links back to JBRish.com are appreciated and encouraged, please acquire approval for any reproduction of original content from this website.

©Jeffrey B. Ross – 2017 – JBRish.com