Photography: Why Use Post Processing Software?

Although I had been interested in photography as far back as my teenage years, after my thirties and a number of life changes, photography took a back seat to my other interests and obligations of life.

I had used professional gear in my twenties and early thirties, but for many years after, I used a point-and-shoot digital camera with between 5 and 8 megapixels. (As a frame of reference, today’s standards would probably call for a minimum of 16 or 24 megapixels for professional use.) My Canon AS590 IS provided a no muss, no fuss regimen for me and I was comfortable just capturing ptographs as a matter of record.

Of course as time passed, post processing software improved and I became interested in revisiting some of my older photographs and trying to “process” them to bring out the colors and beauty that encouraged me to take the photographs in the first place.

When pondering the question, “Why use post processing software,” let me offer the following.

My wife and I enjoy hiking and exploring as readers of JBRish.com know. In 2012, we visited Monument Valley, UT. Sure enough, I had my Canon PowerShot AS590 with 8 megapixels. It took very nice jpeg photographs. Unfortunately, however, the settings and ability of the small sensor was limiting.

Look at this picture for example:


Original picture of the Yei Bi Chei Spires and the Totem Pole

The above is a composition in which I was very interested, but the bright sky and haze did not enable the camera to represent the scene as I envisioned it. The camera did the best it could capturing the scene, but the equipment didn’t render the red rocks and sand as I saw it. The green and yellow grasses played well against the red rocks, but you wouldn’t know it by looking at the photo above.

This shot remained dormant on my hard drive for years and then I began to learn about Adobe Lightroom. Once I understood the basics, I realized I could recapture some of the colors and nuances of the shot that inspired me to take the photograph in the first place.

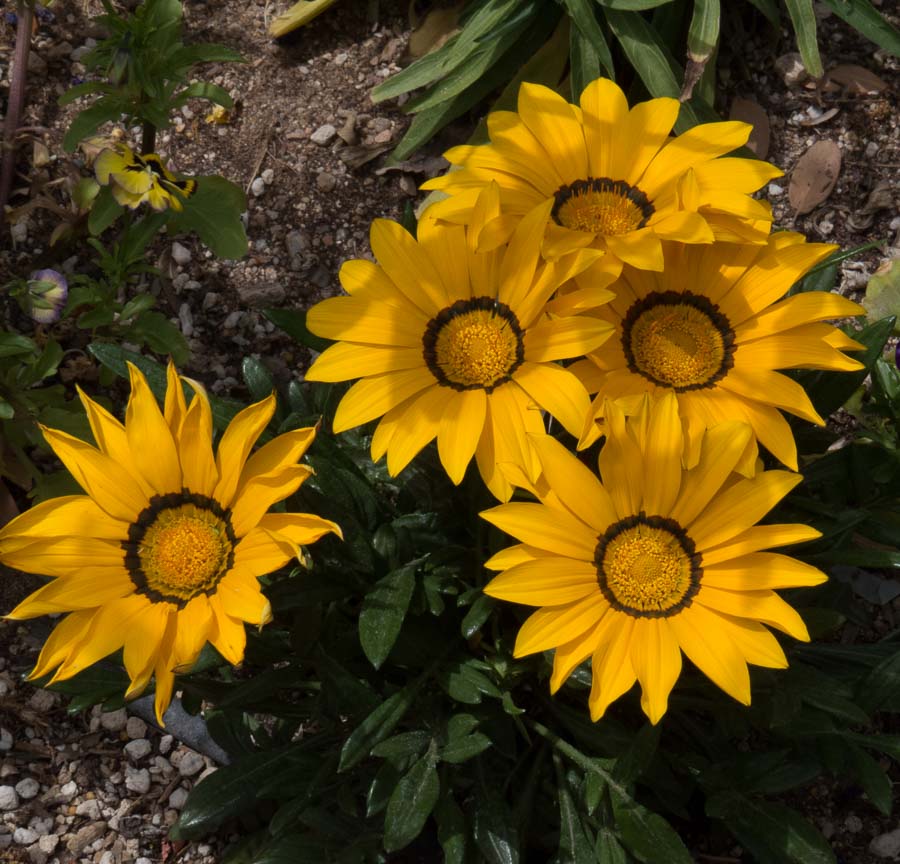
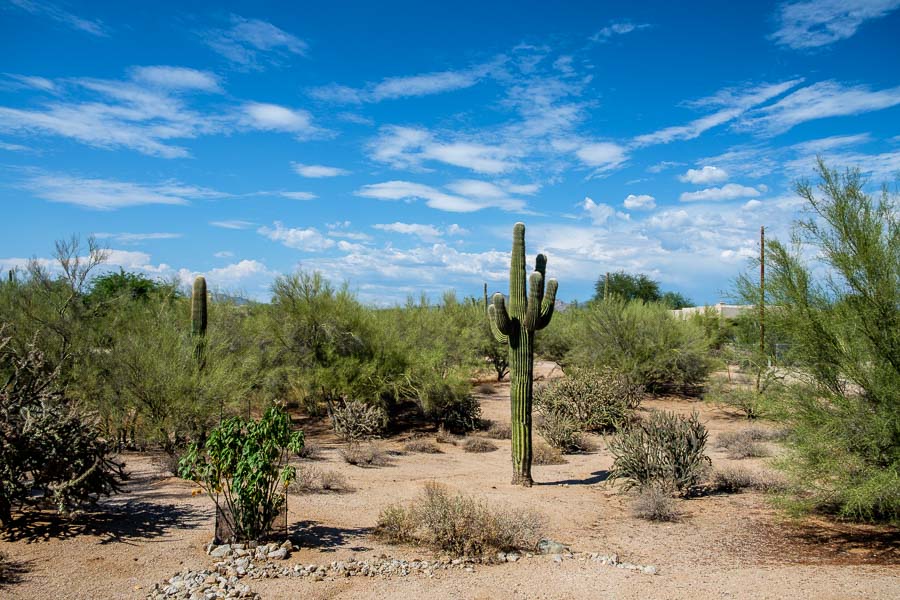
Once processed, the scene is rendered more as I saw it that afternoon.


Processed picture of the Yei Bi Chei Spires and the Totem Pole

Keep in mind that this camera has a very small sensor and by today’s standard is probably equivalent to a smartphone or perhaps less than that. When looking at the picture, understand that the camera did capture information such as which areas are brown, red, green, blue, light, dark, etc. It took the software to help me bring out the colors and contrast nearer to as I recalled them when I stopped to press the shutter. Some of the detail is lost in the transition and the picture is more painterly than I would prefer, but it is certainly closer to my recollection than the original the camera recorded.

This is why post processing software and learning how to use it properly is so popular!

*********

Metadata

File Name: 8871_yei_bi_chei_spires_totempole.JPG
Capture time: Sept. 10, 2012
Exposure: 1/400 sec @ f/4.5
Focal Length: 16mm
ISO: 80
Camera: Canon PowerShot AS590 IS
Lens: 4.3-215mm

Edited in Lightroom

**********

See more JBRish.com photography posts HERE and visit Jeff’s Instagram site HERE


**********


All original content on this blog is copyrighted by Jeffrey B. Ross with ALL Rights Reserved. While reference links back to JBRish.com are appreciated and encouraged, please acquire approval for any reproduction of original content from this website.

©Jeffrey B. Ross – 2018 – JBRish.com


Photography: What is Post-Processing?

When it comes to photography, I consider myself a journeyman or apprentice. I work alone with the Internet serving as my mentor and it has provided great benefits to me as a student of photographic skills. I have always been interested in photography and back in the days of “only film,” I had a black and white darkroom.

Nowadays, digital photography makes things easier; at least for me. Post-processing is chemical free and done on a computer where mistakes can often be easily corrected with a few key strokes. If you are new to photography, you might be wondering: “What is post-processing?” Let me try to give you a simple explanation as I understand it.

When a digital photograph is taken on an automatic setting, the camera, which is really a computerized device, gathers all the information about the scene such as how dark it is, what colors go where, what area should be in focus, etc. and then it interprets the data and converts into a digital image. The current camera models are really quite capable and most will produce good to very good results on automatic settings.

There are times however when the camera may become “confused” because the scene is more difficult to analyze. A picture with lots of snow or many dark areas or one with high contrast will often cause problems. With many cameras, the settings can be changed from automatic to compensate for these difficult situations if the user is skilled enough to adjust the settings manually.

There will invariably be times, however, when a picture is less than ideal. Perhaps the photographer made an error in one of the settings. Some times a dial or setting is changed unintentionally and the error is not noticed until several shots later. The good news is that many mistakes can be remedied after the fact, i.e. post-processing.

In order to have the most options to re-work or revise photographs, some formats are better than others for allowing the photographer to compensate for mistakes such as underexposure or faulty composition. The most common form that offers leeway is the RAW image format, but what I am writing about below applies to almost every format including JPEG, PNG and others as well. It is just that RAW offers more latitude than some and is most common so there are many programs to help correct a picture via appropriate software.

In the RAW format, the camera caputers all the data, but doesn’t put it together for the user as it would in automatic mode. The camera offers the user the opportunity to make most of the decisions about how the photograph is to look. It is as though the camera is communicating with the user and saying: “OK, I know there is red in the scene and I know where it goes, but what is the exact hue of red that you want and what should the saturation and vibrance be?” The user can then use software to manipulate the camera’s information to create the scene as they saw it when the shutter was pressed.

The photograph below, for example, was taken at the Tucson Botanical Garden. When I put the image on my computer to view, it was lacking much of the “punch” and interest that encouraged me to take it in the first place.


I didn’t realize it at the time, but there are too many distracting elements in the photograph. The eye is being pulled away from the main group of the yellow daisy-like flowers by the bits of colors in the pansies on the right.

The upper left also has some distracting plant material. My intent was to have viewers focus on the yellow cluster of flowers. Cropping (cutting off) some elements of the picture will help a bit. In the edit below, I removed as much of the pansies (right-side) as possible without cutting off any of the pretty yellow petals.


Once that was done, I used tools in Lightroom and Photoshop to darken the areas around the plant that were distracting. Making the corners and other areas darker helps to lead the eye directly to the flowers. I also enhanced the color to more closely represent the flowers as I remembered them. I tried to be careful to avoid removing the shadows which add an element of interest to the picture. I like the shades of yellow as they are altered by the varying intensities of the light.


I was relatively happy with the result at this point, but I didn’t like the flower on the extreme left. It was on the wane and seemed to be drawing attention away from the main grouping of four. Experts suggest using odd numbers of objects in a photograph as they most often produce a pleasing result, but I wasn’t sure about this specific image.

I decided to remove the flower on the left to see how that looked.


I like the edited picture above the best. What do you think? When you compare the original image to the final image, I think you will agree that post-processing, i..e. modifying the image after it has been taken, has created a more pleasing and artistic picture.

To quote one of America’s most famous photographers, Ansel Adams, “I don’t take photographs I make photographs.” This is what I try to do. I am an average user of post-processing software, but I continue to learn and enjoy making images. It is much fun and offers the photographer a chance to become a photographic artist.

*********

Metadata

File Name: yellow_flowers_0507-2.CR2
Capture time: 12:21:36 PM
Capture date: April 11, 2014
Exposure: 1/500 sec @ f/8.0
Focal Length: 17.14mm
ISO: 125
Camera: Canon PowerShot SX50 HS
Lens: 4.3-215mm

**********


JBRish.com originally published this post

See previous Photography Posts HERE

See Jeff’s other photographs on Instagram


All original content on this blog is copyrighted by Jeffrey B. Ross with ALL Rights Reserved. While reference links back to JBRish.com are appreciated and encouraged, please acquire approval for any reproduction of original content from this website.

©Jeffrey B. Ross – 2018 – JBRish.com


Fuji X T-2: Improving LR Post Processing Process

My Fuji X T-2 experience is moving right along and I am learning new things almost on a daily basis. I haven’t had an extended shoot yet, but I will have one soon. In the meantime, I have been experimenting and becoming accustomed to all the controls and settings available to me. I can sense now that it will be difficult, with just a bit of knowledge, to take a bad picture. Naturally there will be newbie mistakes, but no more than to be expected when learning any new system.

Before I get to show you some of my first pictures, I want to discuss an issue I knew I would encounter…

I have the camera set to
capture both JPEGs and RAW files. With two card slots, this is really pretty easy. I am not sure I will do this all of the time, but I thought it would be good to try this as I started on my journey to learn the X T-2.

I discovered that the JPEGs are rendering very well, but when I examined the RAW files, they didn’t show the detail that I can see in the JPEGs. I know the camera is working accurately because the JPEGs are right on.


NOTE –
I live in the desert so the photos are of an area near my home. This was a test run just to try out a new polarizing filter so understand that the images may be over saturated, etc. as I am learning to adjust the polarizing effect as well as how to use the camera.

This is the JPEG straight out of camera (SOOC).


JPEG straight out of camera (sooc)

Here is the RAW image, also with the polarizing filter, straight out of camera (SOOC):


RAW straight out of camera (sooc)

I don’t know if you can see a big difference between the two. On my 27″ monitor in LR, there was a noticeable difference.

Here are the two shots after I applied my “regular” (Nikon, Canon) LR settings. JPEG first then RAW.


JPEG


RAW

They were relatively close, but on my larger screen when the images are in LR, I could tell the JPEG had more detail.

Here is a 1:1 enlargement of a section of each picture just to give you the idea. JPEG first then the RAW image (both after similar LR enhancements).

NOTE – All enlargements are screenshots taken on my legacy iMac which produces PNG files.


JPEG


RAW

If you look closely at the clouds, the spines of the large cactus (saguaro) on the left of the frame as well as the tree branches, I think you will note there is more detail in the JPEG. I wish I was better at presenting this.

Here is a similar comparison with a 3:1 enlargement. JPEG first then the RAW image (both after similar LR enhancements).


JPEG


RAW

I knew the detail from Fuji files was an issue with LR. If I hadn’t read about this prior to my purchase, I might have been panicking at this time, but I was prepared.

I wanted a Fuji because in my mind, they put the photographer first. They have demonstrated their dedication to providing the best user experience by offering, free effective firmware updates. These not only correct glitches that might arise, but historically, they have extended the usefulness of the Fuji cameras. Yes, Fuji was the system I wanted even if I had to modify my workflow.

I began to search the Internet for potential solutions to help me generate more detail that I knew were in the RAW files. There seem to be a number of good alternatives. One that I found to work for me, at least at this point, was offered by Jim Harmer of Improve Photography via a video/podcast.

Based on Jim’s suggestions, I adopted the settings below as my starting point in addressing my Fuji files.

These adjustments are made in LR’s Detail Panel as I import the files. I created a preset to do this on import [all of these are, of course, (+/-) according to personal taste ]:

  • Amt – 40
  • Radius – 1.5
  • Detail 80 – 84
  • Masking (if needed ) 45-48
  • I also found that using Provia Standard (Camera Calibration Panel OR Pro Neg. Hi) gives me a look I like for my photos; your mileage may vary.

    NOTE – To anyone who has worked with LR, it is understandable that the above settings are not going to work with every file right out of the gate. Each file will need to be tweaked as necessary moving the sliders until the best rendering is achieved. I use the above as a starting point for my Fuji files and then I move to my other regular settings under the Basic Panel. I go back and forth between panels to achieve the desired result. This is really nothing different than I do with my other files and now that I have the preset for importing the Fuji files, it isn’t difficult.

    Here is the Improve Photography video that helped me:


    Thank you Jim!

    Finally, below are both the JPEG and the RAW file after all of the processing in LR. I have to issue a disclaimer — I have been using LR for only a year or eighteen months and I am the first to admit that my skills are not that of an expert. I am just trying to pass along what I am learning in an effort to help others who can benefit from the information.


    I am satisfied that I have increased the detail rendered in my RAW files to match or surpass the Fuji-generated JPEGs, but I am not done yet!

    NOTE: If you want to delve a bit deeper into the extraction of fine detail from Fuji RAW files, I suggest you read SHARPENING X-TRANS FILES IN ADOBE LIGHTROOM. Pete Bridgwood has done a great service for the Fuji community by constructing a detailed procedure which I intend to use to help me modify the parameters set forth above. He offers a way to build several presets for landscape photography along with much background material and other ideas! It will be well worth your time if you are interested.

    Read more photography posts HERE

    **********


    All original content on this blog is copyrighted by Jeffrey B. Ross with ALL Rights Reserved. While reference links back to JBRish.com are appreciated and encouraged, please acquire approval for any reproduction of original content from this website.

    ©Jeffrey B. Ross – 2017


    Photography – Don’t Let Your JPEGs Grow Up To Be Dull

    Take a Photograph from Bland to Grand

    Followers of JBRish know that one of my interests and near passion is photography. I do enjoy trying to capture the best images possible with the equipment I have. I am an enthusiastic amateur and freely admit that I have much to learn.

    My main camera for a long time was a Canon point-and-shoot such as the Canon PowerShot A590 IS [ Reivew here ] which is an 8 mp model. FYI – The industry is currently centered around a median size of approximately 24 mp. By today’s standard, this is a relic!

    That camera has gone on many trips from Peru to Yosemite National Park. I have taken thousands of pictures with it and I still use that camera under certain circumstances and for the example photos below.

    Enter the Canon PowerShot SX50 HS [ Review Here ]

    This camera has 12.1 megapixels which is a fair jump from the AS590 mentioned above. That is not the reason I bought the SX50 HS however. It had two very important features 1) it had a long zoom for wildlife photographs. I enjoy birding and this would help me identify birds I saw and 2) it could shoot in the RAW format.

    For those who don’t know what the RAW format is, you can find out more at the link below, but I will try to explain this as simply and as non-technically as possible. I am sure I am leaving important information by the side of the road, but I think most readers will get the idea.

    RAW VS JPEG OVERVIEW – Video

    What a digital camera does…

    A digital camera records a scene in code. It doesn’t record the scene like a film camera would record it. Instead, it has millions of dots (pixels) and it “interprets” the scene and colors these millions of dots to replicate the view that the photographer wants to save. The camera writes this information to a file, usually in jpg (JPEG) format. Once that is done, the built-in software interprets how the colors red, blue, yellow, green, etc. represented when someone opens the file. This information is written in code so the camera can record it in as little space as possible and then interpret it visually when a user wants to view the photograph.

    When shooting in RAW format, the camera records the scene as it is and allows the photographer to decide how dark the darks are, how bright the highlights should be, how exactly the colors will be represented, etc. In other words, instead of enabling the camera to “interpret” the scene, the photographer gets to interpret the scene. This is a good thing because cameras may not be able to capture the full spectrum of lights and darks, reds and blues, etc. in a specific situation. The photographer can then modify many aspects of the digital image to more closely represent what he or she saw, or take it in a totally creative direction. The drawback is that it takes extra steps to work with RAW data and it can be time consuming. (We will skip the philosophical discussions at this point)

    What Photo Editor Should I Use?

    That is a very good question and one with which I struggled when I first became interested in working with my photos once they were moved to the computer and out of the camera. This is called post processing. After trying several programs like iPhoto, Photoshop Essentials, and a few other free offerings, I decided to subscribe to the Adobe Cloud suite which includes Lightroom (LR), Photoshop (PS), Camera RAW and more. If you can afford the less than $10 per month subscription plan, I highly recommend it. I do most of my post processing in LR. I do plan to learn how to make better use of PS, but at this point I don’t find LR too limiting.

    NOTE – I learned Lightroom predominantly from Anthony Morganti. Anthony is a professional photographer with a wealth of information in his videos. These are free to view and a great way to learn Lightroom.

    If you want to learn Lightroom basics, I can’t recommend his videos enough. He is thorough, interesting and easy to understand. Click HERE to see his instructional videos.

    An Example for Your Consideration

    NOTE – This is one of the most simple images captured on my relic of a point-and-shoot camera, the AS590 IS described above. It started as a JPG file so there was a limit to the amount of post processing I could do to the file. Even with that in mind, however, I think you will appreciate the following example.

    The photo below is the original photograph I took on a hike along the Toadstool Trail, at the Grand Staircase-Escalante National Monument, Utah. You can read more about that HERE:

    Toadstools at the Grand Staircase Escalante as the camera produced it

    This wasn’t how I remembered the scene when I arrived home so I decided to do some post processing. Unfortunately, the picture was taken with my least capable camera which is only able of saving information in jpg format. This is not the best file format to begin a post processing project, but it was all I had.

    I have set up my LR program to add a very modest amount of enhancements, called presets, each time I import a photo into the program. This saves some time and gives me a consistent baseline from which to start. This is the photograph after those modest alterations have been made.

    Toadstools at the Grand Staircase Escalante with minor Lightroom enhancements

    The scene as I remembered was much more dramatic than either of these photographs depict. I then edited (post processed) the image to more closely represent my remembered vision of that particular scene. This is closer to the real, rainy, cloudy view.

    Toadstools at the Grand Staircase Escalante with full Lightroom enhancements

    The point I am trying to get across, for those who want to move their creative, artistic, photographic skills up a notch or two and have hertetofore been reluctant, you don’t have to wait. You can get started today with almost any camera you have that captures digital images.

    I think most people would agree that the last picture is more artistic/dramatic/picturesque. It is also closer to the way I remember that hike.

    JPEGs from Drab to Fab – Maybe

    Full Disclosure: I am not a professional photographer. I like photography and it is a hobby. I am not an expert in either photography or post processing. Putting that aside, I do enjoy trying to capture the best photographs I can and to make them look as nice as possible using Adobe’s Lightroom and Google’s Nik Collection.

    I didn’t have anything approaching a “real” DSLR until last year when I purchased a Nikon D3300. I was going to rent some Fuji gear, but it was less expensive at that time to make an outright purchase of the D3300. We were planning our trip to Yosemite National Park and the Sierra Nevada Mountains in California. I wasn’t ready to spend a couple of thousand dollars on camera equipment; at least not yet.

    I currently own three cameras:

    • Canon PowerShot AS590 IS – This Camera is many years old, but keeps on ticking. It has been my companion whenever I go on a photographic expedition. It has an 8.0 megapixel CCD with 4x optical image-stabilized zoom.
    • Canon PowerShot SX50 HS – I purchased this camera for two reasons: 1) I wanted to see if I would enjoy shooting in the RAW format and doing post processing and 2) I wanted a camera with a lot of reach. This has a 50x optical zoom lens which, as Canon claims, goes from 24mm to 1200mm (35 mm equivalent). This is a step up from the AS590 above with 12.1 megapixels and it has helped with my bird identification hobby.
    • Nikon D3300 – This is my newest camera and comes closer to the full DSLR experience. I do enjoy this camera and I am still learning how to harness the full potential. It has a 24.2 Megapixel DX-format sensor and it came with the 18-55mm kit lens. It did as well as I expected during our trip to Bishop, CA and Yosemite National Park.

    With the above out of the way, let me just say that I have a lot of fun turning images from “drab to fab” using Lightroom with Googles’s Nik Collection and doing some intermediate post processing. Let’s just look at one example from my least advanced camera, the Canon AS590.

    We were hiking in Utah and on the way home, we stopped at the Grand Staircase–Escalante National Monument. It was a very gray day with rain threatening. The only camera I owned was my little Canon that was three years old at the time.

    Assessing the weather we were having, we knew we had little time to explore so we parked the car on the side of one of the named trails, the Toadstool Trail, and began to walk toward several beautiful rock formations.

    The toadstools are rock pillars with larger flatish rocks on top of them. Thus they look like (abstractly) toadstools. Below is one of the photographs that I took that day.

    Unprocessed photo of the toadstools
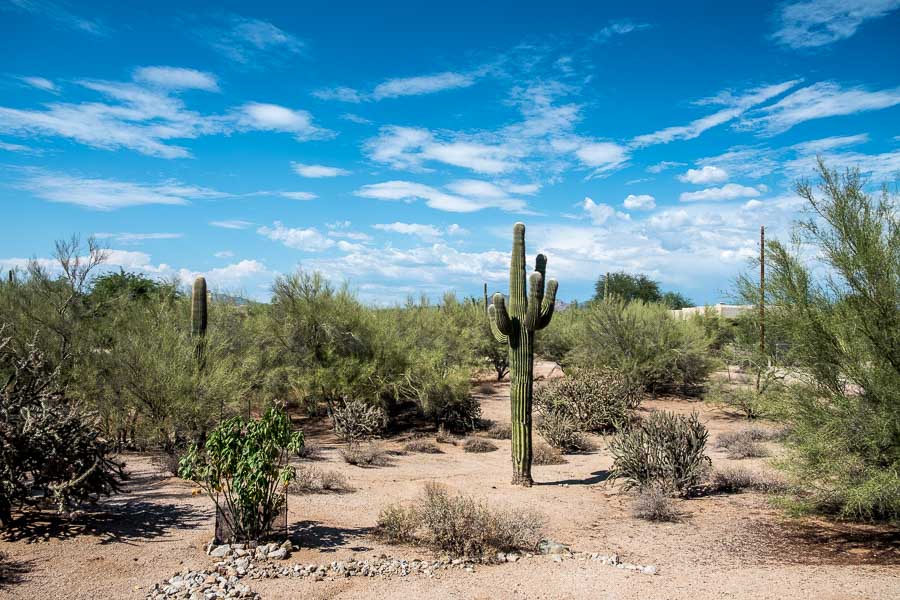
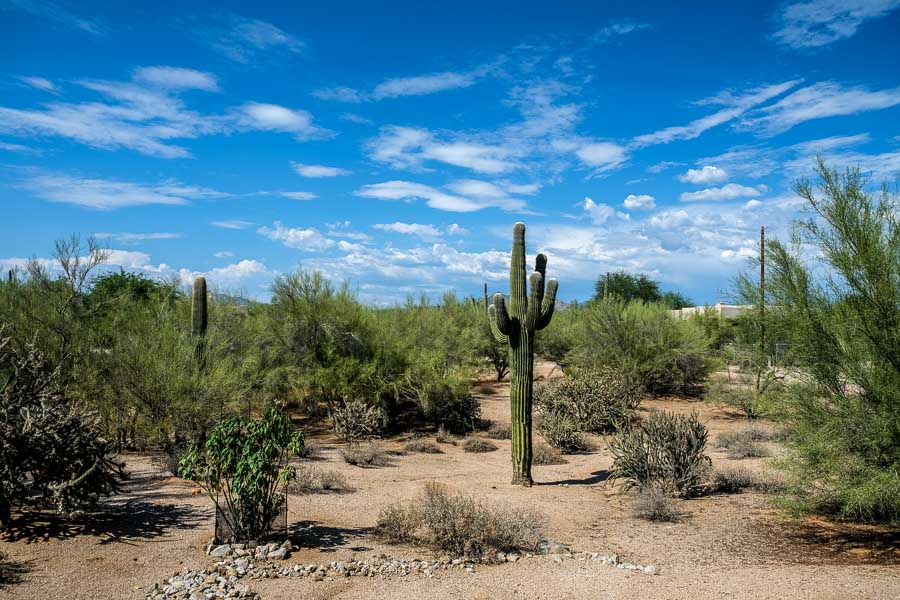
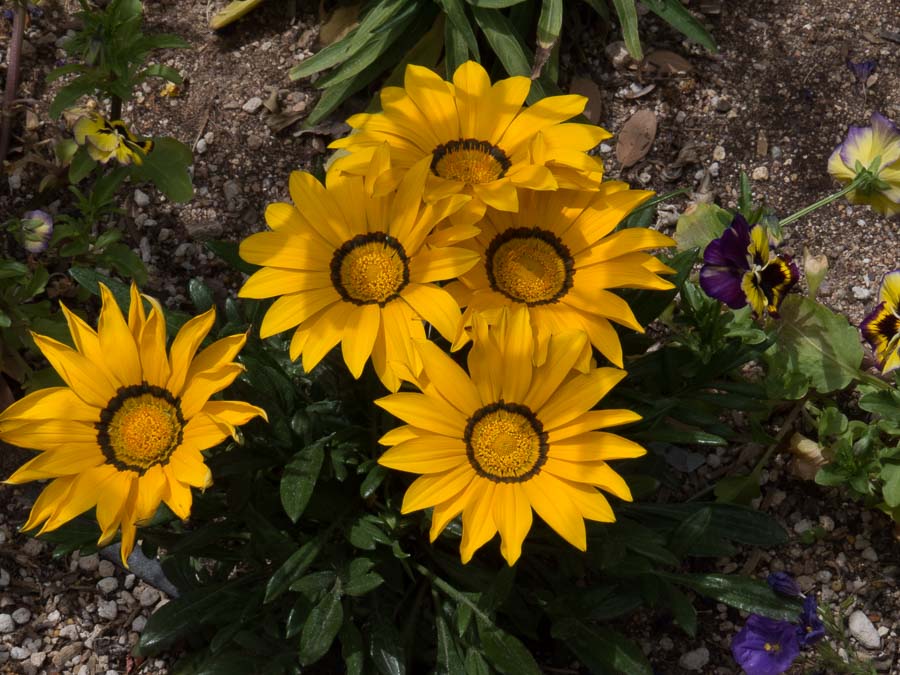
This JPEG photograph was taken with an AS590 IS and is unprocessed

    Understand that this is a JPG only image. It is straight out of camera (SOOC). If you read many of the punditori, they will tell you that there is not much that can be done with post processing and a JPG image and that may be true, but “not much” doesn’t mean that nothing can be done.

    I upload all my images to Lightroom (LR) because it is a good cataloguing tool. When done correctly, it is easy to organize and then find any given photograph you have taken. I follow blogs of photographers who have hundreds of thousands of images indexed in LR. I have less than 10,000 photos in my LR catalog, but I am working on it.

    When I took the photo above, the rocks appeared to have more red tones in them and there was much more contrast in the clouds. Unfortunately, my camera could not render all the nuances my eye was seeing. Although this is a JPEG image, I decided to process it as I would my RAW images.

    This is the final image after doing some work in LR. This is closer to what I remember seeing. I have enhanced the colors and contrast, but that’s what I want…a more beautiful photograph.

    Processed photograph of the toadstoolsThis is the same photograph as the one above with post processing done in Lightroom

    It is hard to compare the two photographs above when they are separated by the narrative. Although this will not provide much detail, the set of smaller images below should impart the basic idea.


    Side by side Comparison of the two images above
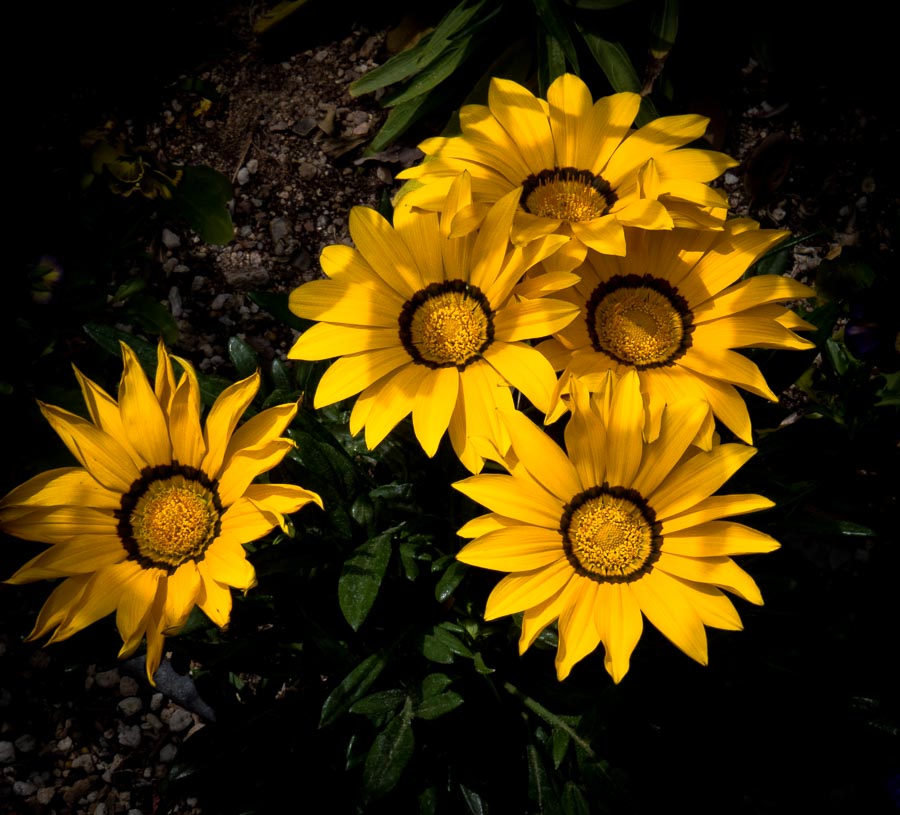
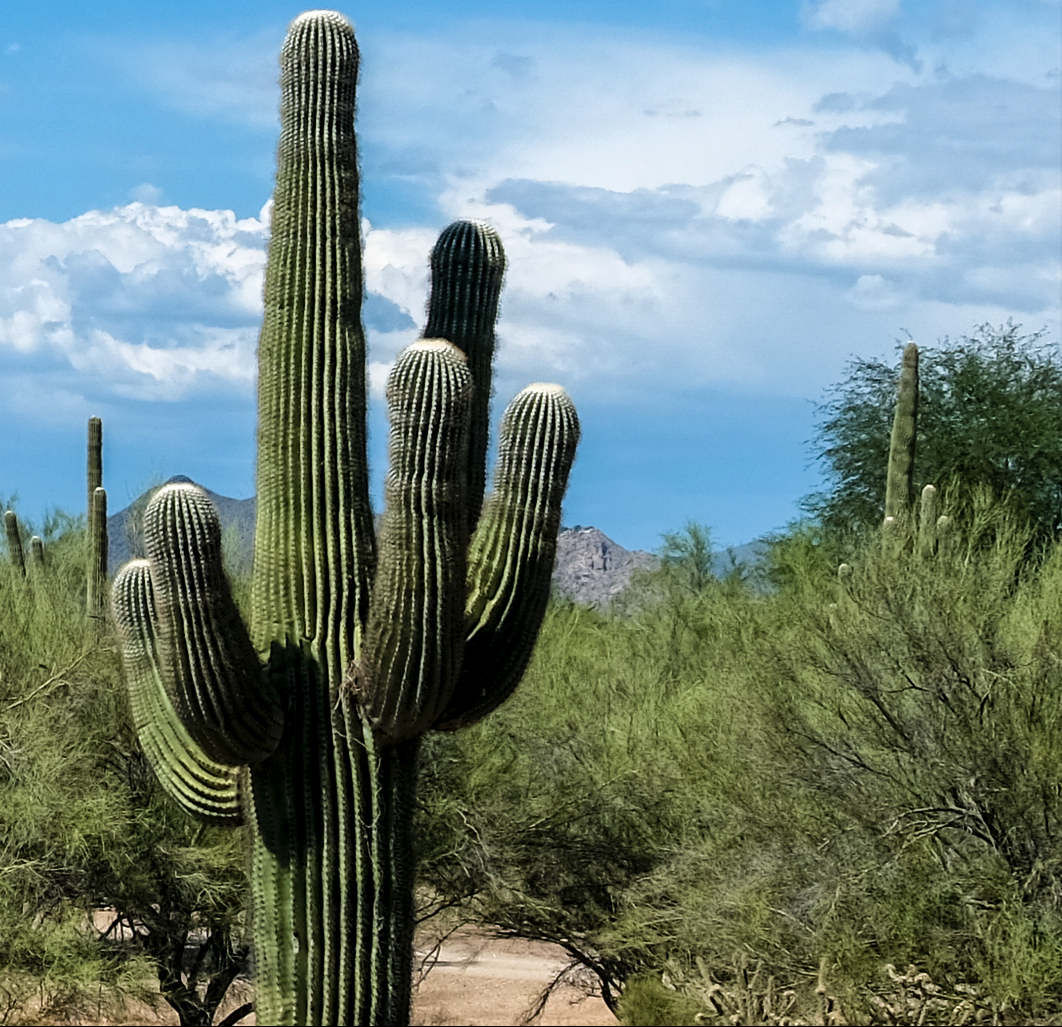
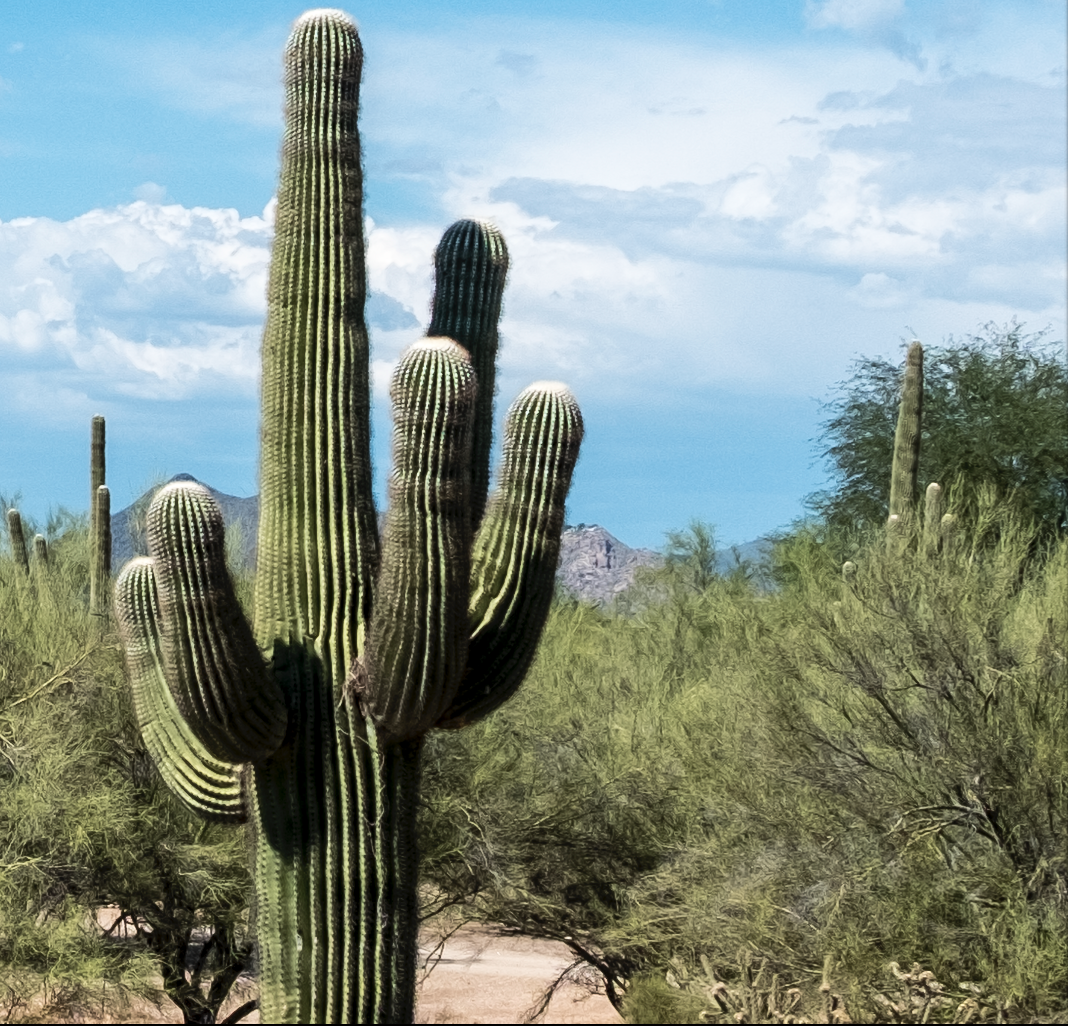
This is a side-by-side comparison of the two images above

    So…what do you think? Don’t you feel the photograph on the right is a more beautiful landscape than the shot on the left? Leave a comment or ask a question in the comment section.


    JBRish.com originally published this post
    All photographs are Copyright by Jeffrey B. Ross with ALL Rights Reserved

    See previous Photography posts HERE

    Cell Phone Photos and Lightroom

    I wanted to follow up on a previous post about using Lightroom (LR) with JPG (JPEG) photos.

    A friend was somewhat interested in learning about LR and she was wondering what effect LR would have on cell phone photographs. Quite frankly, that was a pretty good question since I had never used LR with photos taken on a cell phone.

    Contemporary cell phones can produce images that are quite good and they do have some large files, but do they allow the kind of manipulation that our previous JPGs enabled?

    My friend had a recent photo of her standard poodle that she wanted to improve. The original file is below. It is only 189 KB; not much data with which to work.


    Poodle Picture before editing in Lightroom

    The other requirement was to spend no more than five minutes working on the file. If you read my previous post (Lightroom for JPEG (JPG) Images), you understand that I am not a LR expert and perhaps just a bit more than a novice, but I thought I would give it a try.

    I am not saying the result was excellent, but I was able to recover some detail and darken the background to allow the dog to become the focal point. I could have used a vignette, but I did not think it would render as well.


    Poodle Picture after editing in Lightroom

    While it may not be superb, I do think even a reduced size cell phone picture shows the benefits of being corrected in Lightroom. What do you think? Leave a comment below!

    JBRish.com originally published this post

    Lightroom for JPEG (JPG) Images

    A couple of things up front

    • I have only been using Lightroom (LR) for a few months.
    • Until ten months ago or so, the only camera I used was a Canon PowerShot A590 IS point-and-shoot with 4X optical zoom
    • I now use a Canon SX50 HS with 50X optical zoom
    • Between the age of 22-30, I was very interested in photography and experimented with it as a way of artistic expression
    • For more than thirty years after that, photography only served to capture my personal historic record.
    • I am now trying to become a better photographer and learn the “art” of photography.

    Now that the preliminaries are out of the way, I want to make an important point. Once I decided to try my hand at becoming a more serious student of photography, all of my readings convinced me that I should be shooting in the RAW format. There seemed to be way more advantages than disadvantages.

    Since my only camera was the A590 with only 8 Megapixels to offer, I was stuck in the JPEG (JPG) zone. I wanted to experiment with the RAW format and a slightly more advanced camera and thus I purchased the 12.1 Canon SX50 HS which has served me well for the last ten months.

    Having decided to shoot more in the RAW format, I then needed the appropriate software to read, catalog and process those images. Along came the Adobe subscription plan for Lightroom (LR), Photoshop (PS) and other associated software for a subscription fee of approximately $10 USD per month. My path was clear. I began to learn LR and to work with RAW images.

    But wait…what about all those JPGs I shot with my A590? Could any of those pictures be improved with LR? I know JPGs don’t have as much embedded data to call on, but surely I could make some improvements. Well, I am here to show you a few results. I will be the first to admit that the differences in post processing JPGs will not be as dramatic as with RAW images, there are some significant gains to be had.

    Three years ago, I took my trusty little shooter (not the best term in this day and age) to the Ringling Brothers Barnum & Bailey Circus. Conditions were far less than ideal. The artificial lights were blaring every color when lit and often the arena was dark. Not only that, but elephants, co-stars of the show, are kind of a drab gray. I love elephants, but I have to call it as I see it.

    In any event, I took my camera and did the best I could. Everyone who has followed photography knows the adage: “The best camera is the one you have with you.” and thus I was using my best camera that evening.

    Below are several pictures I took that evening followed by the same picture processed in LR. Now remember what I said above. I am no expert at photography or post processing. I was, in my opinion, able to improve upon the original images using LR. You can decide for yourself. Just one note. The revised/improved images have been cropped so the picture may appear larger, but it is only because the crop has enlarged the remainder of the picture so that all photos are the same general size for posting on the website (+/-).

    Are you following along?

    This picture (below) is of the main entrance into the arena. Notice how dark the image is with lack of much detail in the corners.

    Main Side Entrance

    Notice the colors in this revised pictures and how the details pop a bit more.

    Main Side Entrance

    This performer riding the elephant wasn’t too bad a shot under these conditions, but that spotlight just to the right of the elephant’s foot is distracting as are those shiny lights above. There is no snap to the colors either.

    Female Performer Riding Elephant

    Notice how the contrast is improved. The distracting elements have been edited and the picture is much more pleasing. Now remember, nobody is claiming these are wonderful pictures. These are from my “historical record” and I am just trying to improve them using LR even with the introduction of a bit more “noise” in the scene.

    Female Performer Riding Elephant

    One of the problems I had in the darkened arena was shutter lag. So I often mis-timed the pictures. This picture was not framed correctly; too many distractions such as the trainer on the left and the objects in the bottom right. The overall color is dingy.

    Lion on Rotating Ball

    This is much improved with the crops, more appropriate color balance, etc.

    Lion on Rotating Ball

    Okay so you get the idea by now. No more narration just two more sets of before and after pictures. If anyone has any questions, post a comment and I will do my best to answer.

    Lion and Trainer

     
    Lion and Trainer

    Dragon and Fire

     
    Dragon and Fire