Hue wouldn’t believe my Fuji X T-2 Mishap

“Experience is a good teacher, but she sends in terrific bills.”   —   Minna Antrim

My adventure with the Fuji X T-2 started almost a year ago. I use the word adventure deliberately because that has been my experience. I have read two books about how to set up and use the X T-2, but like much technology, all the books in the world often cannot prevent the unpredictable from happening.

What I am about to explain is not technically the fault of the camera and I have to admit that all errors of the sort I am about to explain are clearly on the shoulders of the user; ME. I am merely writing this article so that perhaps others can avoid the frustration and/or disappointment that such occurrences can cause.

OK, by now you are probably wondering “What happened already!”

I recently returned from a trip to Portugal and Spain and of course I could not wait to download my photos to my computer once I got home. Imagine my surprise when all the JPEGs I shot with the X T-2 had a strong magenta cast to them. I was amazed since I had just used the camera prior to the trip without any problems. I couldn’t figure out what went wrong.

Here is what the JPEGS looked like once imported into Lightroom:


I don’t do much international travel. Usually I am headed for landscapes in and around national parks or similar venues in the United States. When I do that, I often take a computer with me and each evening I download and review the files to double check that all is working as anticipated. I can then see if there is dirt on the lens or sensors and whether the settings are basically correct.

Since I would be with a group on this trip and I was concerned about securing a computer when it was not with me and traveling light, I decided to leave the computer at home.

There was another aspect that should have been a clue to me, but I didn’t pay enough attention to it. I was “lulled” into a sense of security.

Let me explain: When looking through the viewfinder (EVF), there was a color cast to the live view image. I ignored it under the assumption that I had inadvertently adjusted the live view setting and that the pictures would not be affected. In the X T-2 references, I read about adjusting the EVF Color so I thought (my bad again!) that I had adjusted the EVF color inadvertently. This was a clue that I should have investigated further.

What “lulled” me into this mindset was the knowledge that the white balance was set to AUTO so how bad could it be? When I would quickly look at the LCD, it wasn’t that obvious to me that there was a color shift.

So imagine my surprise or disbelief when I arrived home and downloaded the pictures and saw that every JPEG had this rather overwhelming magenta color. I was truly puzzled. Trying to correct the JPEGs in Lightroom was very difficult, but what saved me in this instance was shooting RAW plus JPEG. The RAW files, although the finder images showed the same cast, were rendered perfectly once developed in LR.

I tried searching on the Internet and through two books and the owner’s manual to see what the problem might have been. I was like a sailor lost at sea. I really didn’t know what I didn’t know. Thank goodness Fuji has an excellent support team. I called them and within five minutes I had the answer to my problem and learned how to avoid it in the future.

APPARENTLY one of my settings was accidentally changed so that the white balance, although set to AUTO, was manually altered to change the hue of the light when a photo was captured. Like much advanced technology, the X T-2 provides a multitude of choices and with choices comes the possibility of more user errors or “accidental” system changes.

This is what I learned after my call to the support center:
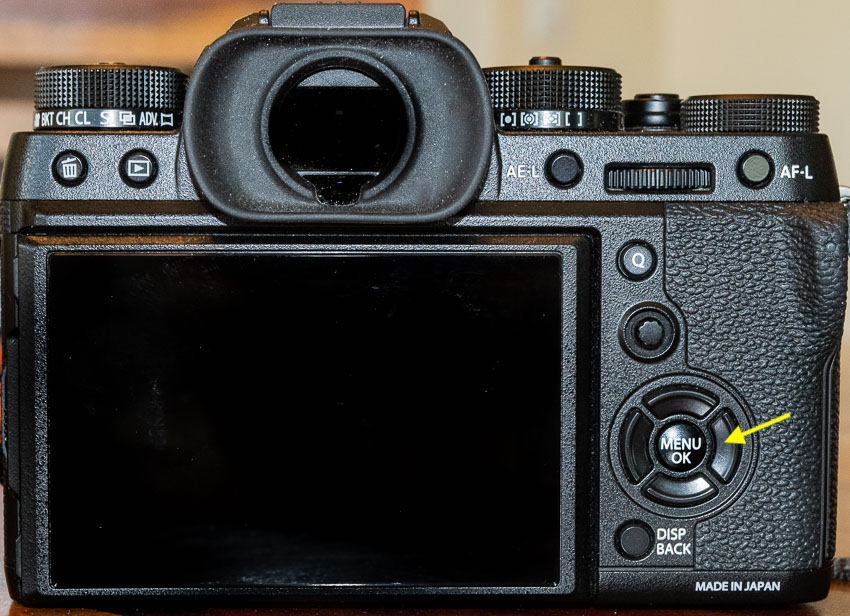


The right selector button (see arrow above) surrounding the rear menu botton is set to change white balance hue by default. There is no lock on this button so when removing the camera from the camera bag, pressing that function button launches an option to change the white balance default color. If not noticed the user can be into the indavertent change for two or three unintended presses before taking the next shot. If it happens when the camera is being placed into the bag and being turned off, it may go unnoticed.

Here is my Tenba bag with my cameras in it.
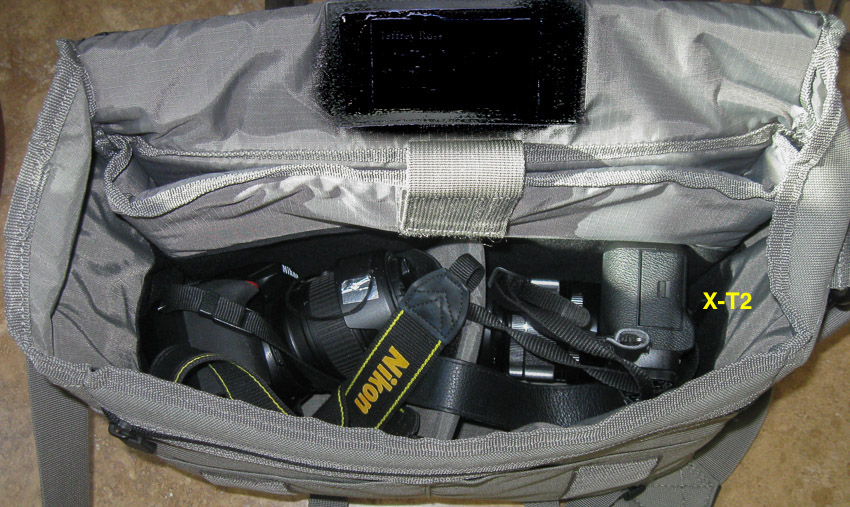


A closer look shows the arrow pointing to the area of the X T-2 where the selector button in question would be directly on the top side (see arrow below).
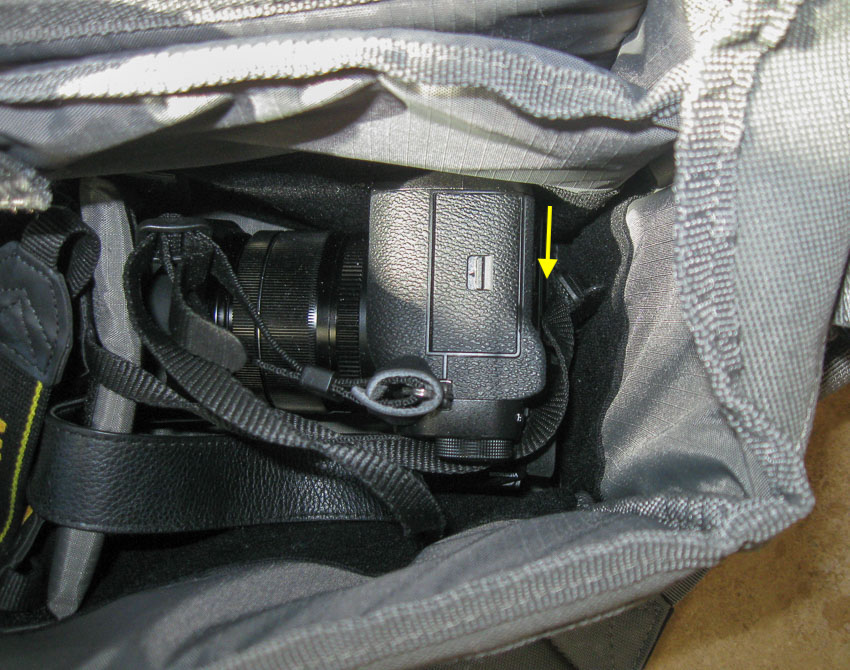


You can imagine how it was possible or perhaps probable that the selector button would be pressed when grabbing the camera to take it out of the bag for shooting which I did several times a day.

The technician at Fuji recommended that I change that partuclar function button to provide playback (a safe choice) which would remove that potential problem from my shooting workflow. Of course I also rebalanced the hue to the neutral position while I was making that change.

This was my fault for not knowing what options these buttons controlled and what pressing them can do. You can bet that I will be checking them all before my next shoot! Would it be better perhaps for these buttons to be undefined by default and allow the users to program them as they see fit once the camera arrives at their door?

Takeaways:

The Good:

I was shooting RAW plus JPEG which saved the pictures for me this time. I lost the ability to rely on the JPEGs for color reference, etc., but that was only a small price to pay (IMO) compared to what could have been.

I had a second camera with which I was much more familiar and I took “near duplicates” of the important shots so I had many more pictures to cover myself if the Fuji pics fell short. This goes back to my analog days of doing some professional gigs where I always had multiple cameras “just in case!”

The Bad:

I should have…

Spent more time and care assessing the photos via the LCD to check for color balance, sharpness, etc.

Understood the purpose of the function buttons before going out into the field. Interesting that I have been using it for several months and haven’t had this problem before.

Checked both cards in playback mode from time-to-time before getting home just to check on things.

Given more importance to taking my laptop with me. Perhaps this would have been the wiser thing, but I am still not certain about this one.


Overall, this was not a disaster and I did capture some nice shots. To paraphrase and borrow from an Oprah Winfrey quote:

“I am a photographer in process. I’m just trying like everybody else. I try to take every conflict, every experience, and learn from it. Life and photography is never dull.”

 
See more photography posts HERE and visit Jeff’s Instagram site HERE


**********


All original content on this blog is copyrighted by Jeffrey B. Ross with ALL Rights Reserved. While reference links back to JBRish.com are appreciated and encouraged, please acquire approval for any reproduction of original content from this website.

©Jeffrey B. Ross – 2018 – JBRish.com


Fuji X-T2: Firmware Update Procedure

One of the reasons to consider a Fuji camera is the ongoing support Fuji offers its users. Some camera manufacturers sell their camera to someone and unless there is a major problem, the firmware rarely gets updated.

Fuji, on the other hand, continues to support their buyers by improving the performance of their cameras by updating the software often with new capabilities. Yes, of course they use updates to correct poor performance or problems, but they don’t stop there.

Last week I learned that my relatively new Fuji X-T2 was eligible for a firmware update. I updated the firmware once before, but I couldn’t remember exactly how to do it and believe me, this is one area where nobody wants to make a mistake. I discovered that there are more warnings than a photographer can shake a stick at while I was reviewing the correct procedure.

I did what most people would do under the circumstance, and I went to the web to determine the best procedure.

Here is the procedure I used: (I give official documentation at the end and I would suggest your read that as well as watching the video.) I found comfort in reviewing the correct procedure from different sources just to make sure I understood it completely.

NOTE: There seem to be many steps, but it is easier than it appears. Just take your time and follow the instructions carefully. Please read this entire web page and information at the links before proceeding. It will give you confidence!

  • 1. I visited the Fuji firmware update page and located the latest firmware upgrade for my camera which was represented by the entry in the table on that web page:
  •  


    X-T2 Firmware update listing

  • 2. Since I knew I needed the update, I clicked on the Firmware-Download link and checked all the necessary agreements!
  •  

  • 3. The file, FWUP0010.DAT, was waiting for me in my downloads folder. I could see that it was 53.5 MB
  •  

  • 4. The next thing needed is a newly formatted memory card. There are couple of ways to do this. P. 203 of the User’s Manual provides the basic outline**:
  •  

      A. – Press the Menu button on the back of the camera and select User Setting (the wrench) –> Format
      B – Choose the slot that has the memory card you want to use and press MENU/OK.
      C – You have to confirm the choice. Naturally, all data on the card will be erased and lost so make sure there isn’t anything on the card that you will need. You can always select CANCEL at this point if you are unsure.
      D – If you are sure you want to format the card, choose OK and let the camera do its work.

    ** Fuji owner’s manual

  • 5. Once the card is formatted correctly, insert it into your computer and copy the .DAT file recently saved as the Fuji firmware download. Don’t change the name of the file or do anything to it other than copy it to the card.
  •  

    NOTE – The copied file needs to be in the main directory or root directory of the card. It should not be in a folder and technically, it should be the only thing on the card! (Just drag and drop it onto the newly formatted card and you will be fine)


  • 6. Eject the card from your computer and carefully insert it into the camera.
  •  

  • 7. Fuji warns users to make sure they are using a fully charged battery. You can insert the battery into your camera to check the power level. Make sure it is fully charged.
  •  

  • NOTE: Firmware updates can take some time. You never want to interrupt an update so be careful in handling the camera so that it is not turned off or disturbed in any way. I just put it down with the screen facing me and let it go through the paces. Fuji suggests that the update can take up to 90 seconds. When waiting for the process to complete, it may seem like a long time, but let it run through the steps. You will be notified when the process is completed.
  •  

  • 8. With the camera turned off, press and hold the DISP/BACK button while turning the camera on. You should see a menu indicating the firmware version. It may give both a body and lens version. Now you can let go of the button.
  •  

  • 9. Make sure BODY is selected and press the OK button on the back of the camera. Pressing the up button should highlight the word “OK.” DO NOT SELECT LENS as this upgrade is for the body’s firmware only.
  •  

  • 10. Press the OK button and the camera will update the firmware. When the update is complete, the screen will show the current firmware (updated) version.
  •  

  • 11. Fuji recommends that you turn off the camera at this point and check the firmware version; good idea. (see step 8 above). It should list the updated version.
  •  

  • 12. Fuji also suggests that once you have checked the firmware version and the upgrade has been successful, you should reformat the memory card so that it can be used for photos and doesn’t become a source of confusion later.
  •  

Here is a video offered by Fuji if you prefer learning that way.

NOTE: The video seems to imply that users should remove the lens, but I did not find that necessary with my X-T2 and the video actually addresses that particular issue so don’t be concerned. You can leave the lens in place with the X-T2

You can also read the Fuji web page detailing the complete procedure which is basically what I outlined above.

I hope newcomers to the Fuji system, especially the X-T2 find this information useful!


**********


All original content on this blog is copyrighted by Jeffrey B. Ross with ALL Rights Reserved. While reference links back to JBRish.com are appreciated and encouraged, please acquire approval for any reproduction of original content from this website.

©Jeffrey B. Ross – 2017


Fuji X T-2: The Magic of Beginnings

“And suddenly you know: It’s time to start something new and trust the magic of beginnings.” — Meister Eckhart

You might have read about my near horror story in a previous blog post, Fuji X T-2: When Support Helped Save a Vacation, but all turned out relatively well after the close call. This was my first major expedition with a nearly brand new Fuji X T-2 and I was anxious to see how it would perform.

I haven’t had a “state-of-the-art” camera in nearly fifty years. I had been using point-and-shoots with only a moderate interest in photography. I was generally a documentarian. I am now embarking upon the development my creative eye.

“You are never too old to set another goal, or to dream a new dream.” – C. S. Lewis

When we arrived in Portland, Oregon, the air was acrid and ash was falling from the sky and landing on our luggage due to the surrounding wildfires. We acquired an automobile and headed toward the coast. By the time we arrived in Astoria, OR, the sun was low in the sky; a saturated light grey. Little did we know that the coast was often grey and/or foggy.

One of my favorite photographs from this trip, was the very first one I captured in Astoria at the end of our first day. Our room was very near the Columbia river and the Megler Bridge. The area was, therefore, a waterfront and had many of trappings expected in such an environment.

As I looked outside the window of our room, I could see several boats that were in disrepair and in dry dock. The lure of these boats was probably the same as that which brings photographers to abandoned buildings. These boats were old and may not have been “sea worthy,” but they had character.

The sun was getting lower by the minute. I grabbed the camera and walked to the area with the retired Ladies of the River. One boat in particular caught my attention because it was stately even when adorned with decay.

I took a couple of pictures with the hope that I could capture the essence of the evening and the feeling I had standing next to this once dignified, yet working class boat.


A river boat in dry dock along the Columbia River, Astoria, OR

My first attempt with the X T-2 on our trip to the Oregon coast

********************
Metadata

File Name: DSCF0045.RAF
Capture time: 5:24:45 PM
Capture date: September 5, 2017
Exposure: 1/750 sec @ f/5.6
Focal Length: 18mm
ISO: 100
Fujifilm X-T2
Lens: 18-55mm f/2.8-4 R LM OIS
Edited in Lightroom

Fujinomics – X T-2 and Polarizing Filter

B&W

Those JBRish readers who have been following my photography exploits, know that I recently purchased a Fuji X T-2. Until a couple of weeks ago, I did little more than take some test shots and “getting to know” the camera photographs.

That changed on September 5th when my wife and I left our Sonoran Desert home and headed for the coast of Oregon with plans to visit Crater Lake before heading home. I learned a great deal about photography in general, my new Fuji X T-2 and my Nikon D3300. Needless to say, there was a whole lot of learning going on.

With the understanding that I was heading for the ocean and lake, I wanted to purchase a polarizing filter for the X T-2. I think anyone getting involved with photography has ambitious plans/dreams and I am no different. My intent is to grow my Fuji system to include some of the telephoto lenses. Research indicated that the lens(es) in which I had some interest (FUJINON XF100-400mmF4.5-5.6 R LM OIS WR – for example) take a 77mm filter size.

My X T-2 has the XF 18-55mm f/2.8-4 R LM OIS zoom kit lens with a 58mm filter thread. Naturally I want to minimize my expenditures and maximize the use of equipment I own or will soon own, so I immediately thought of purchasing a 58 to 77mm step up ring to use the filter on a number of lenses.

One of my concerns was the problem of vignetting around the edges. I called Fuji and asked if I used a polarizing filter with a 58-77mm step up ring on the 18-55mm kit lens would I experience vignetting. The Fuji techs didn’t think so. I then called the online photographic equipment retailer and asked their sales assistant and I received the same answer. Not being satisfied, I also called the filter manufacturer’s US office and they too indicated that they thought vignetting would be unlikely.

With those assurances, I purchased these items:

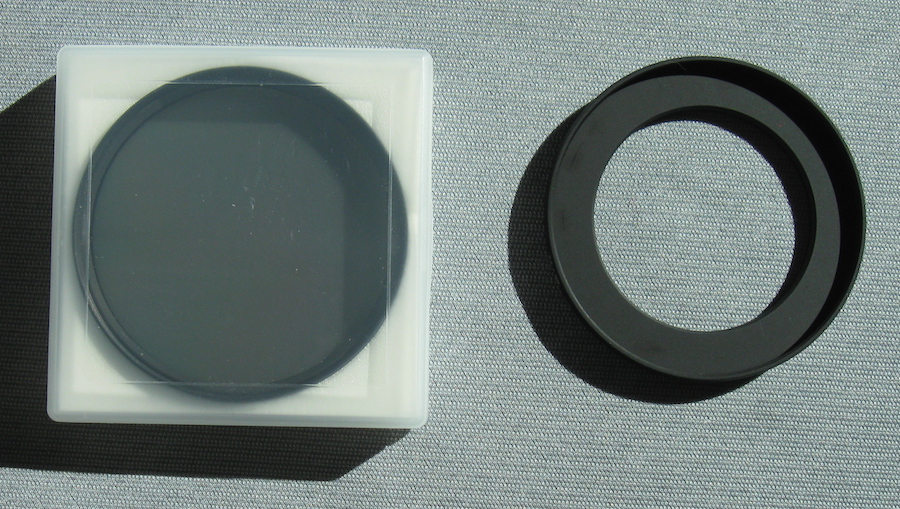
B&W 77mm Circular Polarizer MRC Filter and the B&W 58-77mm Step-Up Ring

You might be wondering why I selected this particular filter… These filters received very good reviews from those who have purchased them. These are not inexpensive filters. They are manufactured in Germany which has a reputation for quality photography products and engineering. Lastly, this particular filter was recommended by a professional photographer I follow online. Purchasing any equipment is never a “sure thing,” but with all of the above, I figured the deck was stacked in my favor.

Naturally, as soon as I received these accessories, I took them outside and shot a few frames with them and I did not see any vignetting on the sample images taken at a variety of focal lengths being sure to capture some with the lens fully extended and fully retracted. Based on these trail shots, I was fairly confident that the prospective filter and step up ring would meet my requirements.

I am recently back from the trip and I have only previewed the shots taken with the polarizing filter and step up ring and, at first glance, I don’t see any vignetting. This was a learning experience for me as I was able to spend significant time with the X T-2 and polarizing filter combo.

HERE ARE SOME TAKEAWAYS:

  • I wasn’t prepared for the surface area on a 77mm filter. It is HUGE.
  • I wasn’t prepared for the amount of dust and other “things” that were attracted to the filter.
  • I was prepared with my Giotto Q-ball (Rocket Blaster) and I was glad I had it. I used it every time I took the camera out of the bag. BTW, this was one of the best purchases I ever made regarding my photography gear; reasonably priced and used every time I use my cameras!

Giotto Q-ball blaster

  • I was prepared with a good number of lint free, microfiber cloths made specifically for cleaning camera lenses.
  • I was pleased with the beautiful rendering of the colors with the camera/filter combination.
  • I was surprised at how much light can be “lost” by using the polarizing filter at one of its stronger settings. When I use the word surprised, I don’t actually mean surprised because all the literature pointed to the reduction in f-stops, but I didn’t appreciate how much of a difference it would actually make in situations where there is not strong daylight.

** NOTES ** – I did not purchase a lens hood to fit on the lens with the polarizing filter because of my concern about the vignetting. I am going to try to find a lens hood and appropriate lens cap to help keep dust off of the filter.

I previously explained how I like to have a tethered lens cap and let me just say that had my lens cap not been tethered, I would have dropped it numerous times and perhaps lost it. This is my issue since I have a particular shooting style re: hiking as I shoot! You can read about my tethering of the Fuji lens cap in this article:

Fuji X T-2: Making the Lens Cap Stay Put on the Kit Lens

I will write more about my photographic exploits with my X T-2 and other gear. Check back for more articles and if you have any questions, leave them in the comment section below.

Read more photography posts HERE:


**********


All original content on this blog is copyrighted by Jeffrey B. Ross with ALL Rights Reserved. While reference links back to JBRish.com are appreciated and encouraged, please acquire approval for any reproduction of original content from this website.

©Jeffrey B. Ross – 2017


Photography: The Fuji X-T2 has arrived (Strap and Lens)


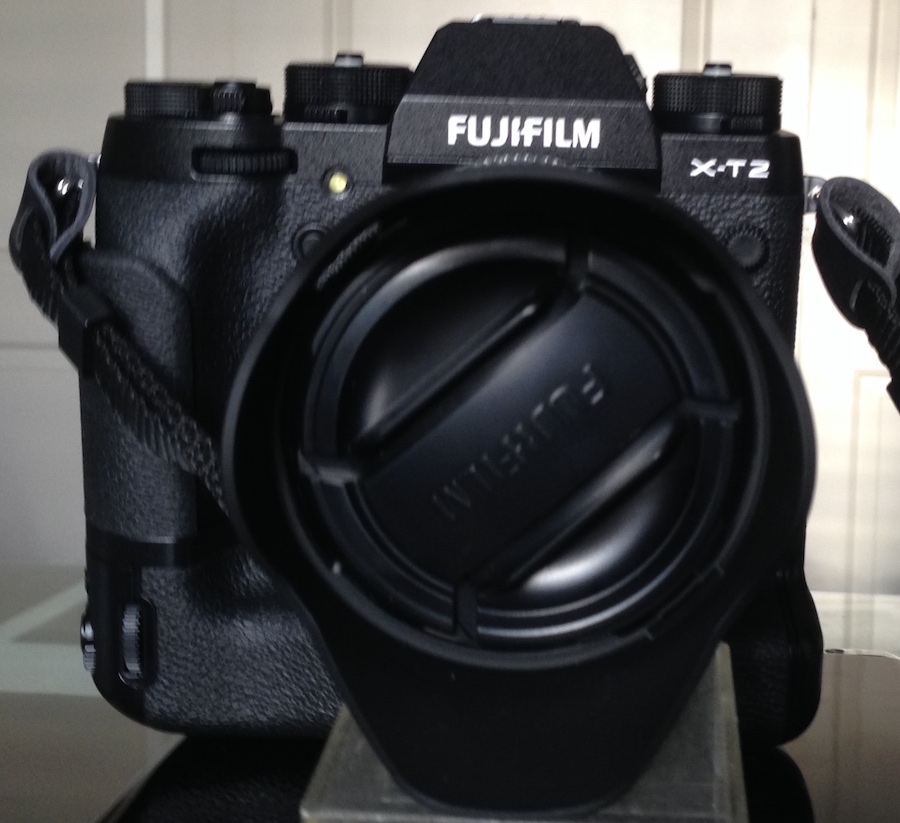
The Fuji X-T2

Hello JBRish readers. I have to say that my postings may be somewhat limited over the next several weeks as my new Fuji X-T2 camera has arrived and I am dedicating myself to learn how to use it.

NOTE – My apologies to anyone who isn’t like me. I celebrate everyone who has a different learning style, but I am basically a concrete, sequential person. What that means is that I like to learn everything in a logical, step-by-step progression with details and with lots of reviewing. This is my story of how I am trying to improve my photography skills and learning how to use a professional level camera; the Fuji X T-2.

There are so many unboxing videos for all types of cameras out there. I am going to skip that part and get right down to what I consider to be the “nitty gritty.”

When you buy a modern digital camera, it really isn’t a camera. The word digital is the giveaway. It is a computer that takes pictures. One look at this piece of gear and you know you have something special in your hands. Something serious that demands your attention.

It is easy to be overwhelmed and I thought that perhaps it would be difficult for me to get up and running quickly without assistance. Manufacturers don’t provide owner’s manuals that are very thorough. I am not complaining. I understand that the camera industry today is quite competitive and that everything is being done to cut costs. Still, we need to learn how to use the gear the best way we can. The Internet is a good resource, but it is spotty and doesn’t always have the information needed.

Let me offer some words from one who has, as of now, been down the path before:

  • 1 – When you first get a new camera, unbox it in a clear area where everything can be laid out in front of you. There is usually a page in the owner’s manual that shows what is included in the box so take everything out of the package and review all items to make sure all the pieces are there.
  • 2 – Next, let’s talk about the camera strap! I generally don’t go in for fancy camera straps and I make do with the straps that come with the camera and use carabiners to keep things organized and to stop them from banging into each other. The strap that came with the X T-2 is a bit above par, but not exciting or extraordinary overall. If I decide later on that a different strap is needed, I will consider it at that point.

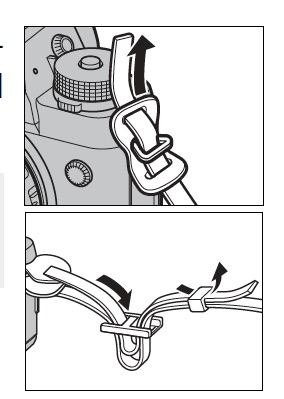
Here is a picture from the manual describing the final two steps explaining how to attach the strap to the camera:


Attach the camera strap
Picture courtesy of Fuji X T-2 Camera Manual, v.2.10

I may not be the smartest bulb on the tree (so to speak), but I really needed a bit more direction than the information in the manual to make sure that the strap is firmly and securely attached. Nobody wants their camera falling off of their body to go smashing to the ground.


As an example:
That piece of plastic in the middle (shown in the bottom frame), the one with the two square-ish sections with the bar in between appears to have “teeth” on one of the faces/sides when you are actually holding it. This doesn’t show in the picture. Do the “teeth” face inward or outward?

I found the video below which presents a pictorial explanation. Truth must be told, I had to watch the video three times to get it done exactly as they explain!

The next logical step after attaching the strap might be to attach the lens.

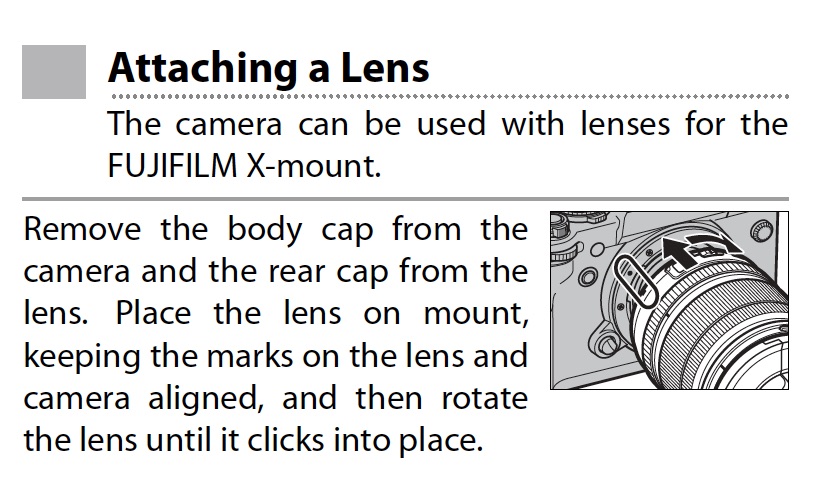
Here is the picture and description from the manual:


Attach the lens to the camera

Picture courtesy of Fuji X T-2 Camera Manual, v.2.10

The marks” to which they refer really cannot be seen well unless both the camera body cap and the rear cap from the lens are removed. Then, you need to line up the red dots and twist the the lens until you hear the click. It is not easy to discern the precise position using the graphics in the owners manual (IMHO).

One reason why users want to do this quickly is to prevent dust form getting on the sensor and thus leaving spots on the images. Do this in as dust-free environment as possible.

This was only the first few steps in getting started. We aren’t quite at the point where we get to take some pictures, at least not yet.

The story will continue…

To read more JBRish photography posts, click HERE!


**********


All original content on this blog is copyrighted by Jeffrey B. Ross with ALL Rights Reserved. While reference links back to JBRish.com are appreciated and encouraged, please acquire approval for any reproduction of original content from this website.

©Jeffrey B. Ross – 2017