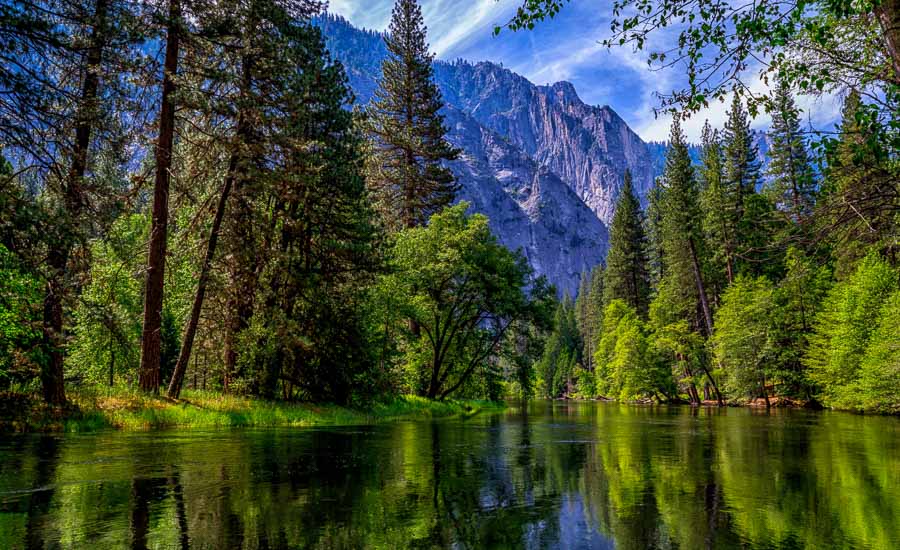
Photography – Don’t Let Your JPEGs Grow Up To Be Dull

Take a Photograph from Bland to Grand

Followers of JBRish know that one of my interests and near passion is photography. I do enjoy trying to capture the best images possible with the equipment I have. I am an enthusiastic amateur and freely admit that I have much to learn.

My main camera for a long time was a Canon point-and-shoot such as the Canon PowerShot A590 IS [ Reivew here ] which is an 8 mp model. FYI – The industry is currently centered around a median size of approximately 24 mp. By today’s standard, this is a relic!

That camera has gone on many trips from Peru to Yosemite National Park. I have taken thousands of pictures with it and I still use that camera under certain circumstances and for the example photos below.

Enter the Canon PowerShot SX50 HS [ Review Here ]

This camera has 12.1 megapixels which is a fair jump from the AS590 mentioned above. That is not the reason I bought the SX50 HS however. It had two very important features 1) it had a long zoom for wildlife photographs. I enjoy birding and this would help me identify birds I saw and 2) it could shoot in the RAW format.

For those who don’t know what the RAW format is, you can find out more at the link below, but I will try to explain this as simply and as non-technically as possible. I am sure I am leaving important information by the side of the road, but I think most readers will get the idea.

RAW VS JPEG OVERVIEW – Video

What a digital camera does…

A digital camera records a scene in code. It doesn’t record the scene like a film camera would record it. Instead, it has millions of dots (pixels) and it “interprets” the scene and colors these millions of dots to replicate the view that the photographer wants to save. The camera writes this information to a file, usually in jpg (JPEG) format. Once that is done, the built-in software interprets how the colors red, blue, yellow, green, etc. represented when someone opens the file. This information is written in code so the camera can record it in as little space as possible and then interpret it visually when a user wants to view the photograph.

When shooting in RAW format, the camera records the scene as it is and allows the photographer to decide how dark the darks are, how bright the highlights should be, how exactly the colors will be represented, etc. In other words, instead of enabling the camera to “interpret” the scene, the photographer gets to interpret the scene. This is a good thing because cameras may not be able to capture the full spectrum of lights and darks, reds and blues, etc. in a specific situation. The photographer can then modify many aspects of the digital image to more closely represent what he or she saw, or take it in a totally creative direction. The drawback is that it takes extra steps to work with RAW data and it can be time consuming. (We will skip the philosophical discussions at this point)

What Photo Editor Should I Use?

That is a very good question and one with which I struggled when I first became interested in working with my photos once they were moved to the computer and out of the camera. This is called post processing. After trying several programs like iPhoto, Photoshop Essentials, and a few other free offerings, I decided to subscribe to the Adobe Cloud suite which includes Lightroom (LR), Photoshop (PS), Camera RAW and more. If you can afford the less than $10 per month subscription plan, I highly recommend it. I do most of my post processing in LR. I do plan to learn how to make better use of PS, but at this point I don’t find LR too limiting.

NOTE – I learned Lightroom predominantly from Anthony Morganti. Anthony is a professional photographer with a wealth of information in his videos. These are free to view and a great way to learn Lightroom.

If you want to learn Lightroom basics, I can’t recommend his videos enough. He is thorough, interesting and easy to understand. Click HERE to see his instructional videos.

An Example for Your Consideration

NOTE – This is one of the most simple images captured on my relic of a point-and-shoot camera, the AS590 IS described above. It started as a JPG file so there was a limit to the amount of post processing I could do to the file. Even with that in mind, however, I think you will appreciate the following example.

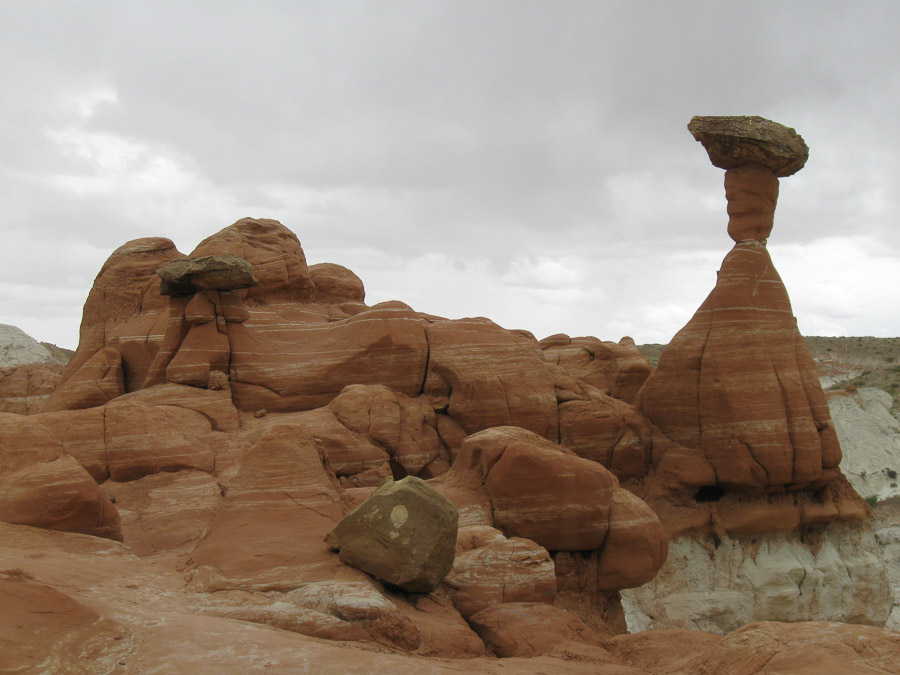
The photo below is the original photograph I took on a hike along the Toadstool Trail, at the Grand Staircase-Escalante National Monument, Utah. You can read more about that HERE:
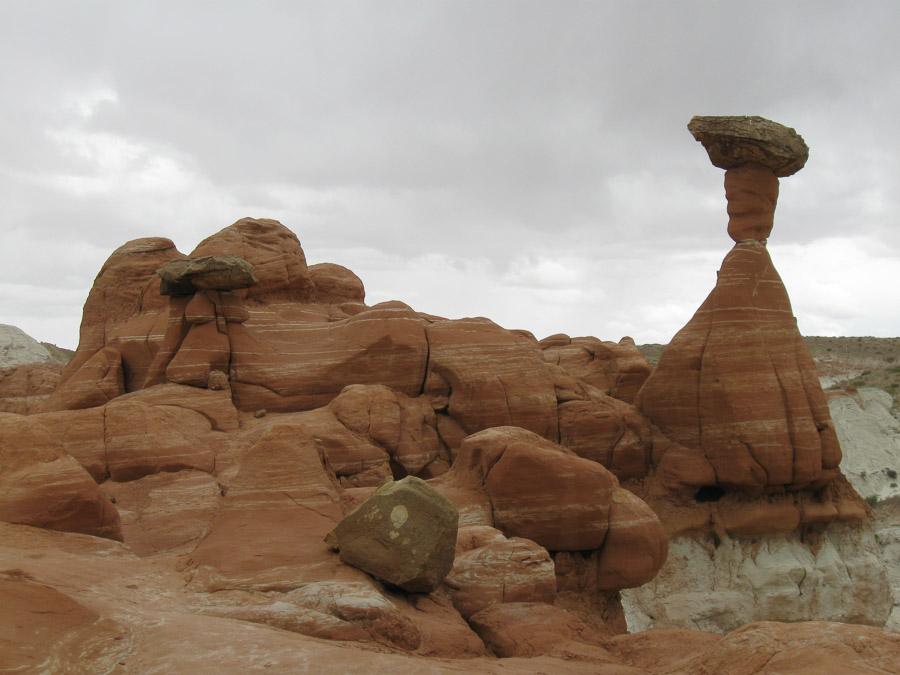
Toadstools at the Grand Staircase Escalante as the camera produced it

This wasn’t how I remembered the scene when I arrived home so I decided to do some post processing. Unfortunately, the picture was taken with my least capable camera which is only able of saving information in jpg format. This is not the best file format to begin a post processing project, but it was all I had.

I have set up my LR program to add a very modest amount of enhancements, called presets, each time I import a photo into the program. This saves some time and gives me a consistent baseline from which to start. This is the photograph after those modest alterations have been made.
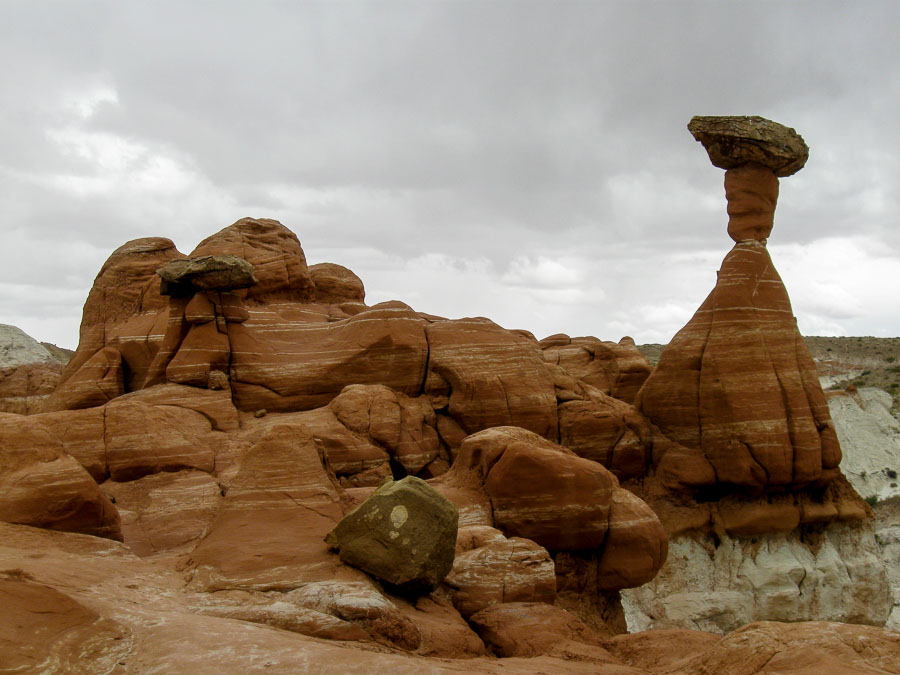
Toadstools at the Grand Staircase Escalante with minor Lightroom enhancements

The scene as I remembered was much more dramatic than either of these photographs depict. I then edited (post processed) the image to more closely represent my remembered vision of that particular scene. This is closer to the real, rainy, cloudy view.
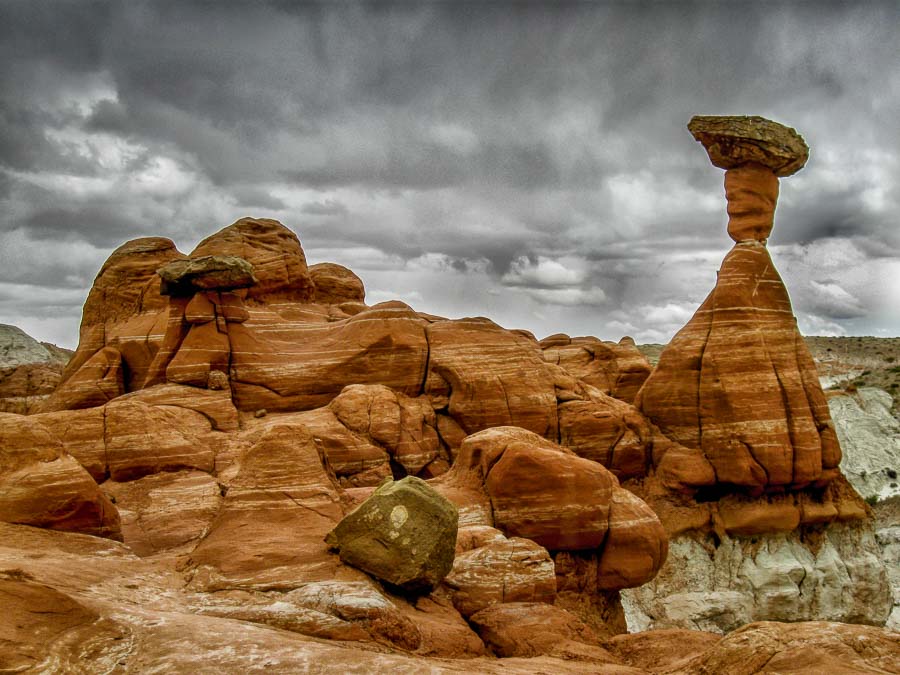
Toadstools at the Grand Staircase Escalante with full Lightroom enhancements

The point I am trying to get across, for those who want to move their creative, artistic, photographic skills up a notch or two and have hertetofore been reluctant, you don’t have to wait. You can get started today with almost any camera you have that captures digital images.

I think most people would agree that the last picture is more artistic/dramatic/picturesque. It is also closer to the way I remember that hike.
JPEGs from Drab to Fab – Maybe

Full Disclosure: I am not a professional photographer. I like photography and it is a hobby. I am not an expert in either photography or post processing. Putting that aside, I do enjoy trying to capture the best photographs I can and to make them look as nice as possible using Adobe’s Lightroom and Google’s Nik Collection.

I didn’t have anything approaching a “real” DSLR until last year when I purchased a Nikon D3300. I was going to rent some Fuji gear, but it was less expensive at that time to make an outright purchase of the D3300. We were planning our trip to Yosemite National Park and the Sierra Nevada Mountains in California. I wasn’t ready to spend a couple of thousand dollars on camera equipment; at least not yet.

I currently own three cameras:

  • Canon PowerShot AS590 IS – This Camera is many years old, but keeps on ticking. It has been my companion whenever I go on a photographic expedition. It has an 8.0 megapixel CCD with 4x optical image-stabilized zoom.
  • Canon PowerShot SX50 HS – I purchased this camera for two reasons: 1) I wanted to see if I would enjoy shooting in the RAW format and doing post processing and 2) I wanted a camera with a lot of reach. This has a 50x optical zoom lens which, as Canon claims, goes from 24mm to 1200mm (35 mm equivalent). This is a step up from the AS590 above with 12.1 megapixels and it has helped with my bird identification hobby.
  • Nikon D3300 – This is my newest camera and comes closer to the full DSLR experience. I do enjoy this camera and I am still learning how to harness the full potential. It has a 24.2 Megapixel DX-format sensor and it came with the 18-55mm kit lens. It did as well as I expected during our trip to Bishop, CA and Yosemite National Park.

With the above out of the way, let me just say that I have a lot of fun turning images from “drab to fab” using Lightroom with Googles’s Nik Collection and doing some intermediate post processing. Let’s just look at one example from my least advanced camera, the Canon AS590.

We were hiking in Utah and on the way home, we stopped at the Grand Staircase–Escalante National Monument. It was a very gray day with rain threatening. The only camera I owned was my little Canon that was three years old at the time.

Assessing the weather we were having, we knew we had little time to explore so we parked the car on the side of one of the named trails, the Toadstool Trail, and began to walk toward several beautiful rock formations.

The toadstools are rock pillars with larger flatish rocks on top of them. Thus they look like (abstractly) toadstools. Below is one of the photographs that I took that day.

Unprocessed photo of the toadstoolsThis JPEG photograph was taken with an AS590 IS and is unprocessed
Understand that this is a JPG only image. It is straight out of camera (SOOC). If you read many of the punditori, they will tell you that there is not much that can be done with post processing and a JPG image and that may be true, but “not much” doesn’t mean that nothing can be done.

I upload all my images to Lightroom (LR) because it is a good cataloguing tool. When done correctly, it is easy to organize and then find any given photograph you have taken. I follow blogs of photographers who have hundreds of thousands of images indexed in LR. I have less than 10,000 photos in my LR catalog, but I am working on it.

When I took the photo above, the rocks appeared to have more red tones in them and there was much more contrast in the clouds. Unfortunately, my camera could not render all the nuances my eye was seeing. Although this is a JPEG image, I decided to process it as I would my RAW images.

This is the final image after doing some work in LR. This is closer to what I remember seeing. I have enhanced the colors and contrast, but that’s what I want…a more beautiful photograph.

Processed photograph of the toadstoolsThis is the same photograph as the one above with post processing done in Lightroom

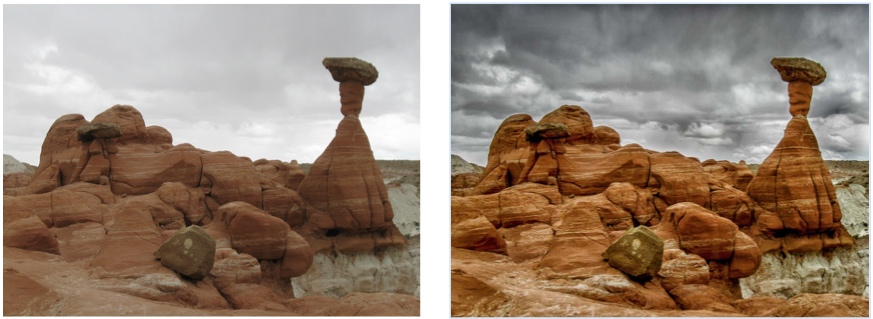
It is hard to compare the two photographs above when they are separated by the narrative. Although this will not provide much detail, the set of smaller images below should impart the basic idea.


Side by side Comparison of the two images aboveThis is a side-by-side comparison of the two images above
So…what do you think? Don’t you feel the photograph on the right is a more beautiful landscape than the shot on the left? Leave a comment or ask a question in the comment section.


JBRish.com originally published this post
All photographs are Copyright by Jeffrey B. Ross with ALL Rights Reserved

See previous Photography posts HERE

The Serendipity of Photography

Planning can often improve one’s ability to capture the best images when on a photography excursion. Having a checklist with the correct equipment and ancillary supplies is also important in that process. Checking the weather is also a must if the journey is to be outside.

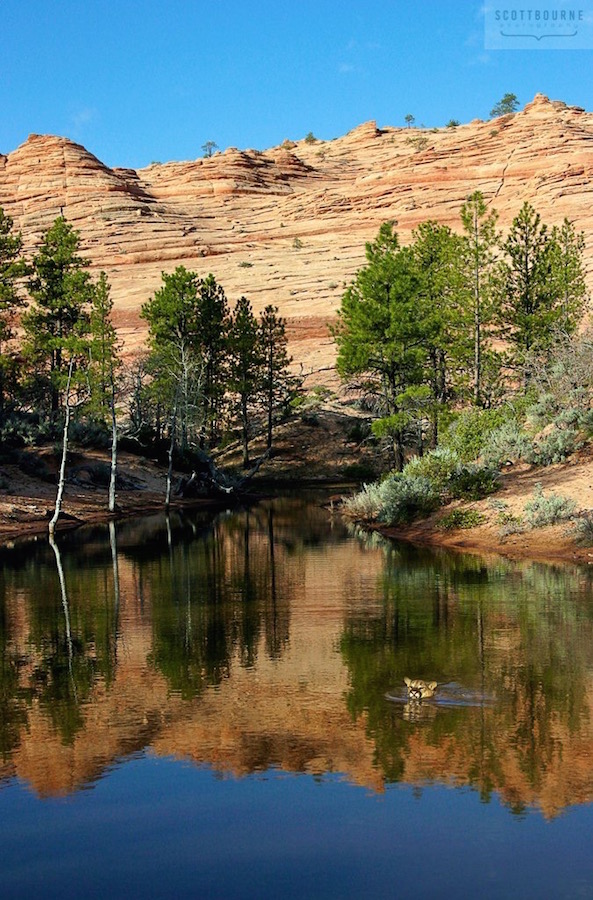
Plan all you want, but every once in a while your best shot, or at least a very good shot, might be captured in a moment of serendipity that could never have been planned.

Scott Bourne, bird and nature photographer, had such an experience and he posted it on his twitter feed on February 11, 2017. This is the picture he took:


Mountain Lion
A unplanned WOW moment captured

Also keep in mind, that being prepared when the opportunity presents itself is also the key.

“Chance is the first step you take, luck is what comes afterward.” — Amy Tan

Picture Via Scott Bourne


See previous Photography posts HERE

STATUS QUOte – Photography – 20170127


Photography Quote

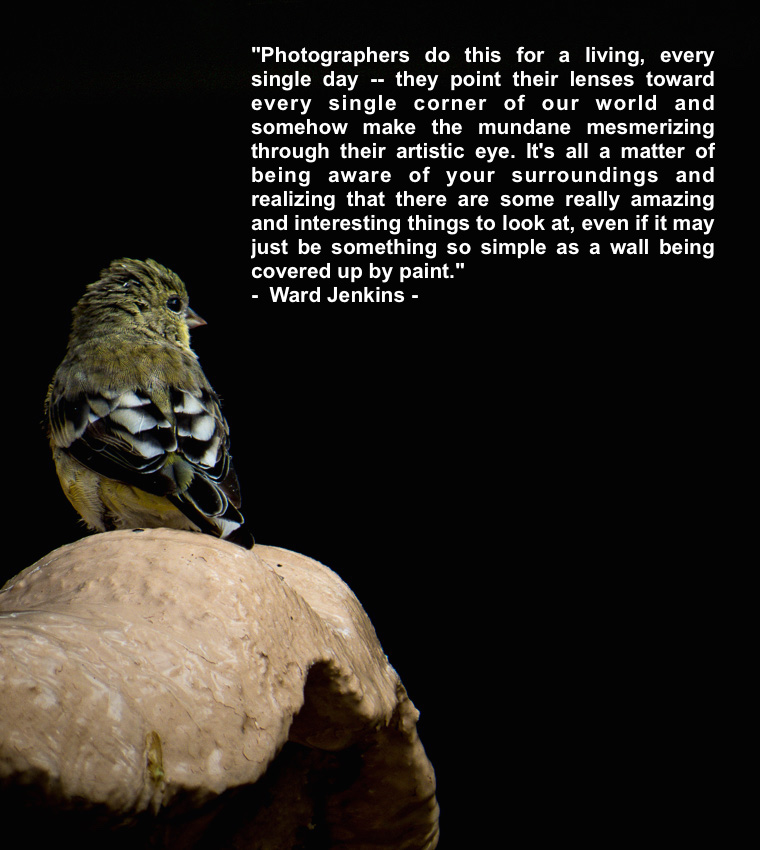
Bird on Fountain at Casa de San Pedro Bed & Breakfast:, Hereford, Arizona - by J. Ross


“Photographers do this for a living, every single day — they point their lenses toward every single corner of our world and somehow make the mundane mesmerizing through their artistic eye. It’s all a matter of being aware of your surroundings and realizing that there are some really amazing and interesting things to look at, even if it may just be something so simple as a wall being covered up by paint.”
– Ward Jenkins –

** – Photograph Notes – **
Photograph Copyright by Jeff Ross – ALL Rights Reserved
A Finch on Fountain at Casa de San Pedro Bed & Breakfast, Hereford, Arizona

File Name: 2395-2.CR2
Capture time: 4:33:57 PM
Capture date: June 9, 2015
Exposure: 1/100 sec @ f/6.5
Focal Length: 215mm
Canon PowerShot SX50 HS


JBRish.com originally published this post

See previous Photography STATUS QUOtes HERE

See Jeff’s other photographs on Instagram

Reflection of Half Dome – Year of Yosemite (YOY) – Day 198

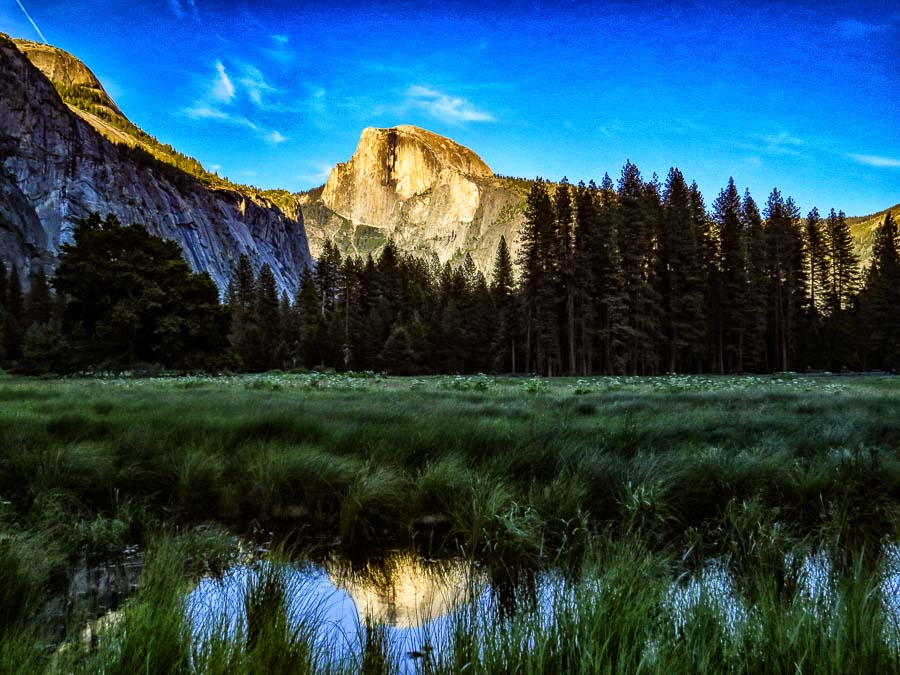
Half Dome from the Ahwahnee Meadow with a reflection

Half Dome at the Ahwahnee Meadow with reflection

This may be bit like pointing out my blemishes after I am dressed and ready to go out, but in an effort to share my photography experiences, I want to have full disclosure. As we returned to Yosemite Village, I noticed that the light was turning very picturesque so I hurried to the meadow to see if I could capture an artistic image of Half Dome.

As noted a number of times in my Year of Yosemite series, there were significant rains prior to our visit. A number of large puddles formed in the meadow and several photographers were trying to find the “ideal” location from which to capture a “perfect image” of Half Dome.

The picture above is one of my attempts. I was working under a couple of handicaps with my lack of experience being a major issue. I had a new camera that I had used just a few times prior and I am not sure I felt comfortable with the metering mode I was using. One of the photographers standing next to me had a variety of neutral density filters which would allow him to take a longer exposure and/or cut down the glare from the puddle. I do not own a set of filters of any type at this point, however I do plan to purchase a polarizing filter in the near future.

Another problem with the photo above is my choice of vantage points. After looking at this photograph now, I think perhaps I should have moved back just a bit to include more meadow in front of the puddle. I think that might have set off the reflection just a bit more.

Nevertheless, I do like my attempt to portray Half Dome in an artistic light, but it is only an “average” picture in my opinion.

 
Do you have a question about our visit to Yosemite? Ask it in the comment section.


JBRish.com originally published this post
*All photographs Copyright by Jeffrey B. Ross with all rights reserved.

 
See previous Year of Yosemite (YOY) posts HERE. If you want to read the introduction to the YOY series, CLICK HERE.

***********************************

Meta Data – Day 198 YOY – Year of Yosemite

File Name: 0343.JPG
Capture time: 7:10:02 PM
Capture date: June 7, 2016
Exposure: 1/1000 sec @ f/3.5
Focal Length: 6mm
ISO 250
Canon PowerShot SX50 HS


A Vertical View of Half Dome – Year of Yosemite (YOY) Day 197

Half Dome from the Ahwahnee Meadow

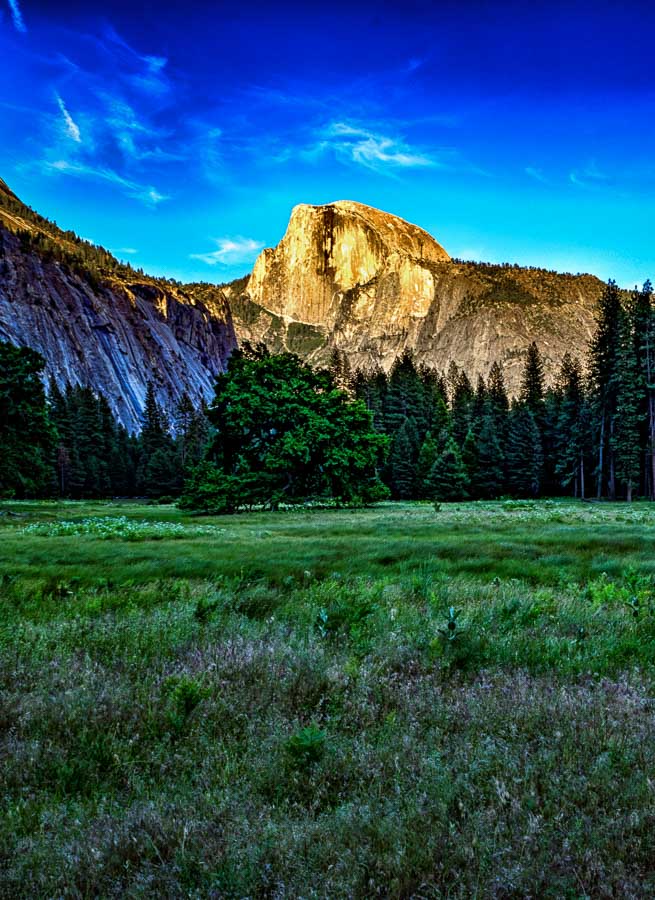
A vertical picture of Half Dome from near the Ahwahnee Meadow

When confronted with such a recognizable landmark such as Half Dome, most photographers are anxious to get the definitive picture. There are two approaches to this task. One, which is not recommended and sometimes scorned by more experienced shooters, is called “Spray and pray” which refers to taking many, many photographs from all different angles and places hoping that the ideal picture will appear somewhere in the grouping.

A more polished method would encourage the photographer to carefully study the scene, understand models of composition and choose their captures selectively. I try to embody the more conservative, polished method. While using this approach, I attempted to compose a vertical shot (above) as opposed to YOY Day 196 which was horizontal. I also wanted to include more of the foreground to use as a leading line drawing the eye towards Half Dome.

I normally prefer a horizontal landscape as opposed to a vertical, but I do find the composition above interesting and at least partially successful. NOTE – The light was changing quickly as the angle of the sun was becoming sharper.

What are your thoughts? (Leave them in a comment)

 
Do you have a question about our visit to Yosemite? Ask it in the comment section.


JBRish.com originally published this post
*All photographs Copyright by Jeffrey B. Ross with all rights reserved.

 
See previous Year of Yosemite (YOY) posts HERE. If you want to read the introduction to the YOY series, CLICK HERE.

***********************************

Meta Data – Day 197 YOY – Year of Yosemite

File Name: 0280.NEF
Capture time: 7:07:13 PM
Capture date: June 7, 2016
Exposure: 1/15 sec @ f/14
Focal Length: 20mm
ISO 100
Nikon D3300


Video – “One Shot” Photographing the Olympics

As a matter of course, I follow Olympic Photographer Jeff Cable. He is a super guy and an excellent photographer. Jeff is not strictly a photographer of the “games” as his skills and creativity go way beyond such a narrow scope. You can see some of his work, including Olympic shots, at his website:


Jeff Cable Photography

If you hurry on over, you can catch his new slide show which is captivating!


**********

The YouTube Video below, One Shot, documenting the harried and stressful business of photographing the Olympic games gives the viewer some insight into the pressures of the job. One of the photographers interviewed explained that when he started covering the games twenty years ago, it would take a minimum of forty minutes to get a picture to the “editor” and now that same shot can be sent through cyberspace in 68 seconds.

If you like the Olympics or Photography or both, you will certainly enjoy this YouTube Video:

From the YouTube Video web page:

‘One Shot’ Photographing the Olympic Games’ offers a unique behind the scenes look at photographing the Olympic Games, from the photographers themselves, but also from the operational perspective of the organising committee and the host city.

‘One Shot’ is built around the 100m men’s final in Rio de Janeiro and features Lucy Nicholson (Reuters), Bob Martin (Sports Illustrated/SilverHub), Tsuyoshi Matsumoto (Yomiuri Shimbun), Tim De Waele (Freelance), Denis Paquin (Associated Press) and Ken Mainardis (Getty Images). This short version of what will be a 25 minute feature was created for the Rio Debrief held in Tokyo in December 2016 and premiered at the PyeongChang World Press Briefing in Korea.

Photography – A Year of Inspiration and Ideas

This is the time of year that photography websites start talking about ideas, resolutions, etc. for the New Year. We often hear about a monthly challenge or perhaps even a weekly challenge.

Every once in a while someone steps up and starts a 365 day photography challenge based on a theme or idea that they have. I am doing a modified* 365 day challenge by posting a picture-a-day for 365 days selected from the shots I took during our hiking and exploration trip to Yosemite National Park. This is the link if you are interested:

Year of Yosemite (YOY) – Day 1 & Project Introduction

*NOTE – While I do intend to post 365 separate photos from my Yosemite excursions, I am not doing them strictly on consecutive days because of previous commitments and plans.

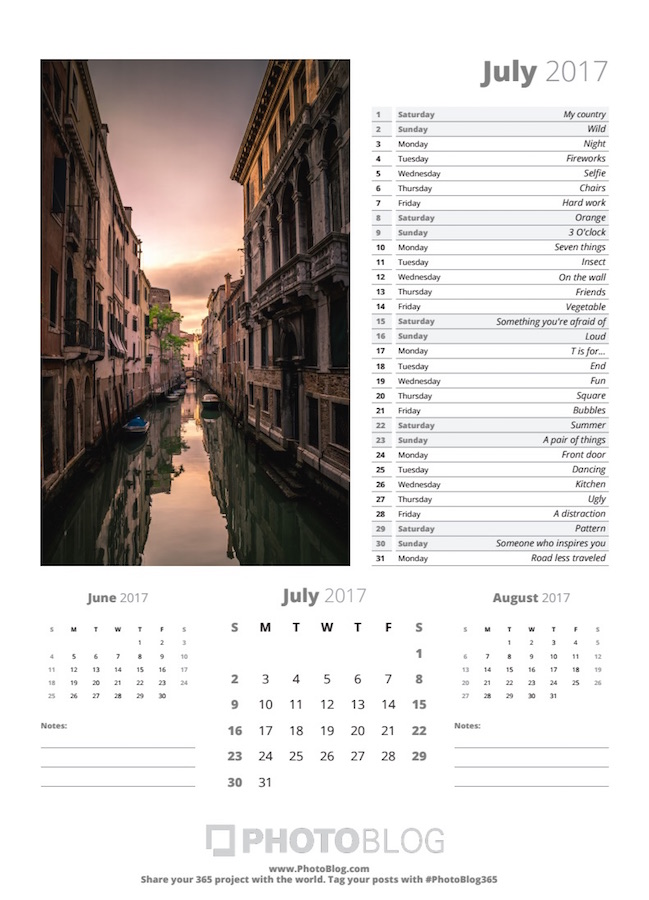
The PHOTOBLOG is stepping up to help those who might need inspiration for such a challenge by offering a yearly calendar with a new photography idea for every day of the year. This would be a wonderful resource for those who just want to gather new and fresh ideas or to stimulate ideas of their own. The PHOTOBLOG suggests it might make a nice gift for a phtographer-friend and I agree!

Here are some random examples of suggested ideas:

  • January 24, Tuesday – Something You made
  • February 17, Friday – Outside the window
  • March 20, Monday – Three Things
  • April 26, Wednesday – Flowers
  • May 6, Saturday – Street
  • June 1, Thursday – Together
  • July 23, Sunday – A Pair of Things

In addition to being a springboard for ideas, the calendar itself has very pretty photography and serves its general utilitarian function of keeping track of the dates. Each page has the main month along with the preceding and following month; a nice touch. See the sample screen shot below.

PhotoBlog Sample Calendar Page

Check out all of the details and find out how to post some of your own project shots by visiting this PHOTOBLOG web page.

 
See previous JBRish.com Photography posts HERE

Year of Yosemite (YOY) – Day 176 (Merced River Early Morning)

Merced River Morning

Morning sun shining through on the Merced River

This is one of my favorite pictures of the Merced River. If you are hiking anywhere in Yosemite Valley, there is little chance you can escape crossing the Merced River at one point or another. My bet is that you will find it a constant companion as you hike the various valley trails as it meanders through most of the scenic areas of Yosemite Valley.

This photograph wasn’t too far from El Capitan and the light was a very pretty color. The reflections, the various hues of green and the water’s calm add to the beauty of the river.

 
Do you have a question about our visit to Yosemite? Ask it in the comment section.


JBRish.com originally published this post
*All photographs Copyright by Jeffrey B. Ross with all rights reserved.

 
See previous Year of Yosemite (YOY) posts HERE. If you want to read the introduction to the YOY series, CLICK HERE.

***********************************

Meta Data – Day 176 YOY – Year of Yosemite

File Name: 0292.NEF
Capture time: 10:15:25 AM
Capture date: June 8, 2016
Exposure: 1/60 sec @ f/10
Focal Length: 18mm
ISO 100
Nikon D3300