Year of Yosemite (YOY) – Day 115 (Lupines – Valley Loop Trail)

Lupines along the Valley Loop Trail 

A wet spring brought wildflowers to Yosemite and the lupines were abundant!

As YOY followers probably know by now, one of my favorite subjects to record as I hike are wildflowers. The diversity and tenacity of nature to have flowers of such beauty that fend for themselves in the wild leaves me in wonder.

As we hiked the Valley Loop Trail, we would come across pockets of lupiines, but this particular specimen appealed to me because of the colors of the nearby ferns and the lupine leaves. The leaves have a unique (palmate) form and dark green color with lighter highlights along the ridges. Not only that, but lupine leaves have a water-gathering quality. If you look at them after a rain (or watering) you can see that the water beads and collects in strategic places on the plant.

A careful examination of the flower might remind you of a pea. Yes, it is a member of the pea family.

My wildflower ID skills are only “fair” so I am guessing these are Gray’s lupine, but they could be Brewer’s lupine. I am providing links to each below so you can decide.

Gray’s Lupine

Brewer’s Lupine

 
Do you have a question about our visit to Yosemite? Ask it in the comment section.


JBRish.com originally published this post
*All photographs Copyright by Jeffrey B. Ross with all rights reserved.

 
See previous Year of Yosemite (YOY) posts HERE. If you want to read the introduction to the YOY series, CLICK HERE.

***********************************

Meta Data – Day 115 YOY – Year of Yosemite

File Name: 0316.NEF
Capture time: 12:16:43 PM
Capture date: June 8, 2016
Exposure: 1/60 sec @ f/13
Focal Length: 38mm
ISO 280
Nikon D3300


Milkweed – The Beauty of A Seed

As I may have mentioned on the pages of this blog in prior posts, I volunteer at the Desert Botanical Garden in Phoenix, AZ. It is a wonderful place to experience desert flora from the Sonoran Desert and other arid regions of the world.

Whenever I work with the various dried seed pods, I am aware of the miracle of nature they represent. That a large flower can grow from the tiniest of seeds is a marvel. Not only that, but many seeds have a beauty of their own.

I recently had the opportunity to work with milkweed seed pods (Asclepias erosa). When I opened the first seed pod, this is what I saw.

milkweed seed pod

** NOTE ** These seed pods were not as dry as they would be in nature, but they had opened on their own and the seeds were removed and dried for storage.

Milkweed plays a key role in the health and welfare of the Monarch Butterfly. You can read more about that HERE. I am writing this post to show the form, function and beauty of the milkweed seed pod.

I was struck by the symmetry of the seeds and how they were aligned in a very particular pattern. In addition to the symmetry, I appreciated the rich colors displayed.

Here is the main seed structure removed from the pod. Notice how some seeds are separated from the main cluster. They fell off readily and easily separated.

symmetry along the main seed stem

As they were separated, they reminded me of tadpoles with their pearly white, almost silky tails flowing easily behind them.

silky white tails on the seeds

As they began to dry, however, they opened up on their own accord to form the fluffy wing-like structures we have come to know.

seed tails beginning to dry and fluff

In no time at all, there was a table full of the “wings.”

The tails dried to form wings

If all the seeds are removed carefully, as I learned after working with several of the pods, the backbone of the pod, so-to-speak, remains attached. It too has a wonderful symmetry and structure.

The remaining spine of the seed pod

Perhaps the picture below better demonstrates the architecture of this botanical backbone and the pointed tips which probably help to secure the seeds until, in a natural setting, they are dry enough to float away on their own.

The structure of the spine helps to retain the seeds until they are ready to fly away

The empty seed pod was slightly sticky and offered a relatively cushioned home for the seeds to await their release.

Empty pod

The two pictures below show milkweed in its natural growing habitat. Both pictures are used courtesy of The New Hampshire Chapter of The Appalachian Mountain Club  

The first picture shows how similar the seeds look while clinging to the pod in the wild.

The second photograph provides a glimpse of how the seeds float away on the wind hoping to find a hospital place to root and grow.

Seeds clinging to the pod in nature

Seeds poised to fly away on their wings with the first gust of wind

You can find more JBRish posts about plants and gardening HERE.

Monsoon Desert Bloom – Mammillaria

For those who are unfamiliar with the Sonoran Desert around North Phoenix, let me explain what happens during the heat of the summer through the middle of September.

The desert often creates strong dust storms and rain storms. These are customarily referred to as “monsoons” although technically they probably do not meet the necessary criteria for such a designation. Read more about our desert monsoons HERE!

During these storms, the Sonoran Desert receives much of its yearly rainfall. This past week, we had some very strong storms with winds and much rain.

When the “monsoon” storms arrive, there are desert plants that respond by soaking up the moisture and using the opportunity to bloom and produce seeds.

The picture below shows one such plant across the street from our house which is basically “the desert”.

desert plants after a rain 

Plants in the desert after the rain


The large plant in the center/top of the photograph that looks like it has antlers is a cholla. This is one plant that people try to avoid because it is segmented with a multitude of needles. The needles grab on to clothing, skin, leather or almost anything and a segment then breaks off and goes for a ride with the bearer. This is one way the cholla propagates.

In front of that large pant is a smaller cluster of cacti. This is a mammillaria and it produces a variety of pinkish flowers that nearly look artificial. They are very attractive and seem as if they would be at home in a tropical drink at the local brew pub.

Here is a closer look…

mammilaria blooms from above 

This mammailaria cluster has dozens of flowers which create a colorful bouquet

This is a non-cultivated plant that grew on its own. We do enjoy having it in our neighborhood!

Agave Trellis

After nearly a decade of gracing our desert landscaping, several agaves started to shoot out their thick center stalk last year.

Agaves with spikes

The “maturation”/growth of this spikey stalk takes nearly a year; and in the final months of the process, the mother plant starts to wither and will eventually die after sending out multiple “pups.”

Agaves with pup

The spikes often exceed 16 feet; and after several months in the hot sun are lightweight yet sturdy. Previous uses for these spikes have included our year-round holiday light pole (scroll all the way down) that continues to adorn our patio. Now we wanted to extend our agave craft to the creation of a trellis!

Internet research yielded no effective uses of these agave poles for a trellis; so an original prototype was designed! Our three spikes were each approximately 12 feet long; with varying thickness of about three to five inches in diameter.

After the appropriate cuts were made, two coats of fast-drying clear satin polyurethane was applied.

XXXXX

XXXXX

The thickest spikes were used to create the three 6’ vertical spikes/supports that were placed at equal spacing over a 5’ linear area (each end spike was approximately 30 inches from the center spike post).

XXXXX

The three vertical poles were carefully placed in 6” PVC piping submerged into the ground, with pea gravel used to fill in any gaps. Effort was made to assure that these poles were aligned carefully to facilitate the placement of the cross bars.

XXXXX

XXXXX

Lighter lengths of spike were used for the three horizontal (cross) bars and placed at equal intervals; with the bottom being 18 inches from the ground.

XXXXX

For additional support (and because the spikes have natural imperfect planes), the middle horizontal bar was placed to the opposite side of the top and bottom bars.

Carriage bolts of varying lengths (dependent upon the thickness of the two spikes used being secured) were employed….and holes were made with a cordless drill prior to ratcheting these bolts into place.

XXXXX

XXXXX

XXXXX

Now the challenge is to find a worthy resident for the trellis that will offer a bounty of flowers and yet get along with the other desert denizens!

Reinforced Trellis Support – Reduce Metal Fatigue

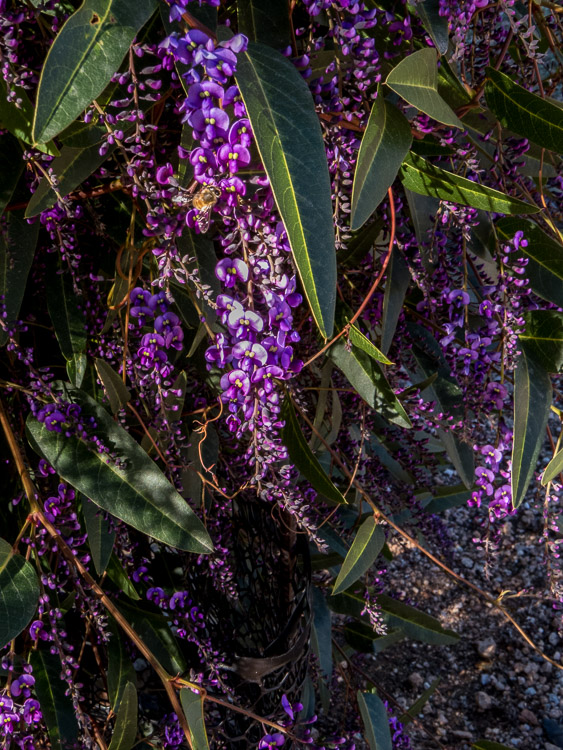
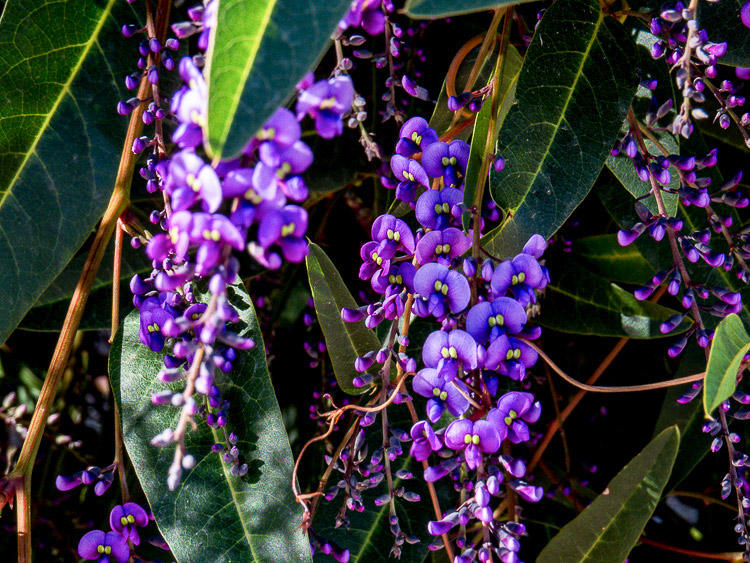
I just came back into the house from taking the picture below of our Queen’s Wreath. This is a very easy vine to grow in the desert as long as the appropriate exposure, water and support are offered. Throw in a bit of fertilizer and this plant does not ask for much else. As a matter of fact, the main challenge is to keep it in bounds as it is a vigorous grower and wants to do more than its fair share!


Queen's Wreath mid-May

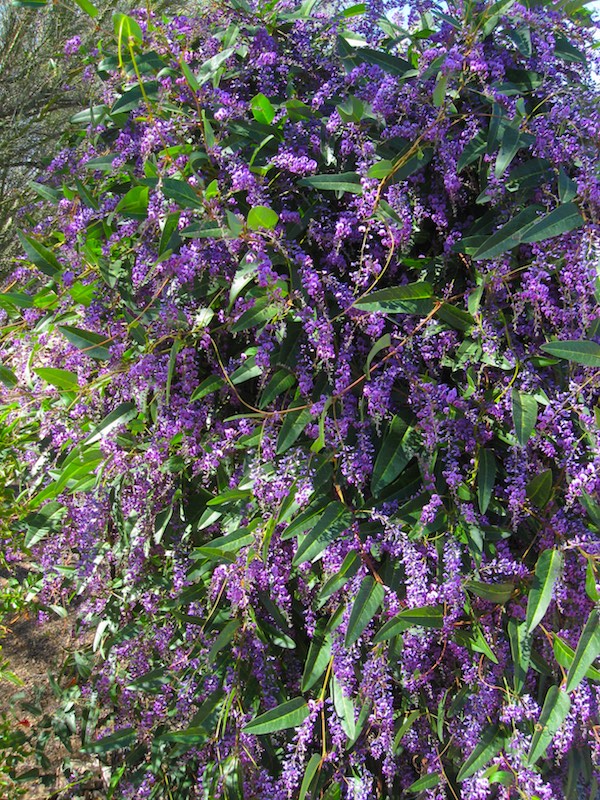
This (above) is still relatively early in the season. Below is a picture of what the plant looked like in a more mature stage.

Stunning Coral Queen's Wreath

As you can see, the plant is quite robust and that is usually a good thing; more plant, more flowers!

That would be true except for the Monsoon Season winds. With all that foliage, this vine on the trellis becomes a sail and catches the wind. This is a big box store trellis and we had to do quite a bit of modifications to make it work for us. The one weak point, which we realized right away, were the welded joints at the base of the trellis which hold the tab for what are now screws. Originally the trellis was packaged with eight inch “J-shaped” spikes that didn’t even have ridges. That wouldn’t support the trellis with the plant on the calmest of days.

We eventually buried concrete blocks in the ground and screwed the trellis to the blocks to offer a more sturdy support. There were other modifications as well, but that is for another post. (See the picture below with arrows indicating potential weak points where metal fatigue might occur.)

Areas of trellis weakness along welds

Even with the feet of the trellis well-anchored by the cement blocks and the screws, we noticed during last year’s winds that the trellis swayed back and forth quite a bit and we feared eventual metal fatigue on the tabs holding the screws and that they would break off.

We had tried to support the vertical posts of the trellis with rebar and then using old nylon stockings to tie the rebar to the supports and we even twisted wire covered with plastic tubing around the rebar and trellis to hold it together, but that did not hold tight enough for real support.

Previous reinforcement attempt

This year we decided to use hose clamps which, in theory, would hold the rebar more tightly to the trellis and hopefully keep movement to a minimum. You probably know them as the clamps used in cars to keep the radiator hoses attached to the metal valves of the radiator.

Here is a picture of the tools needed for the project:

Tools needed

      1 – Wire snips to cut any excess length of the clamp

      2 – Nut driver to secure the screws if necessary and perhaps for use with the clamps themselves

      3 – A hose clamp
      4 – Screw driver to open and close the clamps either loosening or tightening them

    .

Here’s a better look at the nut driver and the hose clamp.

Hose clamp and nut driver

We secured the clamp around the rebar that was in place. Notice how tight the clamp is. The plastic around the rebar is really compressed. Also notice that a thin piece of plastic was used between the inside part of the hose clamp and the trellis to keep the paint from being scratched.

Tightness of hose clamp

We later decided to insert an old piece of 3/4″ irrigation hose around the clamp to protect the metal instead of the thin piece of plastic. In the picture below you can see it on the right with the clamp coming out of it. Notice the long tail of the leftover/unused portion of the ratchet band from the hose clamp. That is where we use the wire snips to cut it off.

Hose clamp with tubing

This is the final result. We did this in two places on all four verticals of the trellis and hopefully the rebar, being held tightly along the trellis, will keep it from swaying as much and reduce the metal fatigue on the supporting screw tabs (yellow arrow).

Final look at a finished hose clamp install

Only time will tell and so will I via a new post if things don’t work out!

If you want to read more about the Queen’s Wreath, you can check out our previous post Showy Queen’s Wreath – October, 2015


JBRish.com originally published this post

 
See more JBRish gardening and desert gardening posts here HERE

Once Lamp Shade-Now Planter!

“Use it up, wear it out, make it do, or do without.” – Boyd K. Parker

Or “repurpose it!!” The concept has been used for hundreds of years (think old cowboy boot nailed on a wooden post as a mail drop!)…but now the practice of using or changing an item for an alternate use has developed “urban cachet”.

When the base of a floor lamp was unable to be safely stabilized, we knew it had to be discarded…but the large glass lampshade was perfectly fine.

It was approximately 18” in diameter with fluted edges that (from afar and to a non-discriminating eye) looked a bit like marble or alabaster! A perfect planter!

Several layers of plastic mesh (rain gutter lining) were placed over the two-inch opening at the base to facilitate drainage and keep the dirt (a modified cactus mix) from escaping through the bottom.

Small succulents (in 3-4” pots) from a local hardware store were carefully transplanted into the lampshade planter. A rounded Mammillaria was chosen for the center and five other selections spaced evenly around the perimeter. These are all fairly slow growing plants with similar light and water needs. Light colored gravel was placed on top to serve as mulch and to add a decorative contrast.

The planter sits on a table top beneath a covered patio and receives filtered light. Although the height makes it (hopefully) inaccessible to javelina; birds and squirrels remain potential adversaries.

After six months, the plants appear healthy and show some (small) growth. The planter now happily lives within 10 feet of where it was once a lampshade!!

Hardenbergia – Desert Lilac Vine

Hardenbergia close view

In the Sonoran Desert this is a transition time of year as we are moving from the cooler winter weather where the temperatures can be relatively low to the warmer daytime temperatures of mid-to-high seventies. This year it seems as though we have been breaking records with temps in the eighties already; yikes!

This has encouraged our Hardenbergia vine (Purple Vine Lilac) to put on quite a show. The wet winter without a frost and the warmer temperatures have our plant strutting her early spring finery!

Late afternoon hardenbergia spray with beee

The late afternoon picture (above) shows that the bees (upper left-ish) enjoy this plant as well.

What makes this post extra sweet for me is that this particular plant was a box store rescue. They had it on a discount table for $1. Of course it looked nothing like its current self and was a leaf or two away from the compost heap!

The photo below is one of my favorite (even though the shallow depth of field has only some of the plant in focus) because the bright yellow anthers look like little eyes and with a bit of imagination, I can see a face in some of these small flowers.

Another close view of the hardenbergia

Hardenbergia originates in Australia and likes to dry out between waterings which is well suited for the desert landscape with just a bit of extra care. It is often used as a ground cover down under, but with the critters we have in the desert, we don’t need to create more hiding places!

Here is a picture of the complete vine which is more than six feet tall!

Full length picture of the hardenbergia vine; higher than six feet

You can read more about Hardenbergia violacea here


See more JBRish gardening and desert gardening posts here HERE

Gazania Mania

During our hot summer it is difficult to find plants that can “take the heat” and keep on blooming or even surviving for that matter. One of our favorites is the Gazania. Well, I am happy to report that they can take the cooler weather as well. While we do protect them from any frost, the cold weather has slowed them a bit, but has not stopped the parade of blooms and the array of colors.

Here is our bicycle planter with Gazanias in the planter-box basket


Orange Gazania in Bicycle Planter

Pink Gazania in Bicycle Planter

Closeups reveal the interesting streaking found on the flower petals with the dark starburst-like ring in the centers.

Orange Gazania Flower Closeup

Yellow Gazania Flower Closeup

Light Orange Gazania Flower Closeup

Pink Gazania Flower Closeup

For more information about growing Gazanias, you can read the following article:

How To Grow Gazania Treasure Flowers: Care Of Gazania Flowers

Winter Holiday in the AZ Desert

I don’t know what most people think about the winter holidays in the Sonoran Desert, but it is celebrated here much the same as it is all over the United States and perhaps the world. We do have a few differences, however. Below are some photographs taken at the Desert Botanical Garden in Phoenix earlier this month.

Poinsettias and cyclamen are popular Christmas plants because of their red, green and white colors and their suitability to cooler temperatures.

poinsettias and white cyclamen

Planters with variations of this assortment can be found in numerous locations at the Desert Botanical Garden this time of year.

poinsettias and white cyclamen

Naturally we do accent some of them with our desert favorites like the agave and aloe in this grouping.

poinsettias, white cyclamen with an agave and aloe

And this taller cactus contrasted with poinsettias.

tall desert cactus accented with red poinsettias

For evening visitors to the DBG, there are metal sculptures with votive candle holders to add to the celebratory nuance of the season (pictured here unlit during the daytime).

metal sculpture of a candle tree

Recognizable in any locale is the relatively standard Christmas wreath!

Christmas wreath with red ribbon and shiny balls

That is not to say we don’t have our quirky desert expression of the season such as…

Cactus with Santa hats

Picture courtesy of AZ Landscape Creations

Happy Holidays form JBRish in the Sonoran Desert!


Showy Queen’s Wreath – October, 2015

Readers of JBRish know that we do quite a bit of gardening in our Sonoran Desert home. One of the showiest plants we have is our Queen’s Wreath (Antigonon leptopus). This is an easy-to-care-for vine that asks little more than enough water and fertilization with a standard blooming plant variety enhancer.

While the plant blooms through much of the growing season, it reaches a full flush at one point which is generally late summer or early fall. It is a stunner. Below is a picture of our coral Queen’s Wreath that we have covering an arched trellis.

Read more about the Queen’s Wreath here:


Stunning Coral Queen's Wreath


JBRish.com originally published this post