Photography: Fuji X-T2 Valuable Resource

for Learning Your Way Around


The Fuji X-T2

For those who are following along, I have attended to unboxing my Fuji X-T2 and putting the strap and the lens on it. You can read about that experience HERE. One of the darnedest things about purchasing a new camera, is that you really shouldn’t try to just pop in the battery and start taking photographs even if you really do know what you are doing.

Most manuals advise to fully charge the battery first so that is what I did. Now a fully discharged Fuji X-T2 with the new batteries (NP-W126s – highly recommended for the X T-2) takes about 2.5 hours. Yep, I plugged in the charger with the battery installed and waited to get going.

So let me take this time to make a recommendation that I found to be a lifesaver for someone like me. What do I mean when I say: “Someone like me?” I am coming to the X T-2 from a background where I generally used primarily point-and-shoot cameras with the exception of my Nikon D3300. Don’t get me wrong, I truly like the Nikon, but it is really a beginner’s camera; nothing wrong with that. I am at the point now where I am looking to get more involved in manipulating the camera in multiple ways and spreading my creative wings.

The Fuji X T-2 is, comparatively speaking, like going from a budget car to a Lexus (IMHO). The menus alone can be very overwhelming and the owner’s manual doesn’t give enough detail about what each option does or does not enable.

What I decided to do was to purchase the eBook:The Complete Guide to Fujifilm’s X-T2 Amazon had the paper bound book for $50 USD and the eBook for approximately $15. USD. After having dropped a bundle on the camera, I decided to go with the eBook.
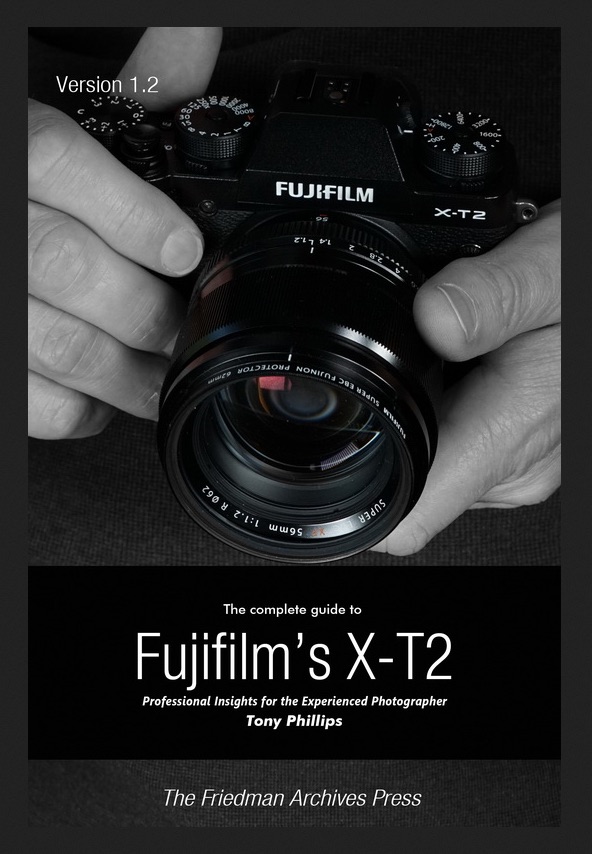

The Complete Guide to Fujifilm's X-T2 - by Tony Phillips
Cover photo courtesy of Tony Phillips via the linked website

My Recommendation – Purchase eBook. It is well worth having. EBooks also make it easy to bookmark sections, highlight others and find the notations later!


NOTE
– My bad!! I previously listed the incorrect price for the printed book from the Tony Phillips website as I misread it. So I am modifying my original post to recommend the eBook as noted above. Thanks to one of the astute readers who pointed this out; sorry!

[Edited – 8/29/17 – 8:30 AM ]

Let me tell you what a “good guy” Tony is. With proof of purchase of the eBook, he will send you a spreadsheet with his list of settings for the X T-2. As you review the spreadsheet and the book Tony explains his rationale for his choice of settings. This is like learning at the Master’s knee.

The settings are explained and cross-referenced to the appropriate section of the book. This alone is worth a lot as it takes users through the menus and saves bundles of time just getting the camera set up.

If you get the eBook, Tony explains that it is difficult to get good graphic representations in an eBook (Kindle) as the photos and graphics tend to be on the small side. To remedy this, and with no extra cost to the customer, Tony will send a PDF copy of the book which is much more legible when it comes to viewing the diagrams, photos, etc. It is the best of both worlds.

If that wasn’t good enough, Tony Phillips also offers his eBook Mastering Flash with Fujifilm X Cameras without additional cost. This was an unexpected and much appreciated bonus.


Mastering Flash with Fujifilm X Cameras- by Tony Phillips
Cover photo courtesy of Tony Phillips via the linked website

Here was another issue I was able to resolve by learning about Tony’s website. Fuji has issued two firmware updates for the X T-2 and the book was printed before these updates were created and sent out to the world. At the above website, the addendum (which explains the details regarding these upgrades) can be purchased for a very reasonable $2.45 USD. How can you beat that?

I bought it all and I was glad to do it. I sat down with my camera for more than an hour and worked my way through the spreadsheet and settings, stopping every once in a while to refer back to the book. I can’t tell you how many times I have opened that book to refer to something about the new camera and I have had it less than a week. I am sure it will have the requisite digital incarnation of dog ears before I am done.

PLEASE NOTE – I haven’t been asked to write the above advice about the book. I am a former educator, school administrator and university instructor and I know the value of good learning materials. I receive no payment or any other remuneration for this recommendation. I am providing my honest opinion about a product I think will help many people like me, who are trying to “step up their photography game” with the X T-2.

The information provided represents my experience at the time I made these purchase.

You don’t have to take my word for it. If you have the Kindle App or a Kindle, Amazon will send you a sample from the book. Look at the TOC and the pages sent and I think you will see the benefits right away.

BTW – Tony knows about other cameras too. Visit his website to see what else he has to offer.

Next post about the X T-2, first shots and experience…

UPDATE – Don’t be disappointed with your Fuji RAW files when imported into Lightroom. Read about the way to post process those images to bring out the color and detail Fuji X T-2: Improving LR Post Processing Process

Read more photography posts HERE


**********


All original content on this blog is copyrighted by Jeffrey B. Ross with ALL Rights Reserved. While reference links back to JBRish.com are appreciated and encouraged, please acquire approval for any reproduction of original content from this website.

©Jeffrey B. Ross – 2017


Photography: The Fuji X-T2 has arrived (Strap and Lens)


The Fuji X-T2

Hello JBRish readers. I have to say that my postings may be somewhat limited over the next several weeks as my new Fuji X-T2 camera has arrived and I am dedicating myself to learn how to use it.

NOTE – My apologies to anyone who isn’t like me. I celebrate everyone who has a different learning style, but I am basically a concrete, sequential person. What that means is that I like to learn everything in a logical, step-by-step progression with details and with lots of reviewing. This is my story of how I am trying to improve my photography skills and learning how to use a professional level camera; the Fuji X T-2.

There are so many unboxing videos for all types of cameras out there. I am going to skip that part and get right down to what I consider to be the “nitty gritty.”

When you buy a modern digital camera, it really isn’t a camera. The word digital is the giveaway. It is a computer that takes pictures. One look at this piece of gear and you know you have something special in your hands. Something serious that demands your attention.

It is easy to be overwhelmed and I thought that perhaps it would be difficult for me to get up and running quickly without assistance. Manufacturers don’t provide owner’s manuals that are very thorough. I am not complaining. I understand that the camera industry today is quite competitive and that everything is being done to cut costs. Still, we need to learn how to use the gear the best way we can. The Internet is a good resource, but it is spotty and doesn’t always have the information needed.

Let me offer some words from one who has, as of now, been down the path before:

  • 1 – When you first get a new camera, unbox it in a clear area where everything can be laid out in front of you. There is usually a page in the owner’s manual that shows what is included in the box so take everything out of the package and review all items to make sure all the pieces are there.
  • 2 – Next, let’s talk about the camera strap! I generally don’t go in for fancy camera straps and I make do with the straps that come with the camera and use carabiners to keep things organized and to stop them from banging into each other. The strap that came with the X T-2 is a bit above par, but not exciting or extraordinary overall. If I decide later on that a different strap is needed, I will consider it at that point.

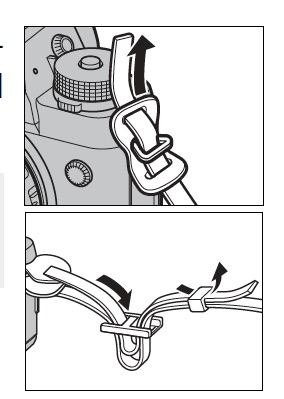
Here is a picture from the manual describing the final two steps explaining how to attach the strap to the camera:


Attach the camera strap
Picture courtesy of Fuji X T-2 Camera Manual, v.2.10

I may not be the smartest bulb on the tree (so to speak), but I really needed a bit more direction than the information in the manual to make sure that the strap is firmly and securely attached. Nobody wants their camera falling off of their body to go smashing to the ground.


As an example:
That piece of plastic in the middle (shown in the bottom frame), the one with the two square-ish sections with the bar in between appears to have “teeth” on one of the faces/sides when you are actually holding it. This doesn’t show in the picture. Do the “teeth” face inward or outward?

I found the video below which presents a pictorial explanation. Truth must be told, I had to watch the video three times to get it done exactly as they explain!

The next logical step after attaching the strap might be to attach the lens.

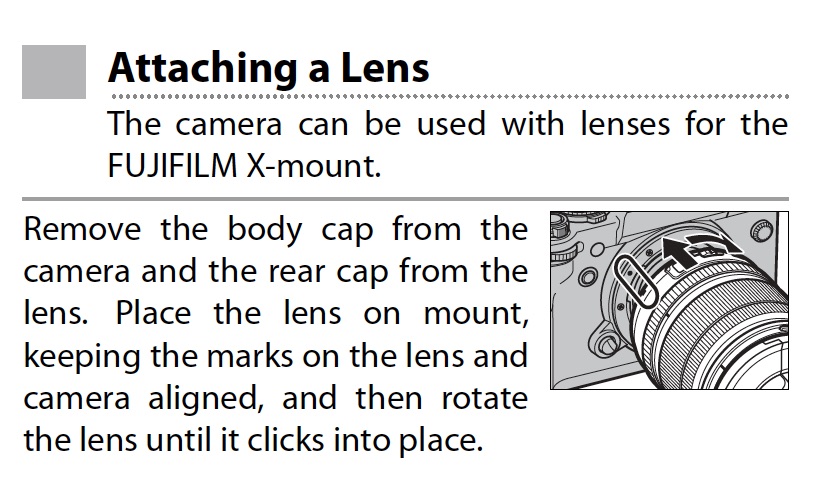
Here is the picture and description from the manual:


Attach the lens to the camera

Picture courtesy of Fuji X T-2 Camera Manual, v.2.10

The marks” to which they refer really cannot be seen well unless both the camera body cap and the rear cap from the lens are removed. Then, you need to line up the red dots and twist the the lens until you hear the click. It is not easy to discern the precise position using the graphics in the owners manual (IMHO).

One reason why users want to do this quickly is to prevent dust form getting on the sensor and thus leaving spots on the images. Do this in as dust-free environment as possible.

This was only the first few steps in getting started. We aren’t quite at the point where we get to take some pictures, at least not yet.

The story will continue…

To read more JBRish photography posts, click HERE!


**********


All original content on this blog is copyrighted by Jeffrey B. Ross with ALL Rights Reserved. While reference links back to JBRish.com are appreciated and encouraged, please acquire approval for any reproduction of original content from this website.

©Jeffrey B. Ross – 2017


Finding and Developing

Your Artistic Genius and Vision


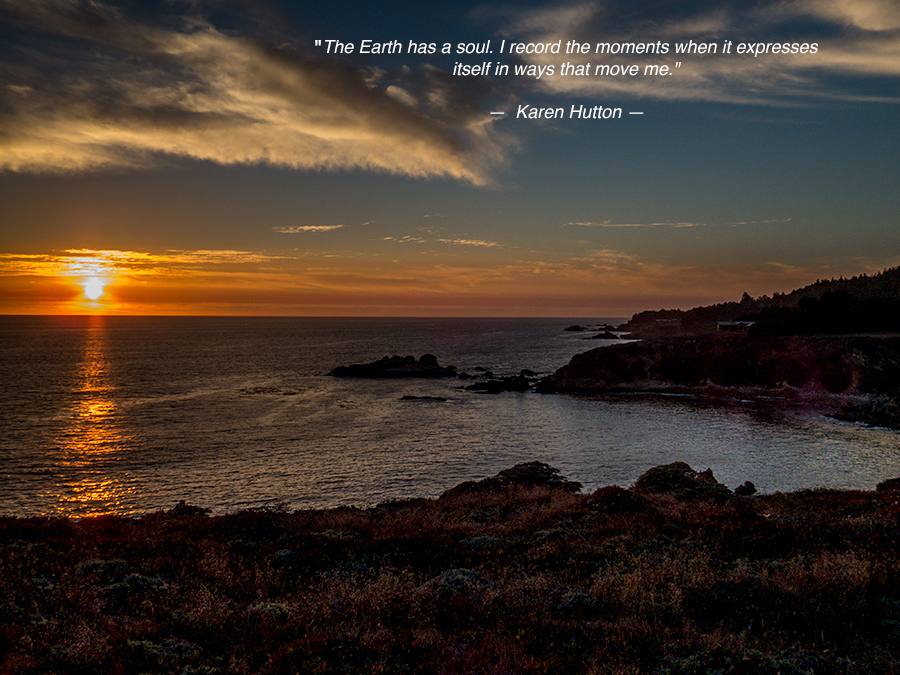
“The Earth has a soul. I record the moments when it expresses itself in ways that move me.”
— Karen Hutton —
Photograph by Jeffrey B. Ross

**********

For those who have followed my photography posts, I have some information you may find of interest and motivational. In any creative endeavor there are several factors involved. I would like to quickly address just two of them.

Tools of the Trade – If you are a musician, sculptor, quilter, painter, stain glass artisan, etc., you understand that there are tools you will need to be successful. Having the correct tools, however is only a start.

You could place a piano in front of me, even the best, most expensive piano available, and I would not be able to play it. I might be able to learn to play it eventually, but I couldn’t do it on my own. I don’t know the difference between the white keys and the black keys. I am aware that there are pedals on the base of the instrument, but I don’t have the faintest idea of what they do.

You could cajole me, bribe me or threaten me, but no matter what, I just couldn’t do it. That is because I haven’t learned the tools of the trade. I haven’t learned how to apply and use the means of the craft.

The first essential element for any creator, therefore, is to completely understand the tools required and how to use each one of them to their fullest. That is perhaps why Malcom Gladwell in his book Outliers, suggested that 10,000 hours of deliberate practice would be necessary to achieve expertise. There is much argument about the number of hours and how Gladwell derived this theory, but suffice it to say that much practice and study would be needed to become an acknowledged expert in one of the arts. And much of those hours would be practicing to effectively use the tools and potentially even inventing new ways of applying them.

Vision – This, in my opinion, can be the more difficult part. Many art students begin by copying the drawings and paintings of the masters and after some time, they become proficient, almost perfect copiers. This, however, does not make them an artist.

To become an artist, one must develop their own unique vision of the world. Once that vision is understood and realized, then it is time to take the tools of the trade and apply them to create their style through their art so the world can appreciate, recognize and enjoy their craft and unique signature.

If this has piqued your curiosity and you are interested in photography or any creative endeavor, then let me suggest you follow Karen Hutton’s series “The Everyday Genius of Your Artist’s Voice.” I admire Karen and I have been following her blog for a while. I find her posts very motivating and insightful. Some of the concepts will be “fuzzy” at first until you have tried to apply them to your own creative universe. After you begin to apply them and really think hard about them, the clarity should evolve.

While Karen focuses on the vision and art of photography, the same advice can be applied to most creative undertakings. Once you get to her blog, you will realize how diverse her background is and why she is able to guide people through this process.

I will make it easy to get started. All you have to do is follow these links to the first set of articles in the series. Once at her site, subscribe and you will receive the rest.


The Everyday Genius of Your Artist’s Voice: Part 1


The Everyday Genius of Your Artist’s Voice: Part 2, Preparation


The Everyday Genius of Your Artist’s Voice: Part 3, Appearance


The Everyday Genius of Your Artistic Voice: Q&A


**********


All original content on this blog is copyrighted by Jeffrey B. Ross with ALL Rights Reserved. While reference links back to JBRish.com are appreciated and encouraged, please acquire approval for any reproduction of original content from this website.

©Jeffrey B. Ross – 2017

Photography: What Was Old Is New Again

I have to confess that I am a bit of a hoarder. If you asked my wife perhaps she would snicker at the phrase “a bit.” This trend carries over to my digital life, but let me jump in here to profess that it isn’t all bad either.

In going through some of my old, make that ancient, photographs taken with cameras that were considered nearstate-of-the-art when four or five megapixels was considered good resolution, I came across photos that could be enhanced these many years later with the available technology. Yes, Lightroom (Lr) and Photoshop (Ps) can help breathe new life into old images.

Just examine this ho-hum photograph, for example, taken with a Canon PowerShot AS590 IS. There really is very little saturation and contrast. It is a nice scenes and the composition is fine, but it is rather flat and dull.


Bringing the same picture into Lr to add a bit of contrast, bring out the shadows, enhance some of the colors, etc. provided more of the feel I remembered from the experience.


One element in the photograph above that I find problematic is that big white cloud in the upper-right. It has a tendency to draw the eye away from the focal point of the river extending into the mountains.

Now understand I am not a Ps expert. As a matter of fact, I have only been using Ps for a couple of months. I gladly bought an online course from one of the photographers I follow and it covered everything from beginning to end. I realized that some of my photographs didn’t render the way I saw the scene and I also wanted to extend my creativity.

So…into Ps, the picture went and I reduced the size of the cloud to make it look as natural as possible with my current skill set. Is this an award winner? I don’t think so, but it is a way for me to present it at its best. I equate this to putting on the last touches before going out on an important date. Let’s all take opportunities to look our best.


***********************************
Metadata

File Name: 8673.jpg
Capture time: 10:19:27 AM
Capture date: August 16, 2012
Exposure: 1/500 sec @ f/4.0
Focal Length: 5.8mm
ISO: 80
Canon PowerShot AS590 IS


***********************************

Readers of JBRish probably enjoy my daily quotes and here is one that sums up the idea behind this post:

“Creativity is making marvelous out of the discarded.” – Unknown

Have you had this experience, i.e. making something good out of an item targeted be discarded? Why not share in the comment section?


**********


All original content on this blog is copyrighted by Jeffrey B. Ross with ALL Rights Reserved. While reference links back to JBRish.com are appreciated and encouraged, please acquire approval for any reproduction of original content from this website.

©Jeffrey B. Ross – 2017


My Computer’s Near Death Experience

– Part 3 –

If you missed the first two parts of this series, you can read it at these links:

My Computer’s Near Death Experience – Part 1

My Computer’s Near Death Experience – Part 2


**********


NOTE – Crashplan is reported to be discontinuing support for individuals and is focusing on corporate customers. – updated 11/26/2017

At this point in the saga, my computer’s hard drive has been repaired and I have restored a number of files including all of my music. Now the rest of the story…

I was more nervous about my photographs. These are very important to me as they go back years and hold so much history as well as much of my work from my photography hobby. A couple of days later, I worked up the courage and began the restore process overnight. Now I am a very conservative person in such matters so before I began to restore the encrypted files from the Crashplan (CP) backup drive, I copied the CP file to the new internal Mac hard drive so I had a backup of the backup; just in case. This isn’t so weird when you realize a good portion of your digital and/or recreational life resides on a small device represented by a series of bits and bytes!

I was pleased the next morning to learn that all my photographs had been saved and were safely restored. I now had to place them in the correct folders on the hard drive so they would be recognized by my photography software. This was not easy and I had to do some research along with trial-and-error, but I was successful. I was glad to learn that only a few of my most recent edits were missing. All my files and photographs appeared to be there. The edits and revisions can be recreated if needed.

I realize that I dodged a bullet and this situation could have been much worse.

***** Lessons Learned *****


Positive:

  • I was well aware and appreciated a need for a backup of my computer files because they represented important aspects of my life.
  • I had taken several actions necessary to insure my files would be available if needed. I had two copies, one old, and one slightly old, of my most precious files – music and photographs.
  • I did not ignore my need for a backup when my original backup failed. I used Crashplan to make a backup of my hard drive. It was free, it was time-consuming to configure, but it saved the day.
  • I tested the recoverability of the files after I decided to use CP’s backup storage system to make sure it worked..and it did.
  • I called support and interfaced with them via email to assure they would be attentive to my needs…and they were.

Negative:

  • I procrastinated too long in re-establishing my Time Machine backup system.
  • As I understand it, this would have provided a plug-and-play solution for my problem and I would most likely not have had any data loss.
  • I should have made a more recent, raw backup of all my data files so I wouldn’t lose any data. This was not critical, but annoying.

Overall Lessons Learned:

  • Some of the missing files and data could be recovered by filtering emails to download certain documents and information. This was an especially important process I followed to recover data going back to 2009 that was important to one of my hobbies. Having email copies and archiving those emails saved the day for this project.
  • I am now studying a more effective and efficient backup system that will have redundancy and flexibility. BTW, I also tried iDrive via a 90% off offer, but their cloud backup would have taken just as long. I believe leaving my computer running for days on end trying to backup to the cloud caused, at least in part, my initial hard drive failure. I am not currently using a cloud service.
  • What I am now doing is making two backups of all my data and using Time Machine over two hard drives. From time-to-time I bring one of my two backups to a friend’s house to cover me in the event of total disaster. That’s the best I can do and I am happy with it.
  • I have learned of a good service for helping resolve my technology issues which thankfully have been few and far between.


**********


All content on this blog is copyrighted by Jeffrey B. Ross with ALL Rights Reserved. While reference links back to JBRish.com are appreciated and encouraged, please acquire approval for any reproduction of original content from this website.

©Jeffrey B. Ross – 2017


My Computer’s Near Death Experience

– Part 2 –

If you missed the first part of this series, you can read it at this link:

My Computer’s Near Death Experience – Part 1

NOTE – Crashplan is reported to be discontinuing support for individuals and is focusing on corporate customers. – updated 11/26/2017

I packed my ailing Mac into the car and off to the Apple Store we went. I had called Apple’s corporate support team and tried to get them to help me arrange support. They interfaced with one of the local Apple stores in Scottsdale, AZ to determine that if I could get there within forty minutes, there was a chance they could look at my computer. There was no guarantee as they were booked with appointments, but there weren’t too many walk-ins so I might have some luck.

A half hour later I was at the Apple Store. Oh, no, my Mac was too old! Apple no longer supported repair for my five-year-old iMac. It was legacy and it wasn’t worthy! The Apple employee offered an alternative authorized repair shop that wasn’t too far away. It was rush hour which is quite an experience in this area of Scottsdale/Phoenix, but I was on a mission.

I was headed to MACMEDIA, INC., 6928 E 5th Ave #1, Scottsdale, AZ 85251

Another forty minutes and I was carrying the seat of all my creative endeavors in to the repair shop. The staff was busy with other customers, but made me feel welcome and relaxed. I walked around the store and then settled in to listen to the conversations going on around me. I could tell by the manner in which the staff was interacting with the other customers and by the conversation that I was, indeed, at the proper place for what was ailing my computer.

Sure enough within a half hour or so, they confirmed my suspicion that the computer could not be immediately recovered and that the fix was not going to be quick. There was a $95 Diagnostic fee which would be applied to any repair if I decided to proceed.; and I did.

I received a call later that afternoon indicating that indeed it was my hard drive. The options, I was told were that they could replace my 1 TB drive with another for a total of $270 +/- OR…I could get a 2TB hard drive for just thirty dollars more. With the 2TB model would come an upgrade to the very latest system software as well. I had to think hard about that wrinkle, but decided to go ahead with it as they recommended. BTW, not all my legacy apps are running perfectly with the new system, but good enough!

The machine was ready for pickup the next day. The hard drive had a three year warranty and the labor was covered for thirty days. I thought the 30 days was a bit on the short side, but it is within industry standards.

Now came the dicey part. I was hesitant to even try this, but I had to get my Firefox (web browser) up and running and then I needed to try to restore the file with all of my passwords. I was hoping that Crashplan’s (CP) local backup had copied it and I was strongly hoping that it could be restored. Remember that I did try to restore a couple of files and had success so I was optimistic.

I plugged in the CP local backup drive, used the CP software to locate the file I needed and selected RESTORE. A few minutes later, Voila! The file was restored. The keys to the kingdom were back in my pocket and I was on my way.

I now had access to all my passwords and my main email accounts. Once again, I relied on CP’s staff to help me answer a few questions about restoring my files. Understand, this was not a clone of my computer. I just had my files in organized folders which I then had to copy on to the new hard drive. While I would rather not have had this experience, I used it to eliminate some of the detritus that lives on any computer that is more than a year old. I deleted some very old outdated files.

The first restoration I made was of my documents folder. After a while I could tell that most of the files were recovered. There were a few I couldn’t locate immediately, but later were found via a system level search for file name and properties. Sadly, there were a few folders and files that didn’t make it to the complete backup and are now gone, but these were not essential and can certainly be recreated or replaced anew.

The first major test was to restore my music files. That took quite a while. I let my computer run overnight and I was pleased the next day to see that all of my music was there!

To read Part 1 of this series, follow this link: My Computer’s Near Death Experience – Part 1


<--- TO BE CONTINUED --->

**********


All content on this blog is copyrighted by Jeffrey B. Ross with ALL Rights Reserved. While reference links back to JBRish.com are appreciated and encouraged, please acquire approval for any reproduction of original content from this website.

©Jeffrey B. Ross – 2017


Photography – Retrospectography


Leaf-footed Bug on Yucca

Retrospectography – The further appreciation of a photograph or picture which reveals insights into that image which were not recognized or appreciated at the time of original capture.

Originally coined by Jeffrey Ross on JBRish.com – as far as research reveals

One of the wonderful things about photography is that there are retrospective insights to be garnered after the initial experience. One of my favorite parts of being a photography enthusiast is arriving home after an excursion and reviewing the pictures. Every once in a while there is an interesting surprise!

My wife and I were hiking in the Organ Mountains Desert Peaks National Monument in New Mexico for several days and on one of the last days we were exploring an area near Fillmore Canyon when we passed a noteable yucca.

I was drawn to the plant by the interesting arrangement of leaves and tendrils dancing in the air. I stopped to admire and photograph the yucca.

I did notice the bug above the flowers at the time, but there was something that went unnoticed until I arrived home and reviewed the photographs.

During the moment of photographic capture, I did not appreciate the beautiful color of the antennae of the Leaf-footed Bug (Acanthocephala terminalis). Isn’t that an amazing orange color?

Leaf-footed Bug on Yucca

Not Only did I enjoy the contemporaneous photographic experience, I also appreciated learning more about, and further admiring this creature of the wild.

You can find more information about Leaf-footed bugs at this Austin Bug Collection page. This is a large family of insects.


**********


All original content on this blog is copyrighted by Jeffrey B. Ross with ALL Rights Reserved. While reference links back to JBRish.com are appreciated and encouraged, please acquire approval for any reproduction of original content from this website.

©Jeffrey B. Ross – 2017


My Computer’s Near Death Experience

– Part 1 –

NOTE – Crashplan is reported to be discontinuing support for individuals and is focusing on corporate customers. – updated 11/26/2017

Followers of JBRish might have seen a posting a couple of months ago that my computer was out of service and postings were temporarily halted. Having a computer crash is never fun; not even for the most casual or the most experience technology user for that matter. For someone like me who relies on the computer for his blog, photography and other creative needs, it is an extreme situation; a nuisance of great magnitude.

Unfortunately, there were circumstances that happened in the recent past that made this potentially even more devastating. I use an iMac. It is a five year old plus machine. To refer to it as a legacy machine is being kind. A month prior to my computer incident, I inadvertently plugged my 3TB Time Machine backup drive into my wife’s PC and for some reason my iMac would no longer read from it.

I tried every Mac utility I had on the machine with no luck. My wife’s PC would not recognize it either. I tried and tried over a period of days to get it to work, but no dice! I then tried to reformat it on the Mac…dead end there too. It wouldn’t even reformat on the PC. The drive was dead. The drive too may have been a bit old, but I cannot explain why it would no longer work based on the actions taken.

I recently read that external 3TB drives, for one reason or another, were more prone to malfunctioning. The article didn’t seem to pin down the exact culprit, but reported the devastating statistics. You can read more about 3TB drives here (Full disclosure – I did not read these specific articles.)

I never did get around to replacing that malfunctioning drive. My most precious files (see bird picture above) are my more than ten thousand photographs and my large music collection. Other than that, any loss of my other documents would not be devastating It would definitely be a problem and a great nuisance, but not devastating. I had two older backups of both my music and my photographs. The music was current, but the photo backups were three months old and I would lose my most current edits if I could not restore my most recent Lightroom files. Not tragic, but certainly not good either.

Realizing I was riding a potential disaster roller coaster, I decided to follow the trend to backup to the cloud using Crashplan. Crashplan (CP) and other cloud companies offer software to use to make a backup of your computer to a local drive as well.

Why did I choose Crashplan? – The Best Online Cloud Backup Service

As it turned out, this was a life saving move. All right, not life saving, but definitely a time and file saver.

Let me digress and say a few words about Crashplan. The reason I chose Crashplan was because they offered a thirty day free trial and, this is important, software to backup document, photograph and music files to a local drive. I configured my computer to do both. I began to backup to CPs cloud service and to a local hard drive I had connected to the iMac. This would not be a clone, just a safeguard against data loss.

During the configuration process, and to test the validity of the back up, I restored several files along the way to see if it worked. I needed to call CP’s support several times. Each time, I was given prompt support. There were a few delays perhaps because I was not as clear as I could have been. Nevertheless, all my issues were resolved and my backups seemed to be working.

This was a learning experience. I had never backed up a large number of files to any cloud service. The closest I had come was using Dropbox to store a series of photographs for family and friends to view. I was quite surprised almost bordering on shock that the estimated time to backup my 1 TB internal hard drive to the cloud was estimated to take between 45-60 days. I understand I have some large files and I am sure CP uses some algorithm to check for errors which slows down this process, but I had no idea of the amount of time it would take to place my data in the cloud.

NOTE – I also have a DSL line which, by nature, is slower than most cable companies and this almost assuredly increased the amount of backup time needed.

I decided to let the cloud option lapse when the trial period expired because I wasn’t sure this was the most efficient service for my needs and I still had days to go. To CPs credit, they continue to allow users to backup to their local drive via their software whether or not they are cloud-paying customers and I continued to take advantage of that option. This too was slow, but not as slow as backing up to the cloud.


Within a short time period, my computer completely failed. I knew it was the hard drive. After my heart returned to its normal rhythm, I began to think of my options. I did have two older hard drives with outdated backups of my most precious files, but there were a lot of documents I would miss. One example is an extensive checklist I have created for long hiking trips which reminds me of all the little things I need to take with me on my hiking vacations such as head lamps, hotel night light, bandages, instant coffee, etc. I even have a version for a short get-away trip. Yeah, that would be annoying to lose.

My most important document is a “coded” text tile with all my logons and passwords. They can be recreated, but what a mess that would be. I have several email accounts and my blog to keep up with almost immediately. Oh well!


<--- TO BE CONTINUED --->


**********


All content on this blog is copyrighted by Jeffrey B. Ross with ALL Rights Reserved. While reference links back to JBRish.com are appreciated and encouraged, please acquire approval for any reproduction of original content from this website.

©Jeffrey B. Ross – 2017


Picture Quote — 20170726

Today’s Picture Quote — 20170726

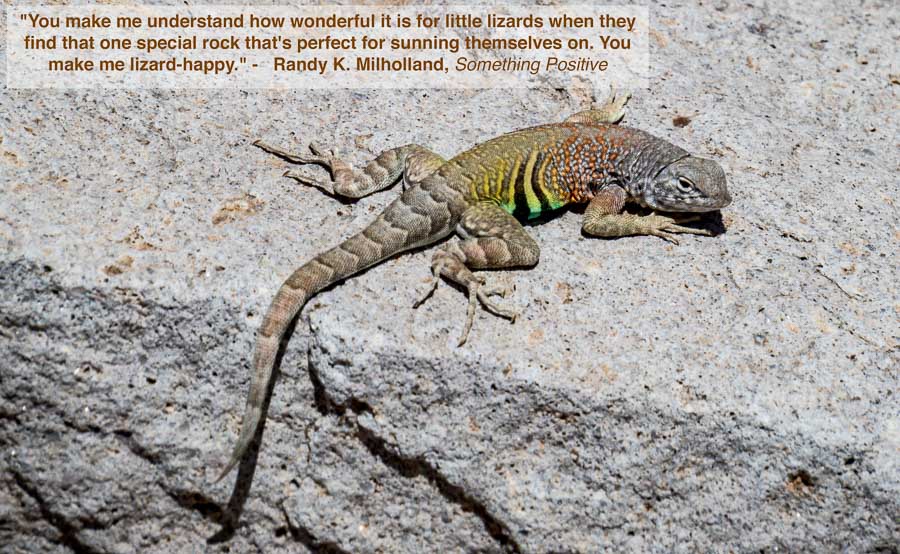
You make me understand how wonderful it is for little lizards when they find that one special rock that's perfect for sunning themselves on. You make me lizard-happy. - Randy K. Milholland
“You make me understand how wonderful it is for little lizards when they find that one special rock that’s perfect for sunning themselves on. You make me lizard-happy.” – Randy K. Milholland
Original Photograph Copyright by Jeffrey B. Ross – 2014 – 2017


***********************************
Photo Meta Data

File Name: IMG_2262.CR2
Capture time: 10:18:27 AM
Capture date: May 9, 2015
Exposure: 1/1250 @ f5.6
Focal Length: 89mm
ISO: 120
Canon Powershot SX50 HS
Location: Las Cruces, NM

*Edited: Lightroom with text added in Photoshop

 
See previous STATUS QUOtes HERE


**********


All original content on this blog is copyrighted by Jeffrey B. Ross with ALL Rights Reserved. While reference links back to JBRish.com are appreciated and encouraged, please acquire approval for any reproduction of original content from this website.

©Jeffrey B. Ross – 2017


Identification for the Birds

Here is a problem every novice or occasional birder is bound to face…

We were enjoying a beautiful hike through Zumwalt Meadow in Kings Canyon, CA observing all of the plants, scenery and wildlife we encountered.

Keep in mind that much of this trail has tree roots, rocks, boulders, fallen branches, etc. so keeping eyes ahead or up is not an option for those hiking along. We would stop when a sudden motion or noise caught our attention or we just wanted to gaze at the scenery. We are avid gazers and thus would probably be considered somewhat pokey when it comes to the more speedy hikers.

But I digress… We were climbing upward through a somewhat narrow corridor formed by boulders on either side and ahead, no more than twenty feet away, an attractive multi-colored bird landed in a tree. I was almost sure this was one that I hadn’t identified yet so of course I was very interested in photographing the bird for future identification.

NOTE – For those who want to know why I didn’t or more truthfully, couldn’t, identify the bird right there and then, read my earlier post – Photography and Birding: Good Photo, Bad Photo

The bird was mostly black, with orange-brown sides, a buff bottom and rump with white markings on black wings. The face also had some blotches of other colors as well. Immediately I thought this was an oriole of one type or another.


Black-headed grosbeak

By the time I was able to stop and take note, the bird was flitting from branch-to-branch and this (above) was the first photograph I was able to capture. Hmmmm – pretty hard to ID from that shot.

What was infuriating was that the bird would jump down closer to me, let’s say eight feet away, but would be among a mass of branches; drats!


Black-headed grosbeak

There was one instance, when the bird was just above my head and I got a good luck at its rump and underparts.


Black-headed grosbeak

Although the bird was skittish, it appeared to have a certain curiosity as it lingered in the area for a long time; in bird minutes!


Black-headed grosbeak

In the field it is hard to tell exactly how good the photographs are and whether or not there would be enough information to piece an identification together, but using all of the photos, I believe I was able to correctly ID the bird.

Let’s take a look….

Using the Internet, I was able to find a few reference photographs. This was one of the better shots


Black-headed grosbeak
Photograph By Alan Vernon – Male Black headed grosbeak (Pheucticus melanocephalus)Uploaded by Snowmanradio, CC BY 2.0, https://commons.wikimedia.org/w/index.php?curid=12140735

NOTE – Text added by JBRish


Looking at my less than stellar photos, I was able to locate most of the same markings. For those new to birding, keep in mind that males and females often have different markings and colorations. I knew this wasn’t an oriole as I originally suspected primarily because of the shape of the beak. An oriole would have a much more pointed beak.

NOTE – This is why I like to take multiple photographs and work the identification at my leisure.

What are your thoughts? Leave them in the comment section below.

To read more JBRish.com posts about birds or birding, click HERE.


**********


All original content on this blog is copyrighted by Jeffrey B. Ross with ALL Rights Reserved. While reference links back to JBRish.com are appreciated and encouraged, please acquire approval for any reproduction of original content from this website.

©Jeffrey B. Ross – 2017